Embroidery Basics
What Are Jumps, Trims and Color Changes in Embroidery?
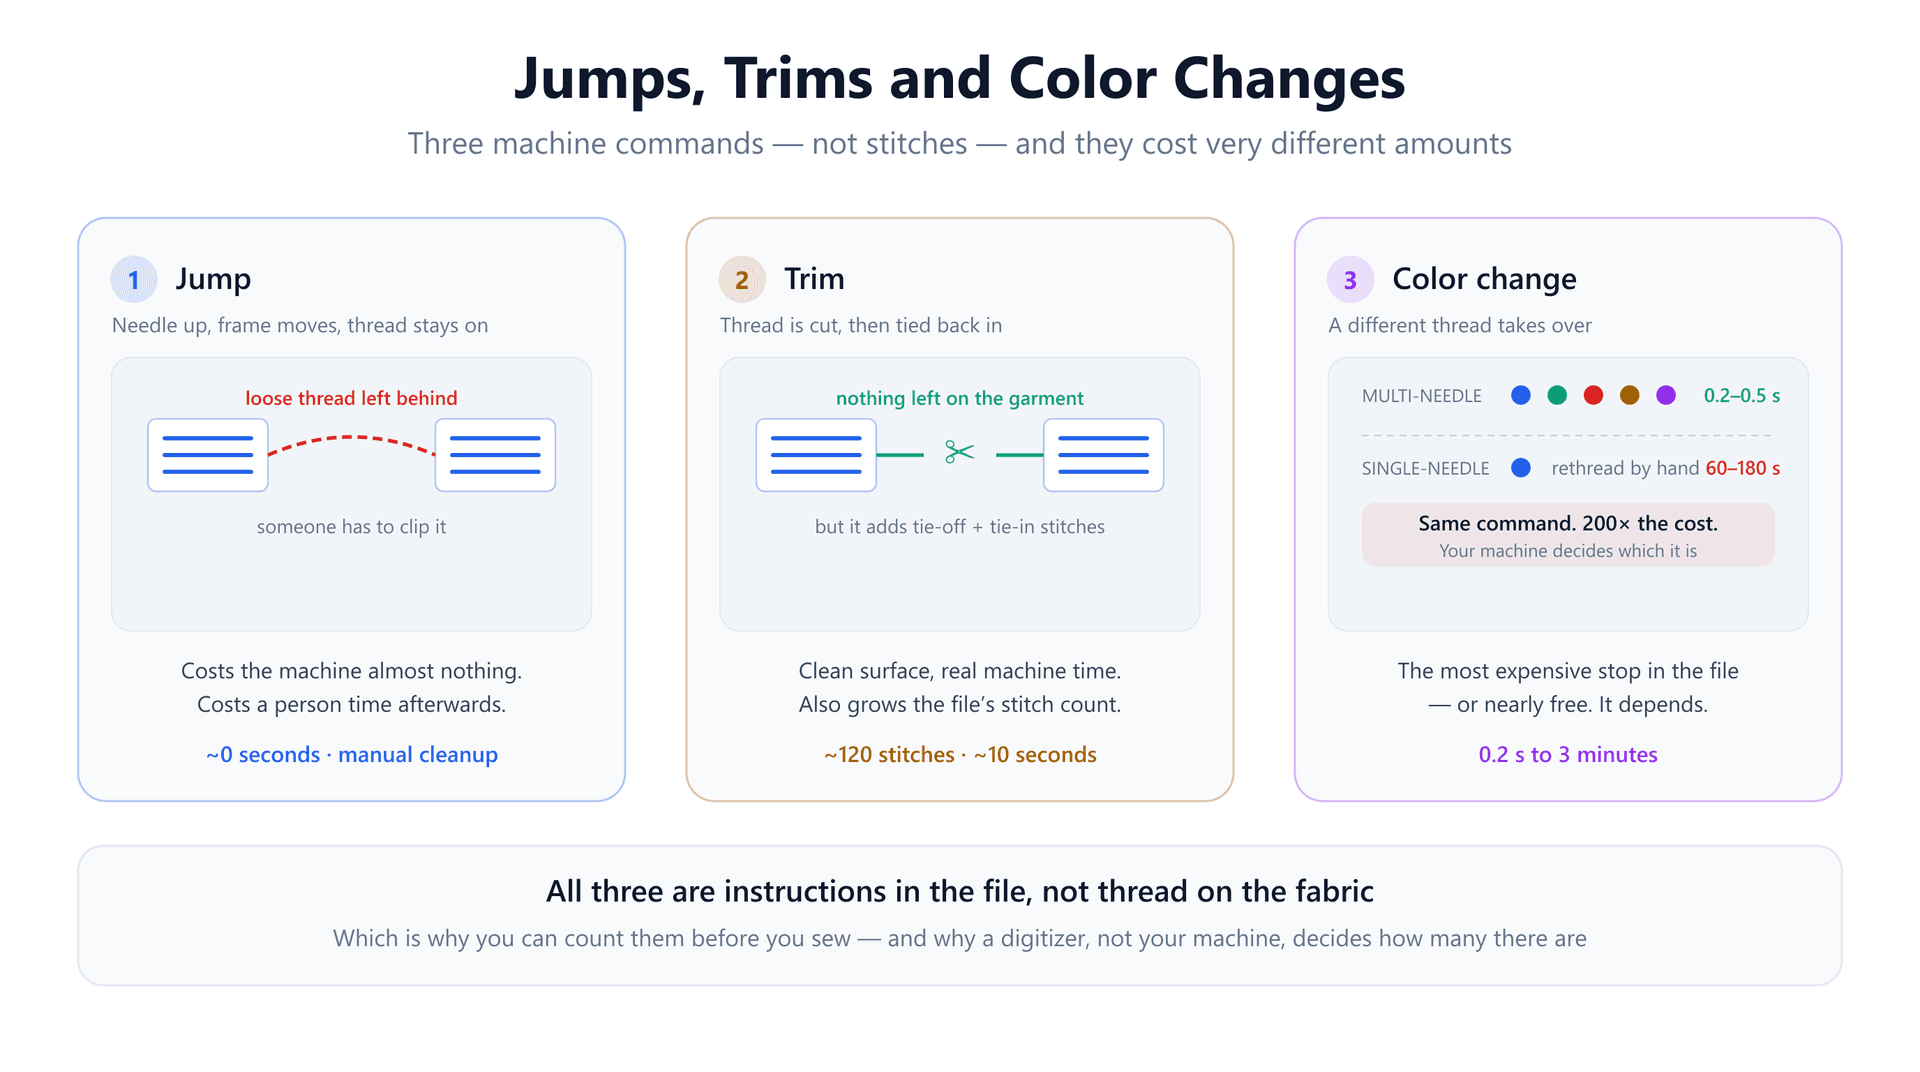
You open a design in a stitch viewer and the panel tells you: 8,400 stitches, 61 jumps, 14 trims, 4 color changes. The stitch count you understand. The other three numbers are the ones that actually decide how long the job takes, how much hand-finishing it needs, and whether the file was digitized by someone competent.
Most explanations of these terms stop at a definition and a tip about clipping loose threads. That leaves out the part that makes them make sense, which is this: jumps, trims and color changes are not stitches at all. They are commands — instructions in the file telling the machine to stop sewing and do something else.
Once you see them as commands rather than thread, everything about their behavior follows: why they cost wildly different amounts of time, why they can be counted before a needle touches fabric, and why the same file can behave differently on two machines sitting side by side.
The Three Commands
An embroidery file is a list of instructions executed strictly in order. Most entries say "move here and put the needle down". These three say something else.
A jump — needle up, thread still attached
The needle lifts, the frame moves the fabric to a new position, and stitching resumes. The thread is never cut, so it stretches across the gap and stays there: a loose strand lying on the surface of the garment.
For the machine this is nearly free — it is the same frame movement it makes constantly, just without the needle coming down. The cost is transferred to a human. Every jump long enough to leave a visible bridge is a thread someone has to clip before the piece ships, and on a design with sixty jumps that is a real chunk of finishing time per garment.
Very short jumps are harmless and often invisible, buried under later stitching. It is the long ones crossing open fabric that turn into work.
A trim — the thread is actually cut
The machine cuts the thread, moves to the new position, and ties back in before resuming. Nothing is left lying on the surface. This is the clean option, and it is the expensive one: roughly 120 stitches of equivalent machine time, or about 10 to 12 seconds once the cut, the movement and the tie-in are all counted.
At a normal commercial speed of 700 to 800 stitches per minute that math gets uncomfortable quickly. Forty avoidable trims in a left-chest logo costs close to seven minutes per garment. On a 200-piece order, that is more than twenty hours of machine time spent not sewing — all decided in an afternoon of digitizing.
A color change — a different thread takes over
The design has finished everything in one color and needs another. What that costs depends entirely on the machine, and the spread between the two cases is the widest in embroidery.
A commercial multi-needle machine already has every thread mounted on its own needle. Changing color means indexing the head to a different needle — 0.2 to 0.5 seconds, essentially free. A single-needle home machine has to stop dead and wait for a person to unthread it, re-thread it, and restart: 60 to 180 seconds of real time, most of it a human standing at a machine.
That is the same command in the same file costing anywhere from a fifth of a second to three minutes. It is why a six-color design is a non-event on a commercial head and a genuinely bad idea on a single-needle machine, where it quietly adds ten to twelve minutes per garment before you have sewn a single extra stitch.
What This Looks Like Inside the File
Here is where the "commands, not stitches" framing pays off, and where most guides stop short. Take DST, the most widely used format in the industry.
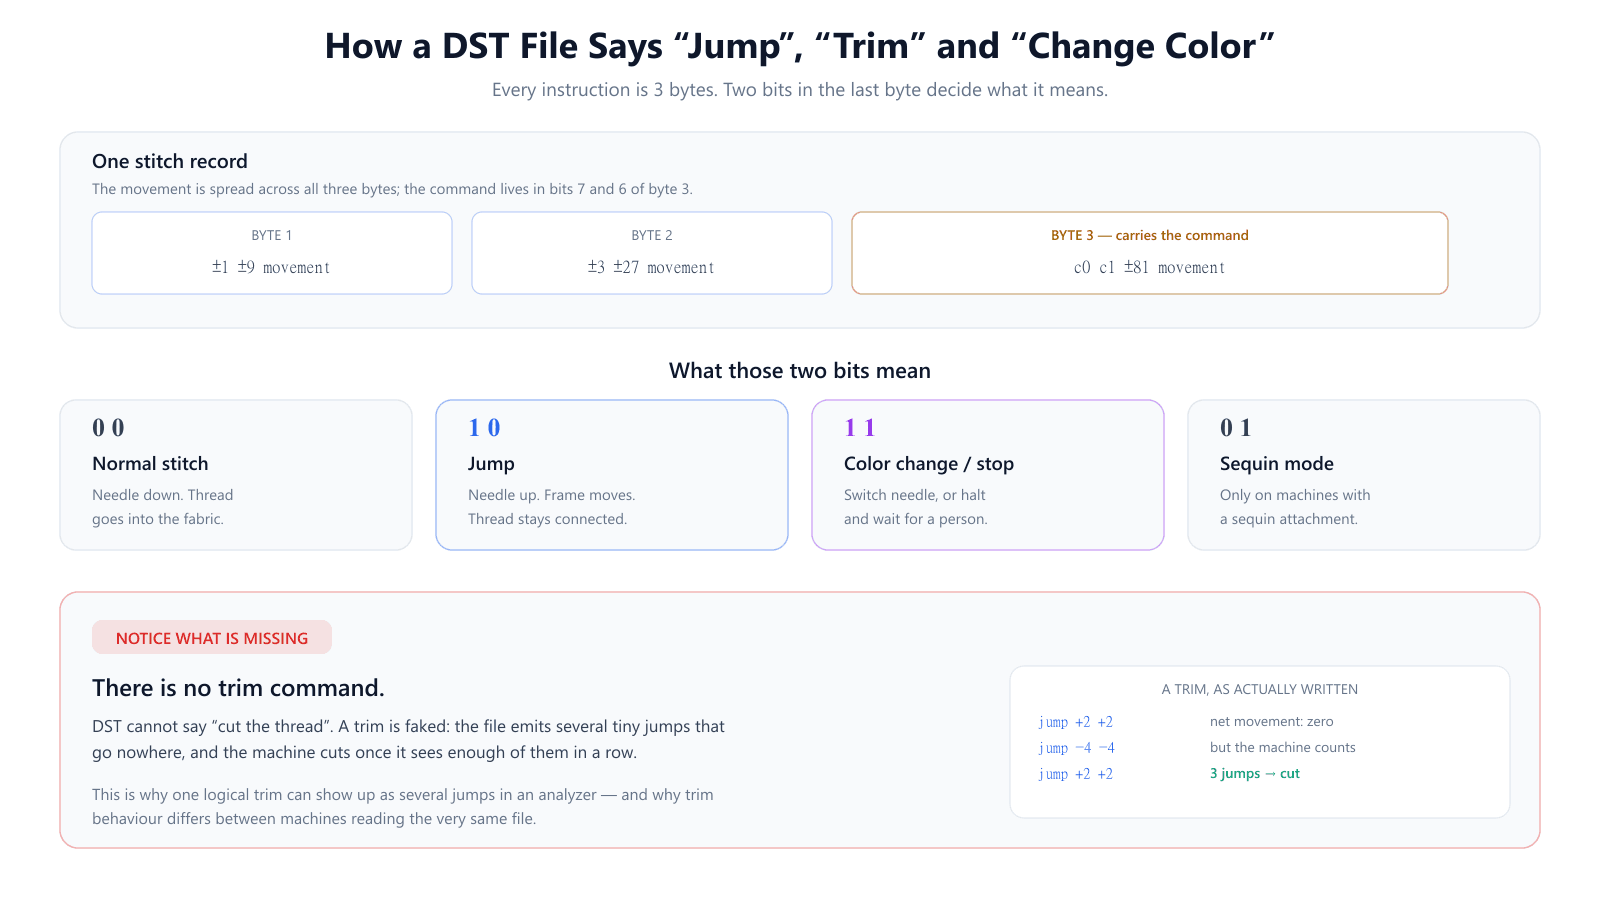
Every instruction in a DST file is exactly three bytes. The movement is encoded across all three in a system of ±1, ±3, ±9, ±27 and ±81 increments, and two bits at the top of the third byte say what kind of instruction it is: normal stitch, jump, color change or stop, or sequin mode.
Read that list again and notice what is absent. There is no trim command.DST has no way to say "cut the thread".
So a trim is faked. The file emits several tiny jumps in a row that cancel each other out — plus two, minus four, plus two — going nowhere at all. The machine watches the number of consecutive jumps and triggers its own cutter once it sees enough of them, typically three to five. The movement is meaningless; the pattern is the signal.
Two practical consequences fall straight out of this. First, one logical trim shows up as several jumps in an analyzer, which is part of why jump counts look inflated. Second, because the threshold lives in the machine rather than the file, the same DST can trim differently on two different machines. A file that behaves perfectly on your machine can leave a colleague's covered in loose threads.
The other reason jump counts run high is the format's movement limit: a single record can only travel about 121 units, so a long 40 mm move gets split into several consecutive jump records. One logical jump, four entries in the file. If you want the fuller picture of the format, our guide to what a DST file is covers what else it does and does not store.
The Cost Everyone Forgets
There is a second price on a trim that almost never gets mentioned, and it undermines a common optimization.
When the thread is cut, the stitching that just ended has to be secured or it will unravel — that is a tie-off, a few tiny stitches locking the end down. When stitching restarts after the trim, the new thread has to be anchored the same way: a tie-in. Those lock stitches are real stitches, recorded in the file, counted in the total.
So trims do not merely cost time — they grow the stitch count. Which means the two things people optimize for can pull against each other. Convert a batch of jumps into trims and the garment comes off the machine cleaner, needing no clipping, while both the run time and the stitch count go up. If you are quoting by stitch count, you are now charging more for a design that also takes longer to sew.
This is worth knowing before you reach for a machine setting that converts jumps to trims wholesale. It is a real trade, not a free improvement.
Reading These Numbers in a Real File
Because all three are commands rather than thread, they can be counted before you sew anything. That makes them the cheapest quality check available on a design you have been sent.
- Trim count — for a standard left-chest logo, more than about 15 deserves a look, and past 30 the file was almost certainly pathed by shape order rather than by route. Each one is roughly 120 stitches of machine time.
- Jump count — expect it to be higher than the number of visible gaps, because of split long moves and the fake jumps that produce trims. What matters is the trend: dozens of long jumps means the needle is crossing the design repeatedly.
- Color changes — count them against your machine. On a multi-needle head this number barely matters. On a single-needle machine, multiply it by 60 to 180 seconds and decide whether the design is worth it.
- Total jump distance — compare it to the design's own width. If the needle travels several times the width of the logo, the route is wandering rather than progressing.
You can pull all of these out of a design in the browser. Our free DST analyzer reports stitch count, jump count, trim count and color changes, so two versions of the same design can be compared with numbers rather than impressions. The DST viewer draws the actual stitch path, which makes the diagnosis visual — well-routed designs look like someone filling in a drawing methodically, while bad ones look like the needle is being flung between opposite corners.
Reducing Them Without Making Things Worse
The instinct is to look for a setting. The setting exists — most machines expose a jump-trim threshold, usually adjustable from 5 mm to 50 mm in 5 mm steps — but it only changes how existing gaps are handled. Raise it and you get fewer stops and more loose threads to clip; lower it and you get a cleaner surface and more machine time. It is a real lever for short runs, and it removes nothing.
The reductions that matter come from sequencing, because the cheapest gap is the one that never exists:
- Finish every element of one color before moving to the next thread, so each color is used once rather than revisited.
- Within a color, move to the nearest unstitched shape — not the next one you happened to draw. Digitizing software will happily stitch objects in creation order, which has no relationship to where they sit on the garment.
- Hide travel underneath work that gets stitched later, so the machine crosses the gap with ordinary running stitches that nobody will ever see. This costs nothing at all — no stop, no cut, no loose thread.
- Accept an extra color change when correct layering genuinely requires it. On a multi-needle machine it costs a fraction of a second; a visible quality defect costs the garment.
That last point is the general principle. These three commands are decided by whoever sequenced the design, not by your machine — the machine only executes the list it is given. Our guide to embroidery pathing covers the sequencing rules in full, including the order they override each other in.
It also matters where designs come from. Command counts are invisible in a preview image and only show up on the machine floor, which is exactly why they are a common corner to cut. If you are generating files from artwork, our image-to-embroidery converter routes between elements by proximity rather than drawing order, and the text-to-embroidery generator connects letters with hidden travel wherever the gap is short enough to bridge.
Quick Reference
- A jump moves without cutting — free for the machine, leaves a loose thread for a person to clip.
- A trim cuts and ties back in — clean surface, about 120 stitches and 10 seconds of machine time.
- A color change costs 0.2–0.5 s on a multi-needle machine and 60–180 s on a single-needle one.
- Trims add tie-off and tie-in lock stitches, so they raise the stitch count as well as the run time.
- DST has no trim command — trims are faked with 3–5 cancelling jumps, so machines can differ.
- DST caps one movement at ~121 units, so long moves split into several jump records.
- Expect the jump count to exceed the number of visible gaps; that alone is not a fault.
- Over ~15 trims on a left-chest logo is worth investigating; over 30 suggests bad sequencing.
- The jump-trim threshold trades machine time against clipping time — it removes no gaps.
- Real reductions come from sequencing: one color at a time, nearest shape next, travel hidden under later stitching.
Conclusion
Jumps, trims and color changes are the three ways an embroidery machine stops stitching, and treating them as commands rather than thread explains everything else about them. A jump defers the cost to a person with snips. A trim pays it in machine time and stitch count. A color change costs almost nothing or several minutes, depending entirely on the hardware in front of you.
None of them are decided by your machine. They are written into the file by whoever sequenced it, which is why they are worth counting before a production run rather than discovering afterwards. Drop a design into the DST analyzer and look at the trim count next to the stitch count. On a file you did not digitize yourself, that pair of numbers usually tells you more than the preview image does.
Frequently Asked Questions
What is a jump stitch in machine embroidery?
A jump is an instruction telling the machine to lift the needle, move the frame, and start stitching somewhere else without cutting the thread. Because the thread stays connected at both ends, it leaves a loose strand lying across the gap on the surface of the garment. The machine loses almost no time on a jump, which is why cheap digitizing produces so many of them — the cost is paid later by whoever sits down with a pair of snips.
What is the difference between a jump and a trim?
Both move the needle from one place to another without stitching. On a jump the thread stays attached, so a loose bridge is left behind for someone to clip. On a trim the machine actually cuts the thread, moves, and ties back in, so nothing is left on the surface — but it costs roughly 120 stitches of machine time, about ten seconds at normal commercial speed. Jump is cheap for the machine and expensive for the finisher; trim is the reverse.
How much time does a trim add to an embroidery design?
About 120 stitches of equivalent machine time once the cut, the frame movement and the tie-in are counted, which works out to roughly 10 to 12 seconds at a typical 700 to 800 stitches per minute. That sounds trivial until it multiplies: 40 avoidable trims in a left-chest logo is close to seven minutes per garment, and across a 200-piece order that is over twenty hours of machine time spent cutting thread rather than sewing.
How long does a color change take?
It depends entirely on the machine, and the spread is enormous. A commercial multi-needle machine already has every thread mounted on its own needle, so a color change is just an indexing move — 0.2 to 0.5 seconds. A single-needle home machine has to stop and wait for a person to physically rethread it, which realistically takes 60 to 180 seconds. That is the same instruction in the file costing anywhere from a fraction of a second to three minutes.
Does a DST file have a trim command?
No, and this surprises people. The DST format encodes only four command types — normal stitch, jump, color change or stop, and sequin mode. There is no instruction that means 'cut the thread'. A trim is produced by emitting several tiny jumps in a row that cancel each other out and go nowhere; the machine sees enough consecutive jumps and triggers its own cutter. This is why a single logical trim can appear as three to five jumps in a stitch analyzer.
Why does my analyzer show more jumps than gaps in the design?
Two reasons stack up. First, DST caps any single movement at about 121 units, so one long 40 mm move has to be split across several consecutive jump records — one logical jump, several entries in the file. Second, trims themselves are written as runs of small fake jumps. Between them, a design with a dozen visible gaps can legitimately report several dozen jumps, without anything being wrong.
Do trims increase the stitch count of a design?
Yes, and this catches people out when they try to optimize for a lower stitch count. Every trim has to be followed by tie-in stitches when the thread restarts, and preceded by tie-off stitches so the previous section does not unravel. Those lock stitches are real stitches recorded in the file. So converting jumps into trims makes the garment cleaner while making both the run time and the stitch count go up.
How do I reduce jump stitches in a design?
The real reductions come from sequencing rather than settings. Stitch all the elements of one color before moving to the next, move to the nearest unstitched shape rather than the next one you happened to draw, and hide travel underneath fills that get stitched later so the gap never needs crossing at all. Adjusting the machine's jump-trim threshold only changes how existing gaps are handled — it does not remove them.