Embroidery Basics
What Is Embroidery Pathing? How Stitch Order Works
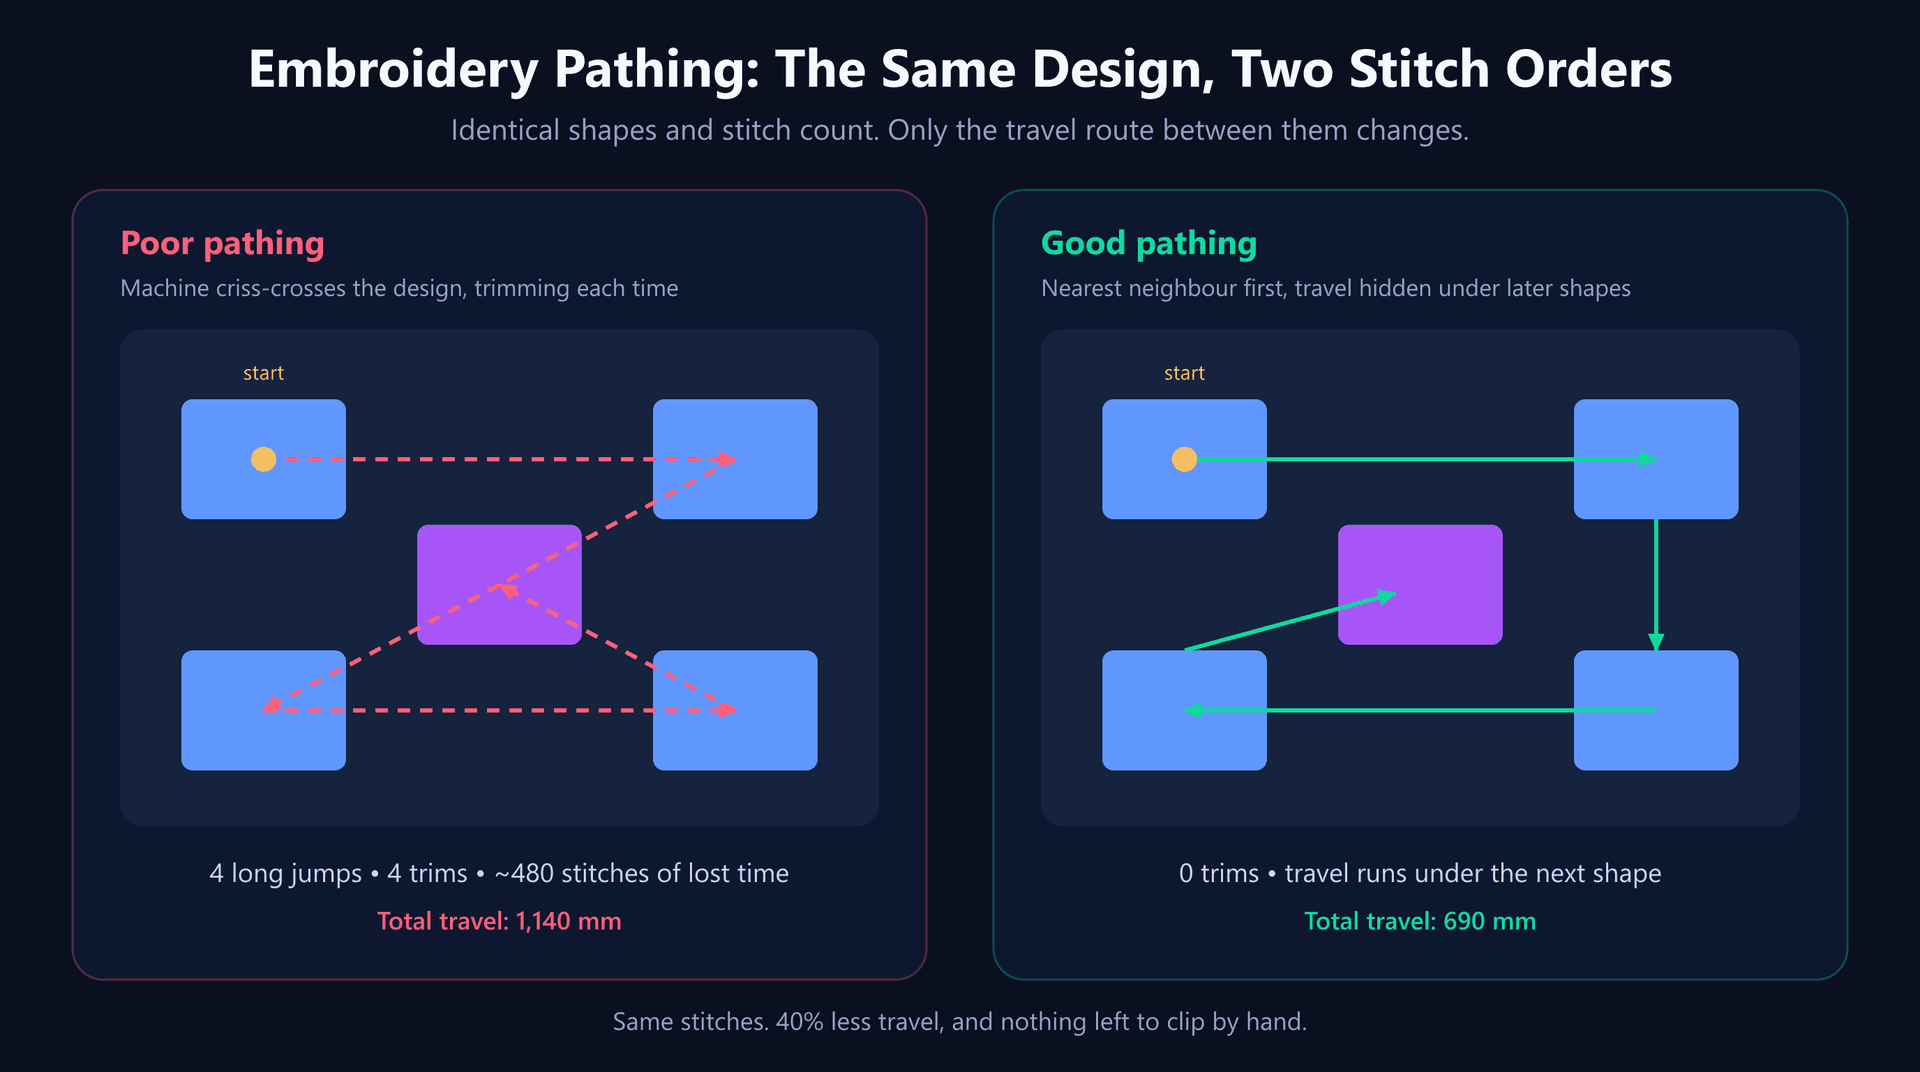
Two digitizers hand you the same logo. Both files have 8,400 stitches, the same four colors, the same dimensions. One runs in six minutes and comes off the machine ready to fold. The other takes eleven minutes and arrives covered in loose threads that somebody has to sit down and clip. Nothing about the stitches changed. What changed was the order they were stitched in.
That order is called pathing, and it is the part of digitizing that customers never see and shops pay for daily. It decides how long a design runs, how much hand-finishing it needs, and — less obviously but more expensively — whether the outlines end up sitting on the shapes they were drawn around.
This guide covers what the machine is physically doing between two shapes, the four rules that determine sequence and the order they override each other in, and how to look at a file you have been sent and tell whether it was pathed by someone who was paying attention.
What Pathing Actually Is
An embroidery file is not a picture. It is a list of instructions executed strictly in order: move here, stitch, stitch, stitch, lift the needle, move there, cut the thread, tie in, keep stitching. The machine has no view of the finished design and makes no decisions of its own. It performs the list.
Pathing is the authoring of that list — which element gets stitched first, which second, and by what route the needle gets from the end of one to the start of the next. Every shape in a design has an entry point and an exit point, and pathing is the work of choosing them so the whole sequence flows instead of ricocheting.
The reason it matters is that the gaps between shapes are not free. Each one has to be crossed somehow, and there are only three ways to cross it — each with a different price.
The Three Ways a Machine Crosses a Gap
This is the mechanism underneath every pathing rule. Once these three options are clear, the rest of the subject stops being a list of tips and becomes arithmetic.
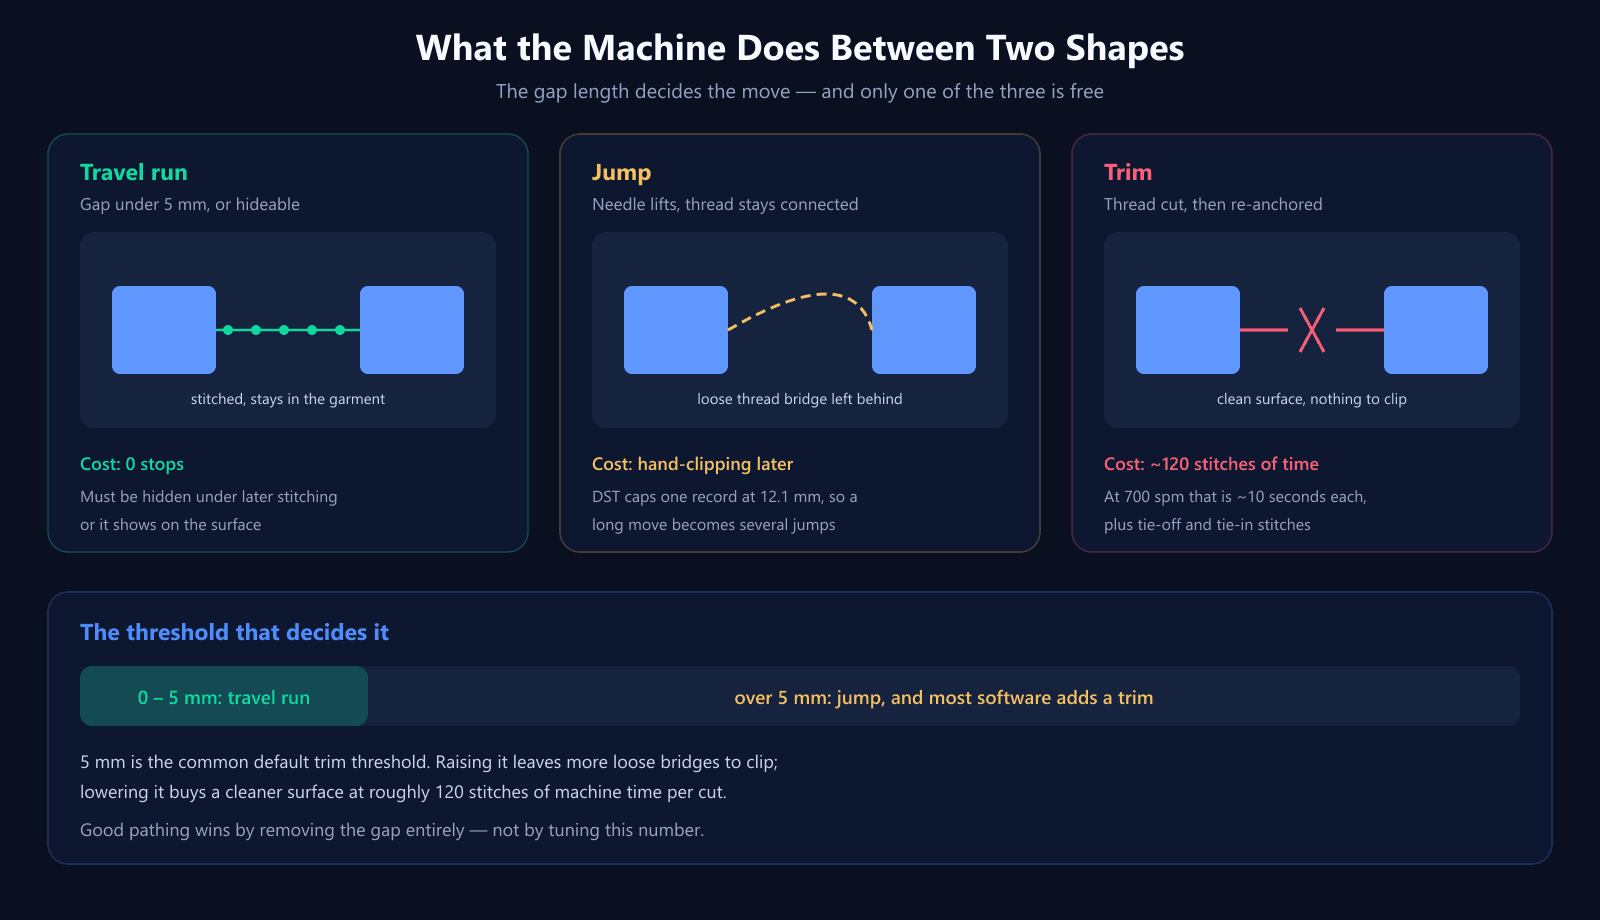
1. A travel run — free, if you can hide it
The machine simply keeps stitching from where it is to where it needs to be, using a line of ordinary running stitches. No stop, no cut, no loose thread. This is the cheapest possible move and good pathing uses it constantly.
The catch is in the word hide. Those stitches stay in the garment permanently, so they have to run somewhere they will not be seen: underneath a fill that gets stitched later, along a line that a satin border will eventually cover, or inside the boundary of a shape rather than across open fabric. A travel run across a bare area is not clever pathing — it is a visible thread line through the middle of the design.
2. A jump — cheap now, paid for later
The needle lifts, the frame moves, and the thread stretches across the gap still connected at both ends. The machine loses almost no time. What it leaves behind is a loose bridge lying on the surface of the garment, and somebody with a pair of snips has to remove it before the piece ships.
Worth knowing if you work with DST files: the format encodes each stitch as a relative move with a hard limit of about 12.1 mm per record. Any longer move gets split into several consecutive jump records. That is why a stitch analyzer will sometimes report a jump count far higher than the number of visible gaps — one 40 mm move is a single logical jump but four records in the file.
3. A trim — clean, and the expensive one
The machine cuts the thread, moves to the new position, and ties back in before resuming. Nothing is left on the surface. The cost is time, and it is larger than most people assume: roughly 120 stitches of equivalent machine time once the cut, the frame movement and the tie-in are counted.
At a normal commercial speed of 700 spm, that works out to about ten seconds per trim. It sounds trivial until you multiply. A left-chest logo carrying 40 avoidable trims loses close to seven minutes per garment. Across a 200-piece order that is more than twenty hours of machine time spent cutting thread — on one design, because of decisions made in an afternoon of digitizing.
Most software decides between these automatically using a trim threshold, typically defaulting to 5 mm: gaps shorter than that get bridged, longer ones get cut. Machines expose their own jump-trim setting, usually adjustable from 5 mm to 50 mm in 5 mm increments. Both are worth knowing, but neither is where the real gains are. Good pathing wins by arranging the design so the long gap never exists — not by adjusting what happens when it does.
The Four Rules of Stitch Order
Sequencing decisions are made in a strict priority. This is the part most guides get wrong: they present efficiency first, when efficiency is actually the last rule, applied only within the freedom the first three leave you.
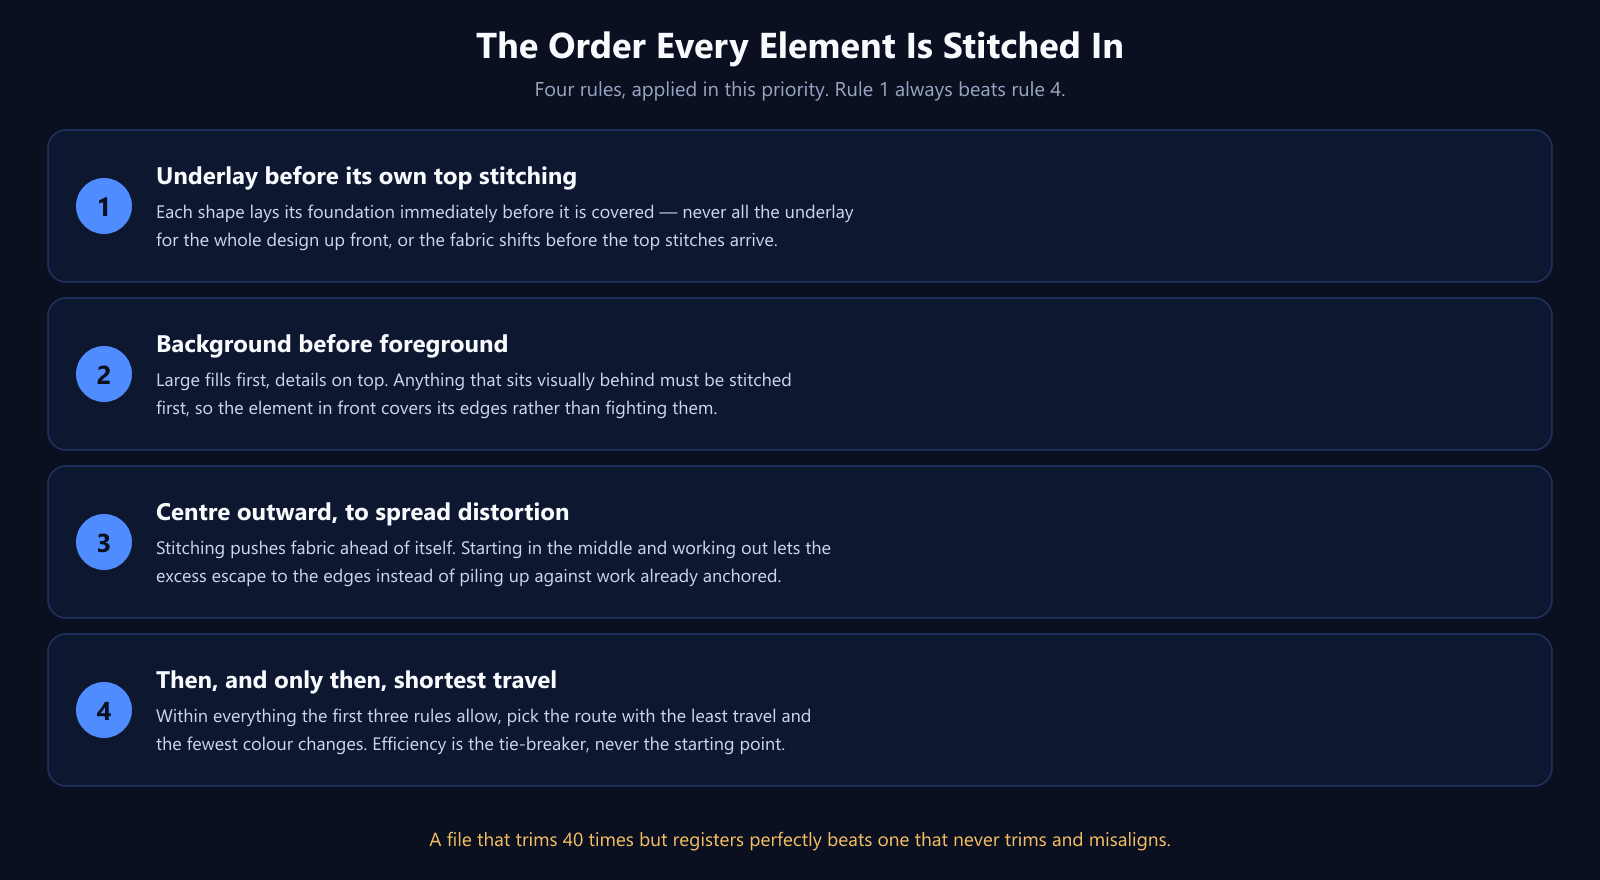
Rule 1: Underlay goes with its own shape
Underlay is the light layer of stitching that tacks fabric to stabilizer and gives the top stitches a base to sit on. Its whole function depends on timing: it belongs immediately before the top stitching of the shape it supports, not batched at the start of the design.
Lay all your underlay up front and the fabric has the entire remaining stitch-out to creep before the top stitches arrive. By then the foundation is no longer under what it was built for. There is an ordering rule within underlay too — a zigzag underlay goes down before an edge run, because doing it the other way lets the zigzag drag the carefully placed edge run inward and destroy the boundary it was there to define. If underlay is new to you, our guide to underlay in embroidery covers the types and when each applies.
Rule 2: Background before foreground
Think of the design as layers of paint. Anything that sits visually behind something else gets stitched first, so the element in front covers its edge cleanly. Large fills go down before the details that sit on them; a border that frames a shape is stitched after the shape it frames.
Get this backwards and you get the tell-tale symptom of a badly sequenced file: a fill stitched after its outline pushes that outline outward, leaving it sitting beside the shape instead of on it. No amount of pull compensation fixes an ordering error, because the problem is not the width of anything — it is that the fabric moved after the reference element was already anchored.
Rule 3: Center outward
Every stitch displaces a small amount of fabric, and that displacement has to go somewhere. If you begin at one edge and work across, each new section pushes fabric against sections already locked down, and the error accumulates in one direction until the far side of the design no longer lines up with where it was drawn.
Sequencing from the middle outward gives the displacement a free edge to escape toward in every direction. On a design with a symmetrical layout — lettering across a chest, a circular patch — this single decision does more for registration than any compensation setting.
Rule 4: Then, shortest travel
Only now does efficiency enter. Within the orderings the first three rules permit, choose the route with the least total travel and the fewest color changes. In practice this means finishing every element of one color before moving to the next thread — unless registration demands otherwise — and, within a color, hopping to the nearest unstitched element rather than working through shapes in the order they happened to be drawn.
That last habit is the most common source of bad pathing in amateur files. Digitizing software will happily stitch your objects in creation order, which has no relationship to their positions on the garment. The result is a needle bouncing between opposite corners, trimming at each end.
And when rules conflict, the priority holds: a file that trims 40 times but registers perfectly beats one that never trims and misaligns. Trims cost minutes. Misregistration costs the garment.
Color Changes Are Pathing Decisions Too
A color change is the most expensive stop in the file — the machine trims, changes needle, and ties in, and on a single-needle machine a human has to physically rethread. Sequencing colors so each is used once is standard practice.
But the rule has a real exception that gets ignored. If an element genuinely sits behind another in the layering, and they are different colors, sometimes correct ordering requires returning to a color you have already used. Digitizers who refuse to ever revisit a color end up violating rule 2 to protect rule 4 — trading a visible quality defect for ten seconds of machine time. When the design truly demands it, take the extra color change.
How to Spot Bad Pathing in a File
You do not need to open the design in digitizing software to judge its pathing. Three numbers tell most of the story, and any decent analyzer reports them.
- Trim count — for a standard left-chest logo, anything past about 15 deserves a look. Past 30 and the file was almost certainly pathed by shape order rather than by route.
- Long jump count — jumps long enough to require a trim. A handful is normal. Dozens means the sequence is crossing the design repeatedly.
- Total jump distance — the sum of all travel that was not stitched. Compare it to the design's width; if the needle is traveling several times the width of the logo, the route is wandering.
The fastest check of all is visual. Load the file into a stitch viewer and watch the sequence play back. Well-pathed designs look like someone filling in a drawing methodically. Badly pathed ones look like the needle is being flung between corners. Our free DST viewer renders the actual stitch path in your browser, and the DST analyzer reports trim count, jump count and total jump distance so you can compare two versions of a design with numbers instead of impressions.
What You Can Fix Without Re-Digitizing
If a file you already own paths badly, your options depend on what is wrong. Some things are cheap to change; the important ones are not.
Raising or lowering the machine's jump-trim threshold is a one-setting change, and it trades cleanly: a higher threshold means fewer stops and more loose bridges to clip, a lower one means a cleaner surface and more machine time. That is a real lever for short runs where hand-finishing time matters more than cycle time.
What you cannot fix from the machine panel is the sequence itself. Layering order, center-out progression and underlay placement are structural — they are the order of the instruction list, and changing them means editing the design. If a file misregisters because its outlines run before its fills, the only real fix is at the source.
This is worth weighing when choosing where designs come from. Pathing quality is invisible in a preview image and shows up on the machine floor, which is exactly why it is the corner most often cut by cheap digitizing. If you are generating designs from artwork, our image-to-embroidery converter sequences elements by layer and routes between them by proximity rather than by drawing order, so the file you download is not carrying avoidable trims. For lettering, the text-to-embroidery generator paths letter to letter in reading order and connects them with hidden travel runs wherever the gap is short enough to bridge.
Pathing Checklist
- Underlay sits immediately before the top stitching of its own shape, never batched at the start.
- Within underlay, zigzag goes down before edge run — not the reverse.
- Everything visually behind is stitched before what sits in front of it.
- Sequence runs center outward so distortion escapes toward free edges.
- Within a color, move to the nearest unstitched element — not the next one you drew.
- Travel runs only where later stitching will cover them; never across bare fabric.
- Gaps under about 5 mm get bridged; longer ones get cut — but restructure to avoid the gap first.
- Accept an extra color change when correct layering requires it.
- Check trim count, long jump count and total jump distance before running a production batch.
- Watch the stitch-out play back once; corner-to-corner bouncing is the giveaway.
Conclusion
Pathing comes down to one sentence: the machine executes your instruction list in order, and every gap between two shapes costs either time, a loose thread, or a compromise in registration. Everything above is a way of making those gaps shorter, fewer, or hidden.
Sequence for the picture first — underlay with its shape, background before foreground, center outward — and only then optimize the route. Files built that way run faster, come off the machine needing less work, and land their outlines where they were drawn. If you want to see what your current designs are actually doing, drop one into the DST analyzer and look at the trim count. It is usually the first surprise.
Frequently Asked Questions
What is pathing in embroidery digitizing?
Pathing is the order in which a design's elements are stitched and the route the needle travels between them. Two files can contain exactly the same shapes, colors and stitch count but be pathed differently — and the difference shows up as run time, trim count, loose threads to clip, and whether outlines land where they should. The stitches are the what; pathing is the when and the how it gets there.
What is the difference between a jump stitch and a trim?
On a jump, the needle lifts and the frame moves while the thread stays connected, leaving a loose bridge across the gap that someone has to clip afterward. On a trim, the machine cuts the thread, moves, then ties back in — no bridge, but it costs roughly 120 stitches worth of machine time. A travel run is the third option: an actual line of stitching hidden under later work, which costs nothing at all.
How much time does each trim cost on an embroidery machine?
About 120 stitches of equivalent machine time once you count the cut, the frame move, and the tie-in. At a typical commercial speed of 700 spm that is roughly 10 seconds per trim. Forty avoidable trims in a left-chest logo is close to seven minutes per garment — on a run of 200 shirts, over 20 hours of machine time spent on nothing but cutting thread.
How long can a travel stitch be before it needs a trim?
Most digitizing software defaults to a 5 mm trim threshold: gaps shorter than that are bridged with a travel run or a short jump, and anything longer triggers a cut. Machines themselves usually allow a jump-trim setting between 5 mm and 50 mm in 5 mm steps. The threshold matters less than whether the travel can be hidden — a 20 mm run underneath a fill that gets stitched later is fine, while a 6 mm run across bare fabric is not.
Why does stitch order affect registration and alignment?
Stitching pushes and pulls fabric as it goes. If you anchor one side of a design first and then stitch toward it, the fabric compresses against work that can no longer move, and elements land off-position — outlines sit beside their fills instead of on them. Sequencing from the center outward lets that displacement escape toward the edges, which is why registration rules outrank efficiency rules when the two conflict.
Should underlay for the whole design be stitched first?
No. Underlay belongs immediately before the top stitching of its own shape, not batched at the start of the design. Underlay works by tacking fabric to stabilizer and holding it there for the stitches that follow within seconds. If you lay all the underlay up front, the fabric has the whole rest of the design's stitching to shift before the top stitches arrive, and the foundation is no longer under what it was meant to support.
How can I tell if a design file has bad pathing?
Look at three numbers: trim count, long jump count, and total jump distance. A left-chest logo with more than about 15 trims, or with long jumps repeatedly crossing the full width of the design, was almost certainly pathed by shape order rather than by route. Loading the file in a stitch viewer and watching the sequence play back makes it obvious — bad pathing looks like the needle bouncing between opposite corners.
Does automatic pathing in digitizing software work well?
Auto-pathing handles the easy half well: it is good at finding short routes and grouping same-color elements. What it cannot reliably judge is which shapes sit visually behind others and where distortion needs somewhere to escape to, because those are decisions about the picture rather than the geometry. Use it for a first pass, then check the sequence against the layering and center-out rules by eye.