Embroidery Basics
What Is Underlay in Embroidery? The Invisible Stitches That Decide Everything
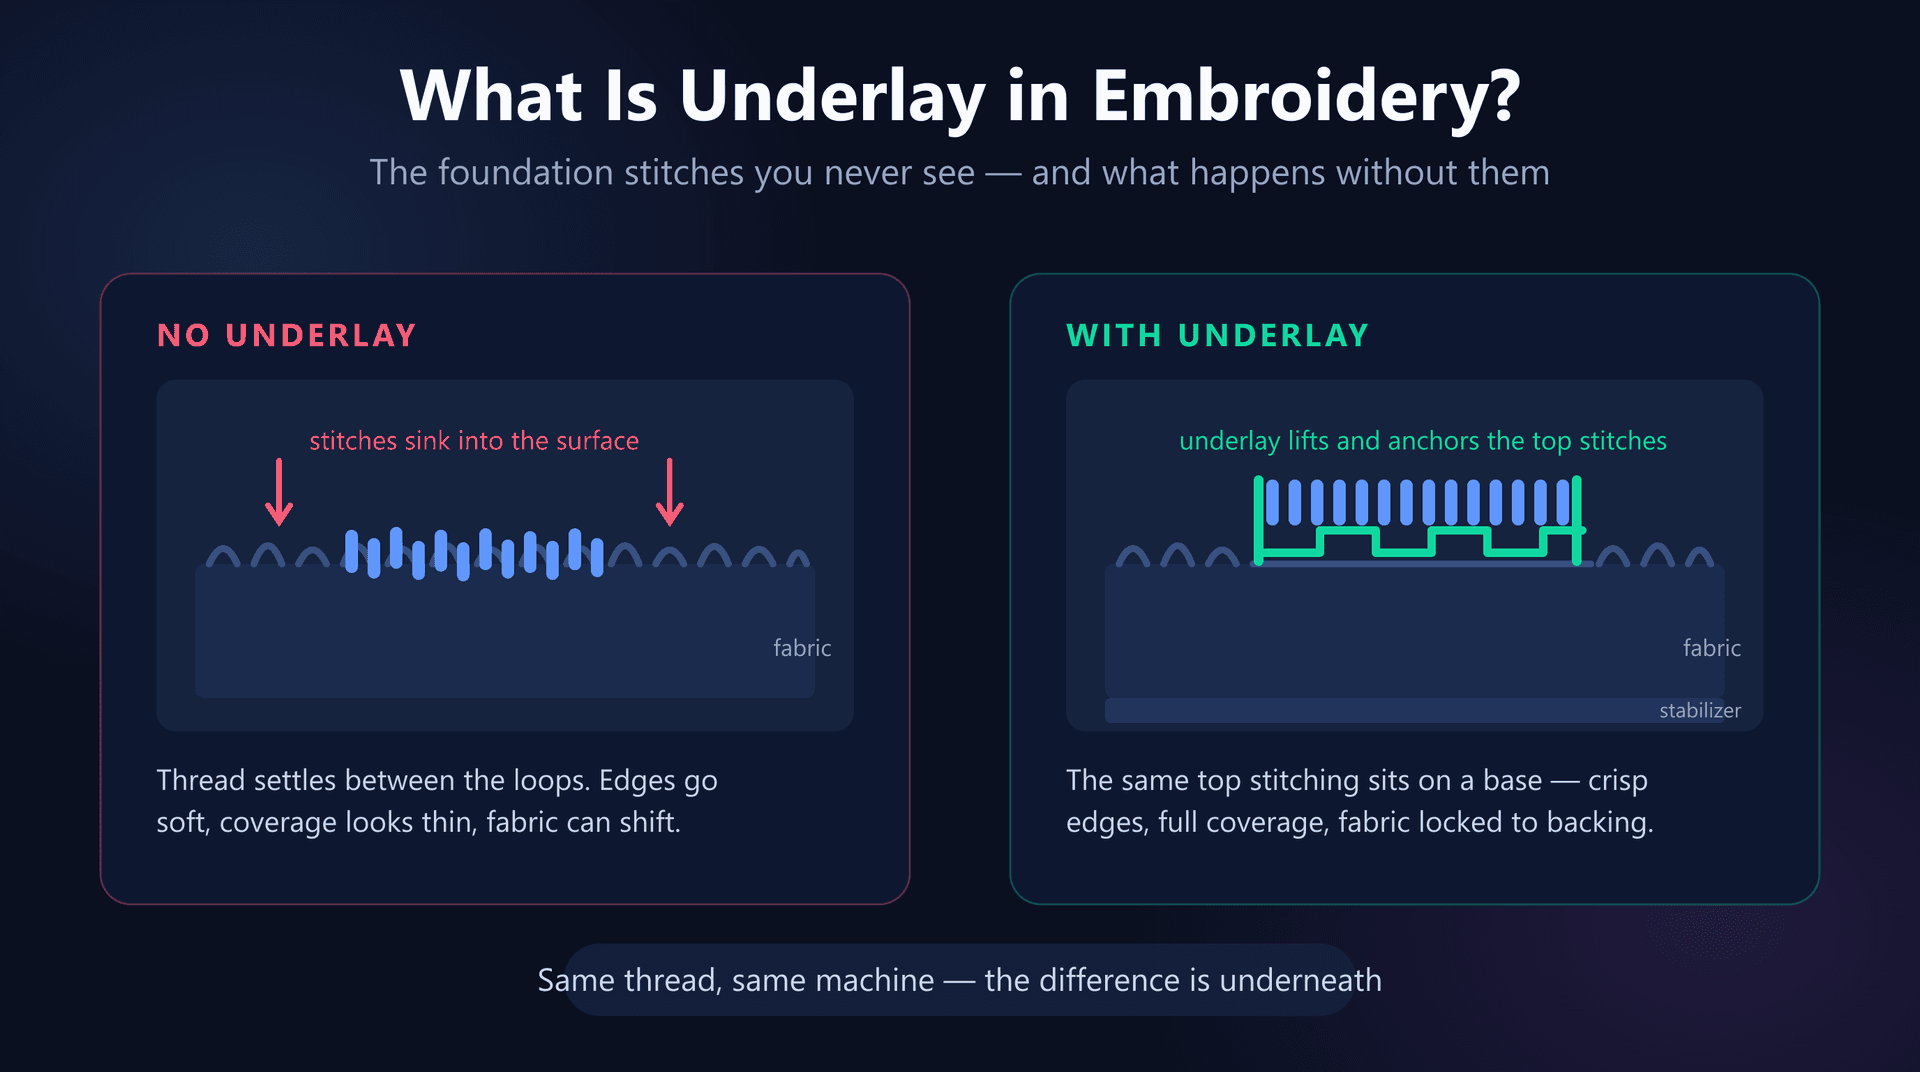
Two embroiderers stitch the same logo on the same machine, with the same thread, on the same polo shirt. One comes out sharp and slightly raised, with edges you could cut yourself on. The other looks flat, a little fuzzy, and the letters have sunk into the fabric. The difference is usually a layer of stitching neither customer will ever see.
That layer is called underlay, and it is the clearest dividing line between amateur and professional digitizing. It is also the part beginners skip most often, because it is invisible in the finished piece and it adds stitches to the file — so it looks like waste right up until the moment you stitch a design without it.
This guide covers what underlay actually does, the four types and when each one applies, the density and inset numbers to start from, how to match underlay to fabric, and how to tell whether a file you have been handed contains any at all.
What Underlay Actually Is
Underlay is a layer of light, widely spaced stitching sewn inside a shape before the visible top stitching goes down. When the design finishes, the top stitching has covered it completely. You will never see it on the garment — you only see its absence.
It helps to think of it the way a painter thinks about primer. You do not prime a wall because you want to look at primer. You prime it because paint applied straight onto bare drywall soaks in, covers unevenly, and needs three coats to look like one. Underlay is the same bargain: a cheap preparatory layer that makes the expensive visible layer behave.
The Three Jobs Underlay Does
Underlay is not one technique with one purpose. It solves three distinct problems at once, which is why designs missing it fail in three different-looking ways.
1. It anchors the fabric to the stabilizer
Your stabilizer is only doing its job if the fabric is actually attached to it. Hooping holds the two together at the edges, but in the middle of the hoop — exactly where your design is — the fabric can still creep, shift and stretch as the needle works.
Underlay stitches through both layers across the whole footprint of the design, effectively laminating the fabric to its backing before any visible stitching starts. On a knit, this is the difference between loops that stay put and loops that travel toward the center of every column. It is why underlay appears in nearly every discussion of puckering on knit fabric.
2. It lifts the design off the fabric surface
Fabric is not a flat plane. Terry cloth is a field of loops, fleece is a pile, piqué and waffle knits have structured texture, and even a plain t-shirt has a visible knit grain. Lay satin stitches directly onto any of those and the thread settles down into the low spots. The design reads as fuzzy and sunken because it literally is.
Underlay flattens that texture and builds a small platform of thread for the top stitching to sit on. This is what produces the slightly raised, dimensional look of good commercial embroidery — the top stitches are sitting on a base rather than in a hole.
3. It gives the top stitching a rail to anchor to
A satin column's edges are only as clean as the boundary its stitches turn around. With nothing underneath, each needle penetration lands in soft fabric that gives slightly, and the accumulated variation shows up as a wavering, soft-edged column.
An underlay line running just inside the column edge gives every one of those stitches a firm, consistent thing to bite into. The result is the crisp border you see on professional lettering and logo work.
The Four Types of Underlay
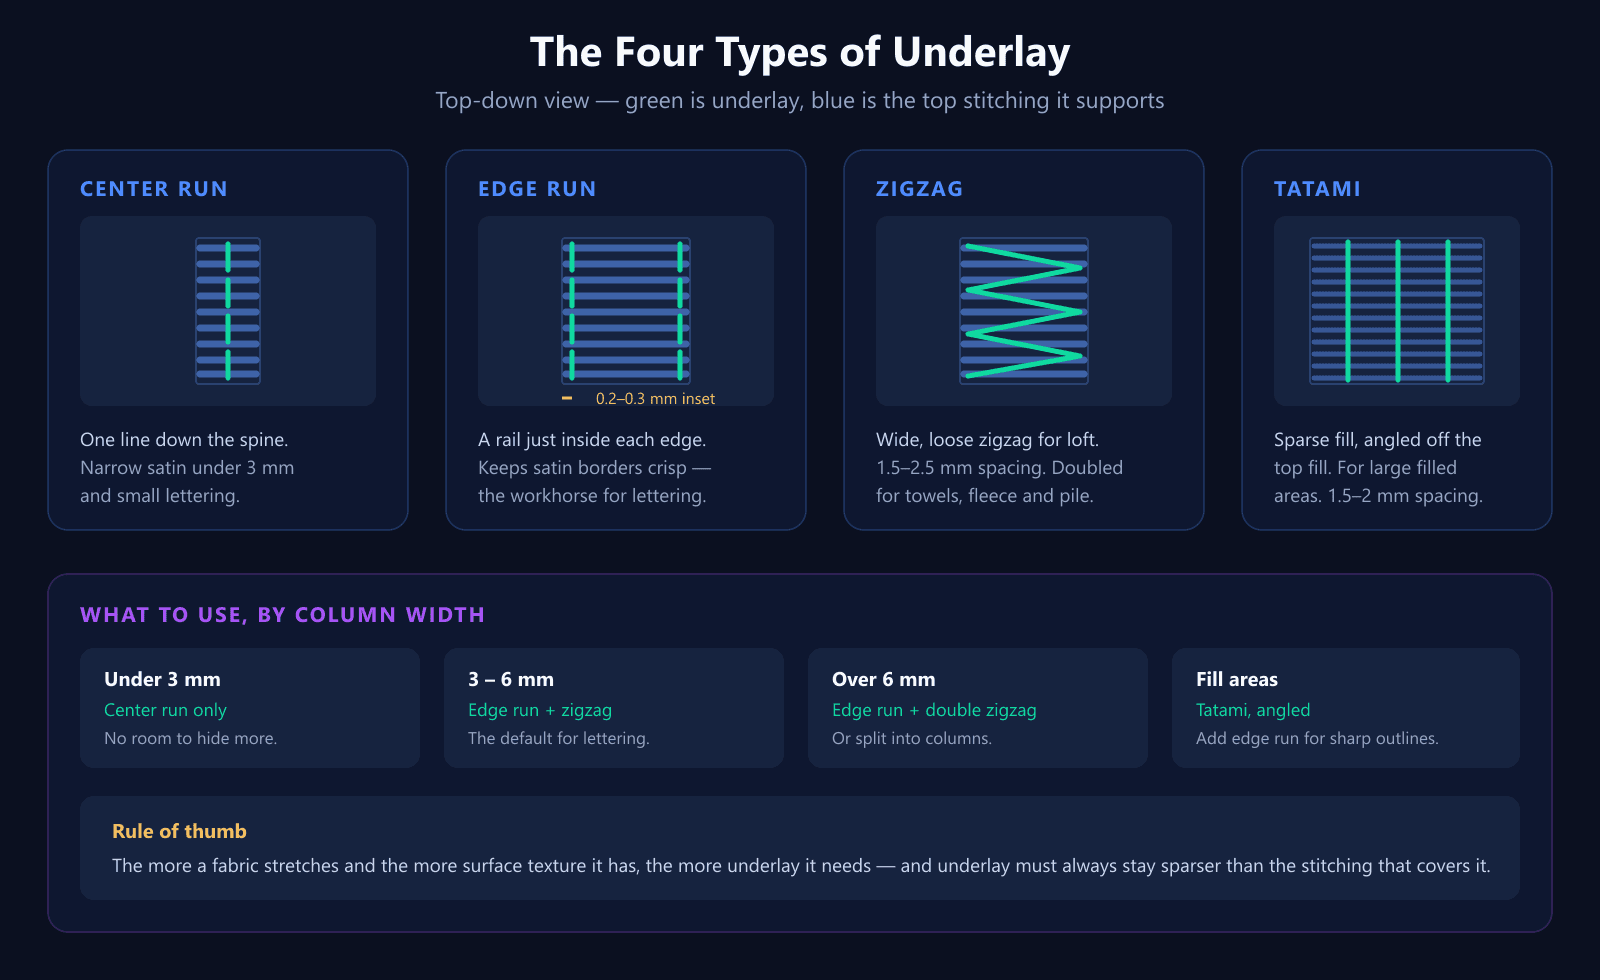
Digitizing software offers a handful of underlay patterns. Four cover essentially all real work, and they are frequently combined rather than used alone.
Center run
A single line of running stitches down the spine of a shape. It is the lightest option available — the minimum viable underlay.
Use it for narrow satin columns, roughly under 3 mm, and for small lettering. At those widths there is no room for anything more elaborate: a zigzag underlay inside a 2 mm column would be nearly as wide as the column itself. Typical stitch length is 2 to 3 mm.
Edge run (contour)
A line of running stitches just inside each edge of the shape, tracing its outline. Also called contour or edge walk underlay.
This is the workhorse for satin columns and any shape whose outline matters. It creates the firm rail described above, so the satin edge lands consistently. Inset it about 0.2 to 0.3 mm inside the finished outline so the top stitching hides it — if you see a fringe of underlay poking out past the satin, increase that inset.
Zigzag and double zigzag
A wide, low-density zigzag running the length of the shape. Double zigzag runs it out and then back, crossing itself for extra support.
Zigzag is the loft builder. It is what you reach for on textured or unstable fabric, and under wider satin columns where a pair of edge runs alone leaves the middle unsupported. Spacing typically sits around 1.5 to 2.5 mm — far looser than the satin above it. Double zigzag is for the hard cases: towels, fleece, heavy pile and loosely woven fabric.
Tatami (full fill) underlay
A sparse fill covering the entire shape, usually stitched at an angle to the top fill.
This is the choice under large fill areas, where the top stitching covers too much ground for edge runs to stabilize. Running the underlay at an angle — commonly around 45 degrees off the top fill direction — is deliberate: crossing directions resist distortion in both axes and stop the whole area drifting one way. Spacing is usually about 1.5 to 2 mm.
Combining Types: What Professionals Use
In practice, underlay is rarely a single pattern. The standard combinations are worth memorizing, because they cover most of what you will ever digitize.
- Narrow satin, under 3 mm — center run alone. Anything more adds bulk the column cannot hide.
- Standard satin, 3 to 6 mm — edge run plus zigzag. The edge run keeps the border crisp, the zigzag supports the middle. This is the default for lettering and logo columns.
- Wide satin, over 6 mm — edge run plus double zigzag, and consider splitting the column or converting it to a fill instead.
- Fill areas — tatami underlay at an angle to the top fill, with an edge run added when the outline needs to be sharp.
- Towels, fleece and pile — double zigzag or tatami, usually paired with a water-soluble topping on the surface.
- Appliqué — edge run around the placement line so the fabric patch is tacked flat before the finishing satin covers its raw edge.
Want designs that come out of the converter with underlay and pull compensation already applied?
Try the AI digitizerMatching Underlay to Fabric
The right underlay depends less on what the design looks like than on what it is being stitched onto. The rule of thumb: the more a fabric can move, and the more surface texture it has, the more underlay it needs.
Stable wovens — canvas, denim, twill
These barely move, so underlay is doing the edge-definition job more than the stabilizing one. Light underlay is enough: edge run under satin, light tatami under fills. Over-doing it here just stiffens the design.
Knits — jersey, interlock, piqué
Knits stretch, so underlay is load-bearing. Edge run plus zigzag under satin is the baseline, not the upgrade. Combine it with cut-away stabilizer rather than tear-away, because underlay can only hold the fabric to a backing that is still there after the stitch-out.
Pile and terry — towels, fleece, velour
The hardest case, and the one where underlay is most visibly decisive. Use double zigzag or tatami to crush the pile flat and build a platform. A water-soluble topping on the surface stops loops from working up through the top stitching. Without both, the design disappears into the towel.
Caps and structured goods
Caps stitch on a curved surface with a stiff buckram interlining, and the fabric wants to shift as the frame rotates. Center-out stitching order and solid zigzag underlay both matter here more than on flat goods.
Five Underlay Mistakes to Avoid
Underlay problems are easier to diagnose than most embroidery faults, because each mistake has a distinctive signature.
- Too dense — the classic beginner overcorrection. Dense underlay adds bulk, stiffens the design, perforates the fabric along the same lines the top stitching will use, and can push the top stitches apart from below. Underlay should always be visibly sparse compared with what covers it.
- Not inset far enough — underlay peeks out from beneath the satin as a fringe of stray stitches. Increase the inset in 0.1 mm steps until it disappears.
- Inset too far — the satin edge has nothing under it and goes soft and wavering. This is the opposite failure and looks like an edge-quality problem rather than an underlay problem.
- Underlay on tiny text — below roughly 5 mm letter height there is no room to hide a foundation layer. It adds bulk that fills in the counters of letters like e and a, turning small text into a blob.
- Same underlay for every fabric — the single biggest cause of designs that stitch beautifully on the sample and badly in production. Underlay is a fabric decision, not a design decision.
What Underlay Costs You
Underlay typically adds somewhere around 10 to 20% to a design's stitch count. On a one-off that is invisible. On a run of five hundred shirts it is real machine time and real money, and it is the reason cheap digitizing so often arrives with the underlay stripped out.
It is almost always worth paying. The alternatives to underlay — heavier stabilizer, denser top stitching, slower machine speed — cost their own stitches and bulk without addressing the actual problem, and rejected garments cost far more than either. If you want to see how much of a file's stitch count is going where, our DST analyzer reports stitch counts and density so you can judge whether a design is heavy for the garment you plan to run it on.
How to Tell If a File Has Underlay
You do not have to take a digitizer's word for it. Underlay is visible in any tool that renders stitch order.
Open the design in a stitch viewer and watch it build. Underlay shows up as loose, sparse stitching laid down inside a shape, which then gets covered by dense satin or fill in that same area moments later. If the first stitches to appear in a shape are already the final dense top stitching, there is no underlay in the file. Our free DST viewer renders the real stitch paths in the browser, so you can check a file before committing fabric to it.
This is worth doing on any design you did not digitize yourself, especially free downloads and low-cost digitizing. A design with no underlay is not unusable — but you will need to compensate with stabilizer and technique, and it is much better to know that before the first stitch-out than after.
Quick Reference
- Underlay is stitched first and hidden completely by the top stitching.
- It anchors fabric to stabilizer, lifts the design above surface texture, and gives edges a firm rail.
- Center run — narrow satin under 3 mm, 2 to 3 mm stitch length.
- Edge run — satin borders and any shape whose outline matters, inset 0.2 to 0.3 mm.
- Zigzag — loft and support, roughly 1.5 to 2.5 mm spacing; double zigzag for pile and unstable fabric.
- Tatami — under large fills, about 1.5 to 2 mm spacing, angled off the top fill direction.
- Standard satin default: edge run plus zigzag.
- More stretch and more texture means more underlay.
- Keep it sparse — dense underlay causes its own problems.
- Skip it only on very small text and single-line running-stitch designs.
- Budget roughly 10 to 20% extra stitch count.
Conclusion
Underlay is the least glamorous part of digitizing and one of the most decisive. It is invisible by design, it costs stitches, and it is the first thing removed when someone is cutting corners — which is exactly why the presence or absence of it is such a reliable tell between professional and amateur work.
If you are digitizing your own designs, get into the habit of choosing underlay by fabric before you touch anything else. If you are buying designs, open them in a viewer and confirm the foundation is there. And if you would rather not think about it at all, the EmbroidAI image-to-embroidery converter applies underlay, pull compensation and sensible density automatically, so the files it produces already have the layer you will never see.
Frequently Asked Questions
What is underlay in embroidery?
Underlay is a layer of light, widely spaced stitching sewn before the visible top stitches of a design. You never see it in the finished piece — the top stitching covers it completely. It does three jobs: it tacks the fabric to the stabilizer so it cannot shift, it lifts the design above the fabric's surface texture so the top stitches do not sink in, and it gives the top stitching a firm base to sit on so edges stay crisp.
What are the four types of underlay?
Center run lays a single line of running stitches down the middle of a shape, used for narrow columns under about 3 mm. Edge run (also called contour) runs just inside each edge of a shape and keeps satin borders sharp. Zigzag is a wide, low-density zigzag that adds loft and flattens fabric texture. Tatami (or full fill) is a sparse fill covering the whole shape, used under large fill areas. Most real designs combine two — commonly edge run plus zigzag under satin columns.
Do I need underlay for every design?
Almost always, yes. The main exception is very small text and fine detail, where underlay stitches would add bulk without room to hide, and single-line running-stitch designs that have no top coverage to support. Everything else — satin columns, fill areas, appliqué, anything on knit, pile or textured fabric — needs underlay. Skipping it is the most common reason a home-digitized design looks amateurish next to a commercial one.
What density should underlay be?
Underlay is deliberately sparse. Running-stitch underlay typically uses 2 to 3 mm stitch lengths. Zigzag underlay usually sits around 1.5 to 2.5 mm between stitches — roughly four to six times looser than the satin that covers it. Tatami underlay commonly runs about 1.5 to 2 mm spacing. Too dense and you defeat the purpose: you add bulk, stiffen the design, perforate the fabric and risk the underlay showing through.
How far inside the edge should underlay sit?
Inset underlay from the finished edge so the top stitching can cover it. A common starting point is 0.2 to 0.3 mm inside the shape outline for edge run under satin. If underlay peeks out from under the satin as a fringe of contrasting stitches, increase the inset. If the satin edge looks soft and unsupported, decrease it.
Why does my embroidery sink into towels and fleece?
Because there is no underlay lifting it above the pile. On terry cloth, fleece, piqué and waffle knit, the surface is three-dimensional, and top stitching laid straight onto it settles down between the loops. A zigzag or tatami underlay flattens the pile and builds a platform for the design to sit on. Pairing it with a water-soluble topping on the surface handles the worst cases.
Does underlay increase stitch count and cost?
Yes, typically by around 10 to 20% depending on the type and the design. That is a real cost on a production run, and it is almost always worth paying. Skipping underlay to save stitches usually costs more in rejected garments, and the alternative fixes — heavier stabilizer, denser top stitching — add their own bulk and stitch count without solving the underlying problem.
Can I tell whether a design file already has underlay?
Yes. Open it in a stitch viewer and step through the stitch order, or watch the render build up. Underlay appears as sparse, loose stitching that is laid down first inside a shape and then covered by the dense top stitching in the same area. If a shape's first stitches are already the final dense satin or fill, the design has no underlay.