Embroidery Basics
What Is Stitch Density in Embroidery? A Practical Guide With Numbers
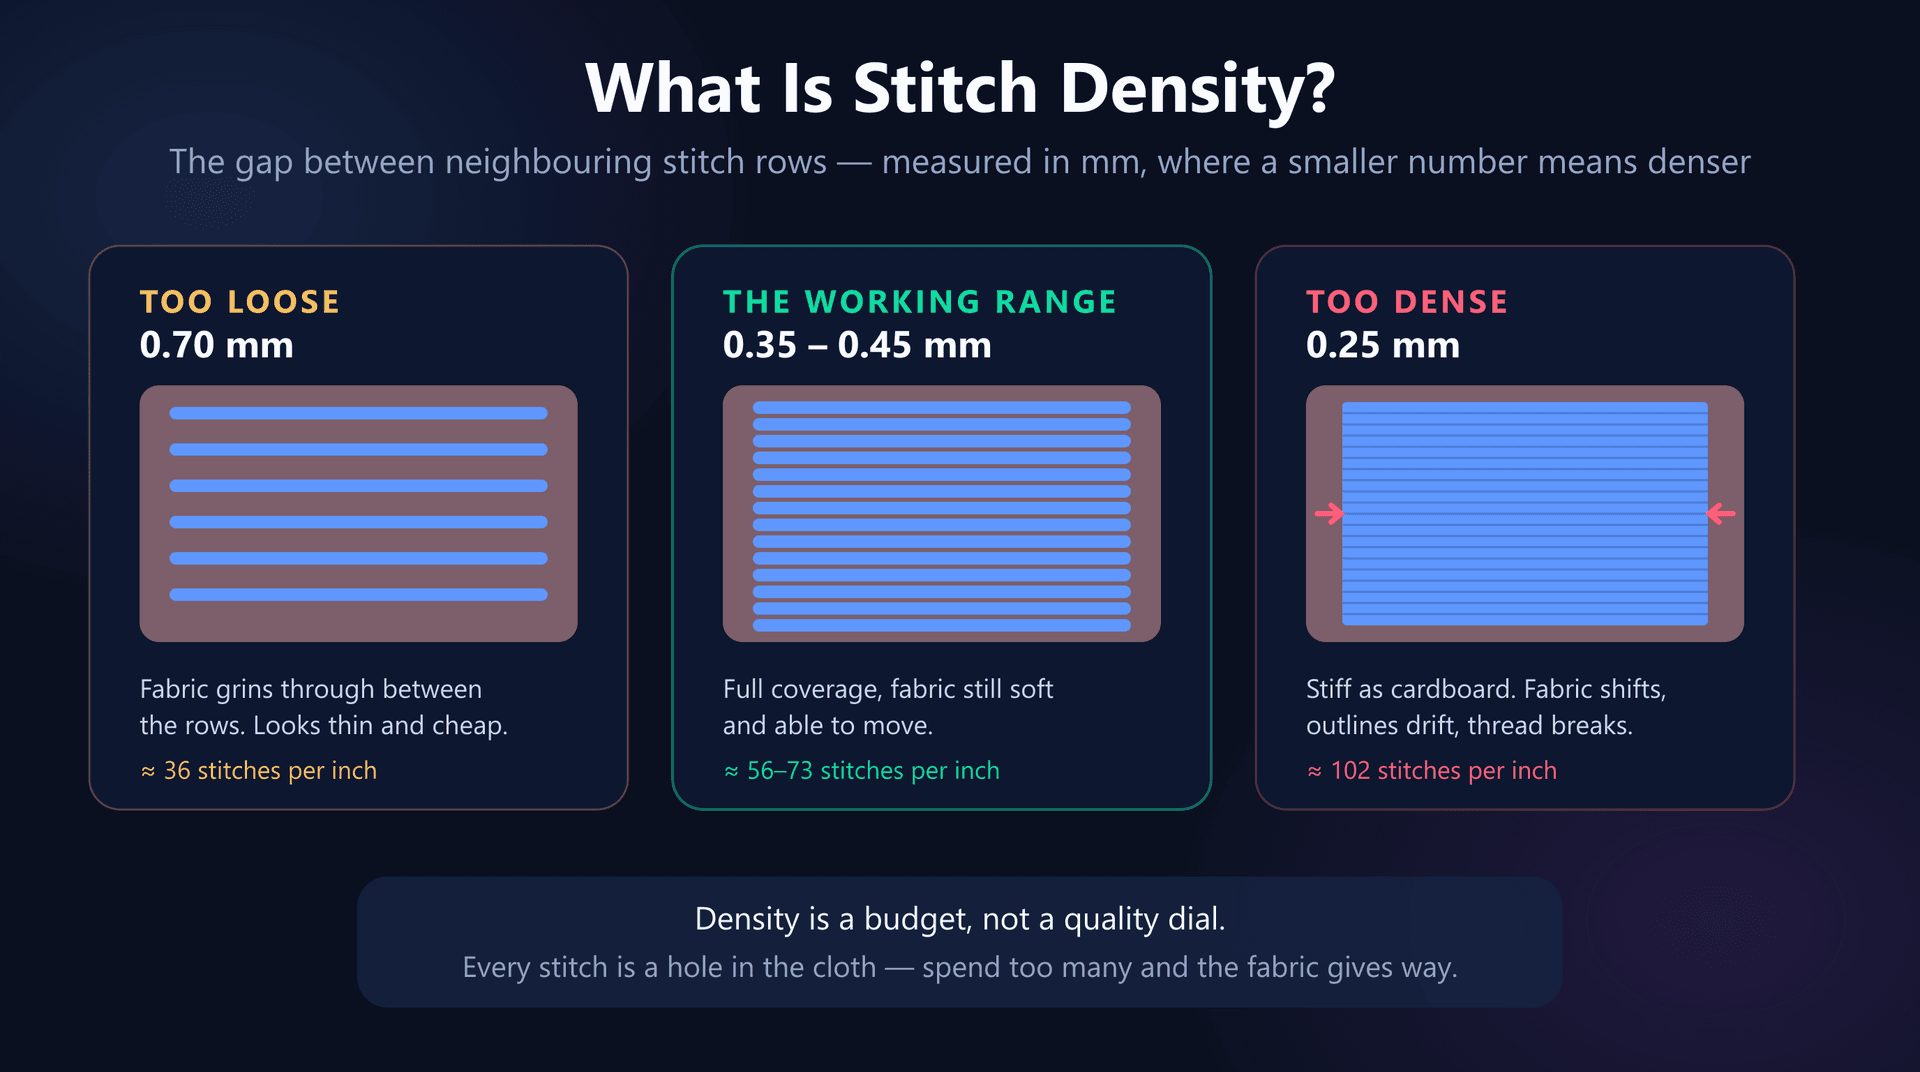
A design stitches out beautifully on a canvas tote. The same file on a polo comes out stiff, slightly puckered, and the outline no longer sits where the fill ends. Nothing about the file changed. What changed is that the fabric underneath could not absorb the number of needle holes the design was asking of it.
That budget — how many holes a piece of cloth can take in a given area before it stops behaving like cloth — is what stitch density really controls. The setting itself is simple, and most guides will hand you a table of numbers. The useful part is understanding what you are spending when you change it.
What the Number Actually Measures
Stitch density is the distance between neighbouring rows of stitching, measured in millimetres. A density of 0.40 mm means each row of stitches sits four tenths of a millimetre from the next one.
The first thing that trips people up is that the scale runs backwards from intuition. A smaller number means denser embroidery. 0.30 mm is heavy and packed; 0.60 mm is light and open. You are measuring the gap, not the thread, so shrinking the gap adds stitches.
Some software and most American digitizers use stitches per inch instead. The conversion is one division — 25.4 divided by the spacing in millimetres:
- 0.25 mm ≈ 102 SPI — far too dense for most work.
- 0.35 mm ≈ 73 SPI — the tight end of normal.
- 0.40 mm ≈ 63.5 SPI — the standard default.
- 0.45 mm ≈ 56 SPI — the open end of normal.
- 0.70 mm ≈ 36 SPI — light coverage, for delicate fabric.
Worth knowing if you buy digitizing from more than one supplier: the same file can be described as “0.4 mm” by one and “63 SPI” by another, and they are talking about exactly the same thing.
Why Denser Is Not Better
The instinct when embroidery looks thin is to add density. It feels like the obvious lever: more thread, better coverage. On a screen that is exactly what happens, because software renders thread and ignores the fabric. On a machine, something else is going on.
Every stitch is a puncture. The needle does not lay thread onto the surface; it drives through the material and back, leaving a hole. Rows of stitches at 0.40 mm mean rows of holes at 0.40 mm. Tighten to 0.25 mm and you have nearly doubled the number of holes in the same area — you are perforating the fabric along a line, in the same way a stamp sheet is designed to tear.
At the same time, all of that thread is under tension and pulling inward. The fabric compresses, and if it has anywhere to go, it moves.
This is not theoretical. In a published density test running fill from 0.25 mm to 1.05 mm, the 0.25 mm sample came out extremely stiff, the compressed fabric shifted during stitching, and the result had visible gaps where the outline no longer met the fill it was supposed to border. The design was not badly drawn — registration failed because the fabric moved under the needle. Density caused a problem that looks, at first glance, like a digitizing error.
So the honest framing is that density is a budget rather than a quality dial. Spend the right amount and the design looks rich. Overspend and the fabric pays for it.
The Right Density Is a Property of the Fabric
Because the constraint lives in the material, the correct value changes with what you are stitching on. Sturdy, tightly woven fabric can absorb a lot of needle holes. Fine, loose or stretchy fabric cannot.
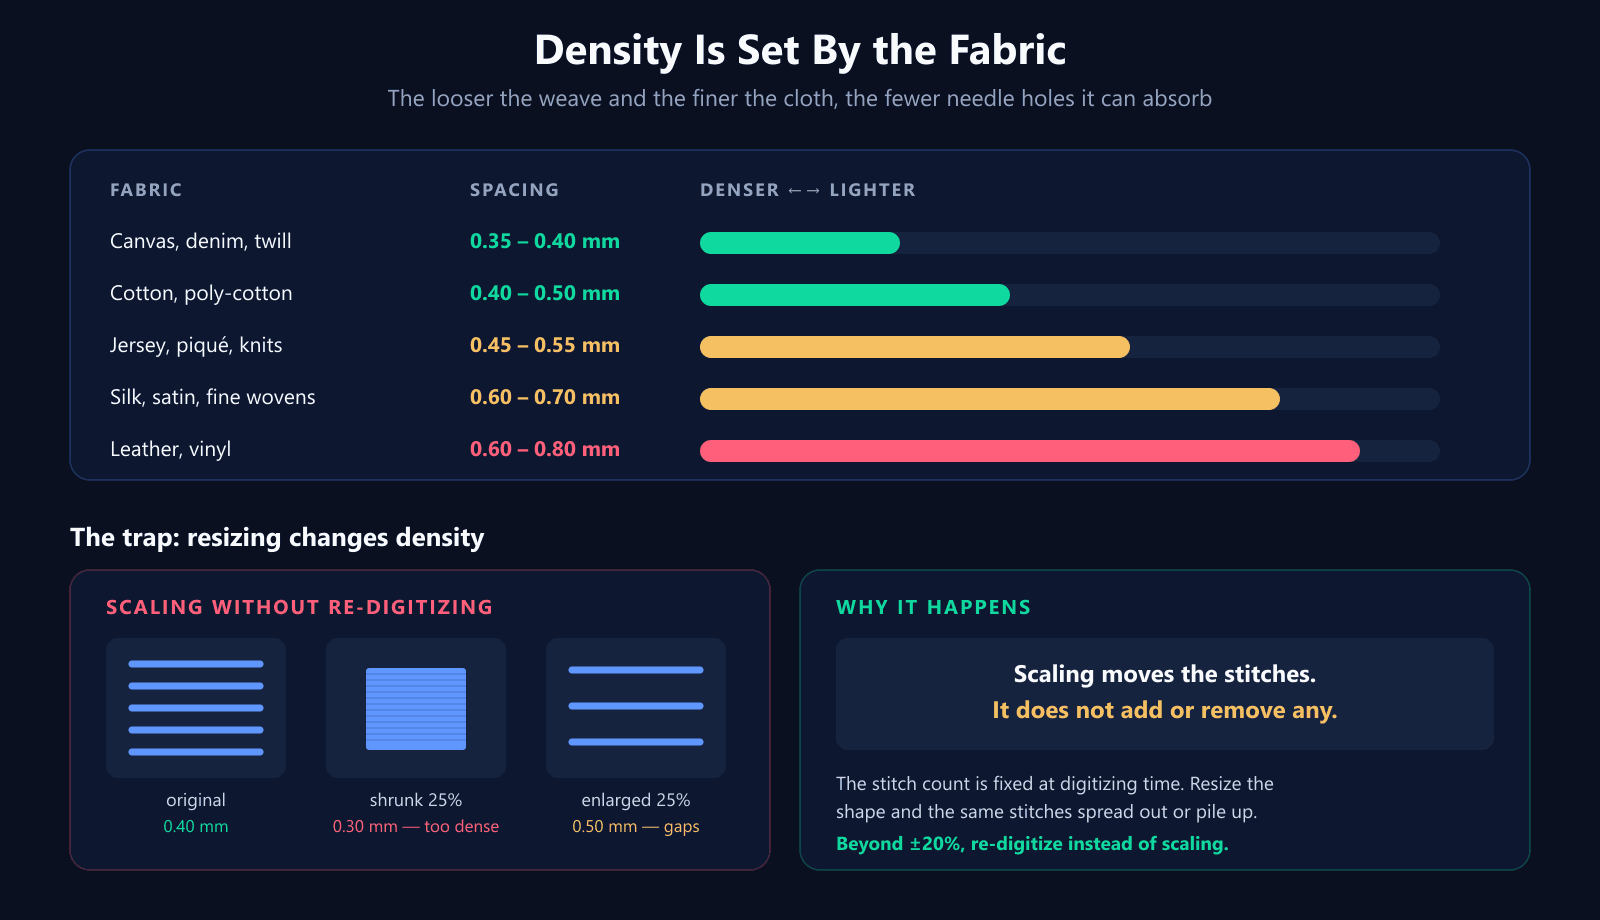
Stable wovens — canvas, denim, twill
These take density well. 0.35–0.40 mm gives a rich, solid result, and the fabric barely reacts. If you are going to run anything tight, run it here.
Cotton and poly-cotton
The everyday case: 0.40–0.50 mm. A t-shirt is a knit and belongs in the next category, but a woven cotton shirt or a canvas bag sits comfortably here.
Knits — jersey, piqué, interlock
Open it up to roughly 0.45–0.55 mm. Knits are built from loops that slide, so they have far less resistance to the inward pull of the stitching. Density that looks luxurious on a woven polo will chew through lightweight jersey — one of several reasons designs pucker on knit fabric.
Silk, satin and fine wovens
0.60–0.70 mm. Fine fabric simply cannot take many punctures per square millimetre without visible damage, and the design should be light in every sense — fewer stitches, smaller shapes, less coverage.
Leather and vinyl
0.60–0.80 mm, and here the reasoning changes. Leather does not close around a needle hole the way woven cloth does. Each penetration is permanent, so a dense design perforates the material along the stitch line and it will eventually tear along that line. Density on leather is a structural decision, not an aesthetic one.
Want files that come out with sensible density already applied?
Try the AI digitizerThe Trap: Resizing Silently Changes Density
This one causes more ruined garments than any density setting, because nothing warns you it is happening.
When you scale an embroidery file in most software, it moves the existing stitches to new coordinates. It does not recalculate the design. The stitch count was fixed when the file was digitized and scaling does not change it.
So the same number of stitches now has to cover a different area:
- Shrink a design to 75% of its size and a 0.40 mm density becomes about 0.30 mm — dense enough to stiffen the fabric and risk thread breaks.
- Enlarge it to 125% and the same file opens up to about 0.50 mm, and the coverage starts to look thin.
A common rule of thumb is that ±20% is roughly the safe window for scaling an existing file. Beyond that, the design needs to be re-digitized at the new size so the stitch count is recalculated rather than stretched. This is exactly why a design that stitched perfectly at 100 mm can fail at 60 mm with no other change.
You can check before you stitch. Our free DST analyzer reports stitch count and dimensions, so you can see whether a file is carrying more stitches than its size warrants, and the DST viewer renders the actual stitch paths so you can see how tightly packed a fill really is.
Where Density Lies to You
A density setting is a nominal value, and there is one place it stops describing what the machine actually does: curves.
On the inside of a curve, the rows converge. A satin column rounding a tight bend has its stitches fanning out on the outer edge and bunching on the inner one. The setting still says 0.40 mm, but along that inner edge the real spacing can be a fraction of it. Wilcom notes plainly that bunched stitches on the inside of a curve both look wrong and cause thread breaks.
If a design breaks thread in the same spot every time and the density looks fine on paper, look at the geometry rather than the number. The fix is usually to break the curve into shorter segments or let the software vary spacing around the bend, not to lower the density of the whole object.
Density Is a Line on the Invoice
Density sets stitch count, stitch count sets run time, and commercial embroidery is priced on run time. The relationship is direct and worth doing the arithmetic on.
Going from 0.45 mm to 0.35 mm on the same design packs roughly 30% more rows into the same area, and the stitch count moves with it. On one sample that is a few extra seconds. On five hundred shirts it is hours of machine time and a noticeably larger thread bill, for a difference most customers cannot see.
This is why unnecessarily dense digitizing is expensive twice over: once in production, and again in the rejects when a heavy design meets a light fabric.
How to Set Density in Practice
Work in this order. The point is to change one variable at a time so you learn something from each stitch-out.
- 1. Start from the fabric, not the design. Pick the band above for what you are actually stitching on.
- 2. Use 0.40 mm as the default for anything woven and unremarkable. It is the industry's starting point for good reason.
- 3. Stitch a test on the real garment material — not a scrap of something similar. Stabilizer and fabric together determine the result.
- 4. If coverage is thin, check underlay and thread weight before touching density. Poor coverage is more often an underlay problem than a density one.
- 5. If the fabric puckers or feels stiff, open the density by 0.05 mm and re-test rather than reaching for heavier stabilizer.
- 6. Wash the test piece before approving it. Density problems on knits often only appear after the fabric relaxes.
- 7. Never rescale a finished file beyond about ±20%. Re-digitize instead.
What These Numbers Don't Cover
Two honest limits on everything above.
First, these values assume standard 40-weight polyester or rayon thread. A heavier 30-weight thread covers more per row and wants looser spacing; fine 60-weight thread needs tighter spacing to cover at all. Change the thread and every number here shifts.
Second, density interacts with underlay, stabilizer, hooping and machine tension, and it is frequently blamed for their failures. If a design is puckering, density is one of six or seven possible causes — worth checking, but not worth assuming. Getting the backing and hooping right first will resolve more problems than any change to spacing.
Quick Reference
- Density = the gap between stitch rows, in mm. Smaller number = denser.
- Convert to SPI by dividing 25.4 by the mm value. 0.40 mm ≈ 63.5 SPI.
- Default for stable wovens: 0.40 mm. Working range: 0.35–0.45 mm.
- Canvas and denim 0.35–0.40 · cotton 0.40–0.50 · knits 0.45–0.55 · silk 0.60–0.70 · leather 0.60–0.80.
- Every stitch is a hole. Too dense perforates the fabric and causes stiffness, shifting and thread breaks.
- 0.25 mm is documented as far too dense — stiff, distorted, and registration lost.
- Scaling a file changes its effective density; stay inside ±20% or re-digitize.
- Curves bunch stitches on the inner edge regardless of the nominal setting.
- Density drives stitch count, which drives cost. 0.45 → 0.35 mm is roughly 30% more rows.
- Fix coverage with underlay and thread weight before reaching for density.
Conclusion
Stitch density is not a quality setting where more is better. It is a budget: the fabric can absorb a certain number of needle holes per unit of area, and every failure mode — stiffness, puckering, shifted registration, broken thread, torn leather — is what overdrawing that budget looks like.
Start at 0.40 mm on woven fabric, open it up for anything finer or stretchier, test on the real material, and treat resizing as a density change in disguise. And if you would rather the file arrived with sensible values already in place, the EmbroidAI image-to-embroidery converter applies density, underlay and pull compensation together, so the design starts from settings that are not fighting the cloth.
Frequently Asked Questions
What is stitch density in embroidery?
Stitch density is the distance between neighbouring rows of stitching, measured in millimetres. A density of 0.40 mm means each row of stitches sits 0.40 mm from the next. The number is inverted from what most people expect: a smaller number means the rows are closer together, so the embroidery is denser. It is the setting that controls how much thread covers a given area, and it is the single biggest influence on stitch count, run time and how the finished piece feels.
What is a good stitch density for embroidery?
For most designs on stable woven fabric, 0.35–0.45 mm is the working range, with 0.40 mm being the common default. That gives full coverage without making the fabric stiff. Lighter fabrics need looser values — around 0.45–0.55 mm on knits and 0.60–0.70 mm on silk. These are starting points for a test stitch-out, not universal settings.
How do you convert mm density to stitches per inch?
Divide 25.4 by the spacing in millimetres. So 0.40 mm spacing equals 25.4 ÷ 0.40 = about 63.5 stitches per inch. At 0.35 mm you get roughly 73 SPI, at 0.45 mm about 56 SPI, and at 0.25 mm about 102 SPI. American digitizers often quote SPI while European software defaults to millimetres, which is why the same design can be described two apparently different ways.
Why does higher density cause puckering?
Every stitch is a needle hole. Pack the holes close enough together and you are effectively perforating the fabric along a line, weakening the material you need to hold the design. At the same time all that thread is under tension pulling inward, so the fabric compresses. In one published density test, a fill at 0.25 mm made the embroidery extremely stiff, shifted the fabric during stitching, and left visible gaps where the outline no longer lined up with the fill.
Does increasing density fix poor coverage?
Sometimes, but it is usually the wrong first move. If the fabric is showing through, check thread weight, underlay and whether the colour of the fabric is simply darker than the thread — a white design on black fabric needs help from underlay far more than it needs extra density. Tightening density adds stitch count, cost, stiffness and pucker risk, so it should be the last adjustment you make, not the first.
Does resizing an embroidery design change its density?
Yes, and this catches people out constantly. Scaling a design in most software moves the existing stitches rather than recalculating them, so the stitch count stays the same while the area changes. Shrink a design by 25% and a 0.40 mm density becomes roughly 0.30 mm — dense enough to cause problems. Enlarge it by 25% and the same design opens up to about 0.50 mm, leaving gaps. Beyond about ±20%, the design should be re-digitized rather than scaled.
Should satin and fill use the same density?
They are usually set to similar values — around 0.40 mm — but they behave differently. Satin lays long parallel stitches, so its density directly controls sheen and coverage. A fill covers the same area with short stitches in staggered rows, so at the same nominal spacing it produces a flatter, matte surface and typically a lower stitch count. Satin also needs care around curves, where the stitches on the inside of the bend bunch together and can break thread even though the nominal density looks correct.
How does density affect embroidery cost?
Directly. Density sets stitch count, stitch count sets machine time, and machine time is what commercial embroidery is priced on. Going from 0.45 mm to 0.35 mm on the same design increases the number of rows by roughly 30%, with a matching rise in run time and thread use. On a single item that is invisible; across a production run it is a real line on the invoice, which is why an unnecessarily dense file costs money on every garment.