Embroidery Basics
Why Your Satin Stitches Pucker on Knit Fabric (And How to Stop It)
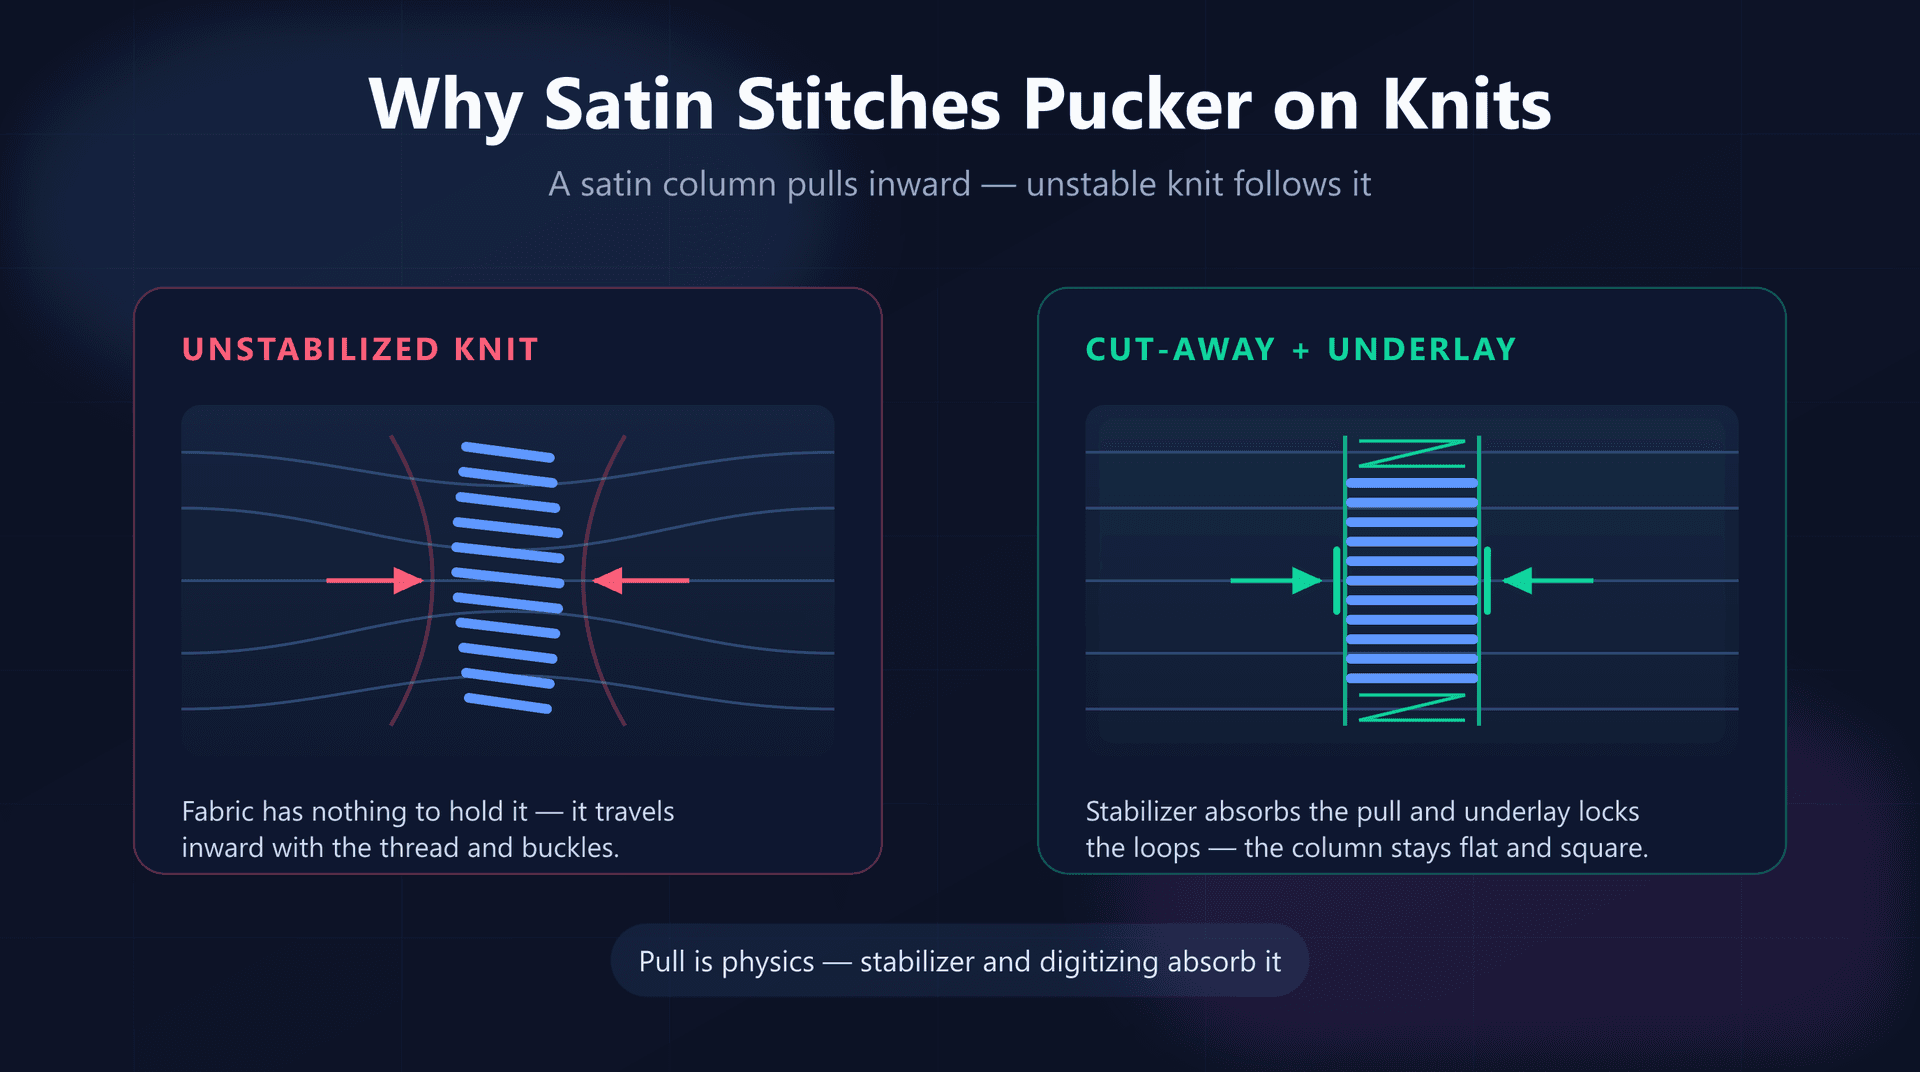
You stitch a logo onto a t-shirt. It looks perfect in the hoop. You unhoop it, and the fabric around your satin columns has gathered into small ridges that no amount of pressing will remove. The same file stitched onto a canvas tote came out flawless. The design didn't change — the fabric did.
Puckering on knits is not bad luck and it is usually not a broken machine. It is the predictable result of a satin stitch pulling inward on a fabric that has nothing to resist it. Once you understand that one mechanism, every fix in this guide stops feeling like a superstition and starts making sense.
This article covers what is physically happening in the fabric, the six causes worth checking, and the order to work through them so you don't waste garments changing things at random.
What Is Actually Happening in the Fabric
A satin stitch is a series of long stitches laid side by side across a shape, each anchored at both edges. Every one of those stitches is thread under tension, and tension wants to shorten. The moment the needle finishes a stitch, that thread pulls its two anchor points very slightly toward each other.
On a woven fabric — canvas, denim, twill — the threads run at right angles and are locked at every crossing point. When a stitch pulls, the weave pushes back, and the fabric barely moves. This is why the same design behaves so well on a tote bag.
A knit is built differently. It is not a grid; it is a single yarn looped through itself thousands of times. Those loops are designed to slide and elongate — that is what makes a t-shirt comfortable. When a satin stitch pulls, nothing stops the loops from traveling toward the center of the column. The fabric moves, gathers, and the surplus has to go somewhere: it rises into a ridge.
So puckering on knits is really a mismatch. The thread applies the same force it always does; the fabric just has no mechanism to refuse it. Every fix below either gives the knit something to push back with, or reduces the force it has to withstand.
The Six Causes of Pucker on Knits
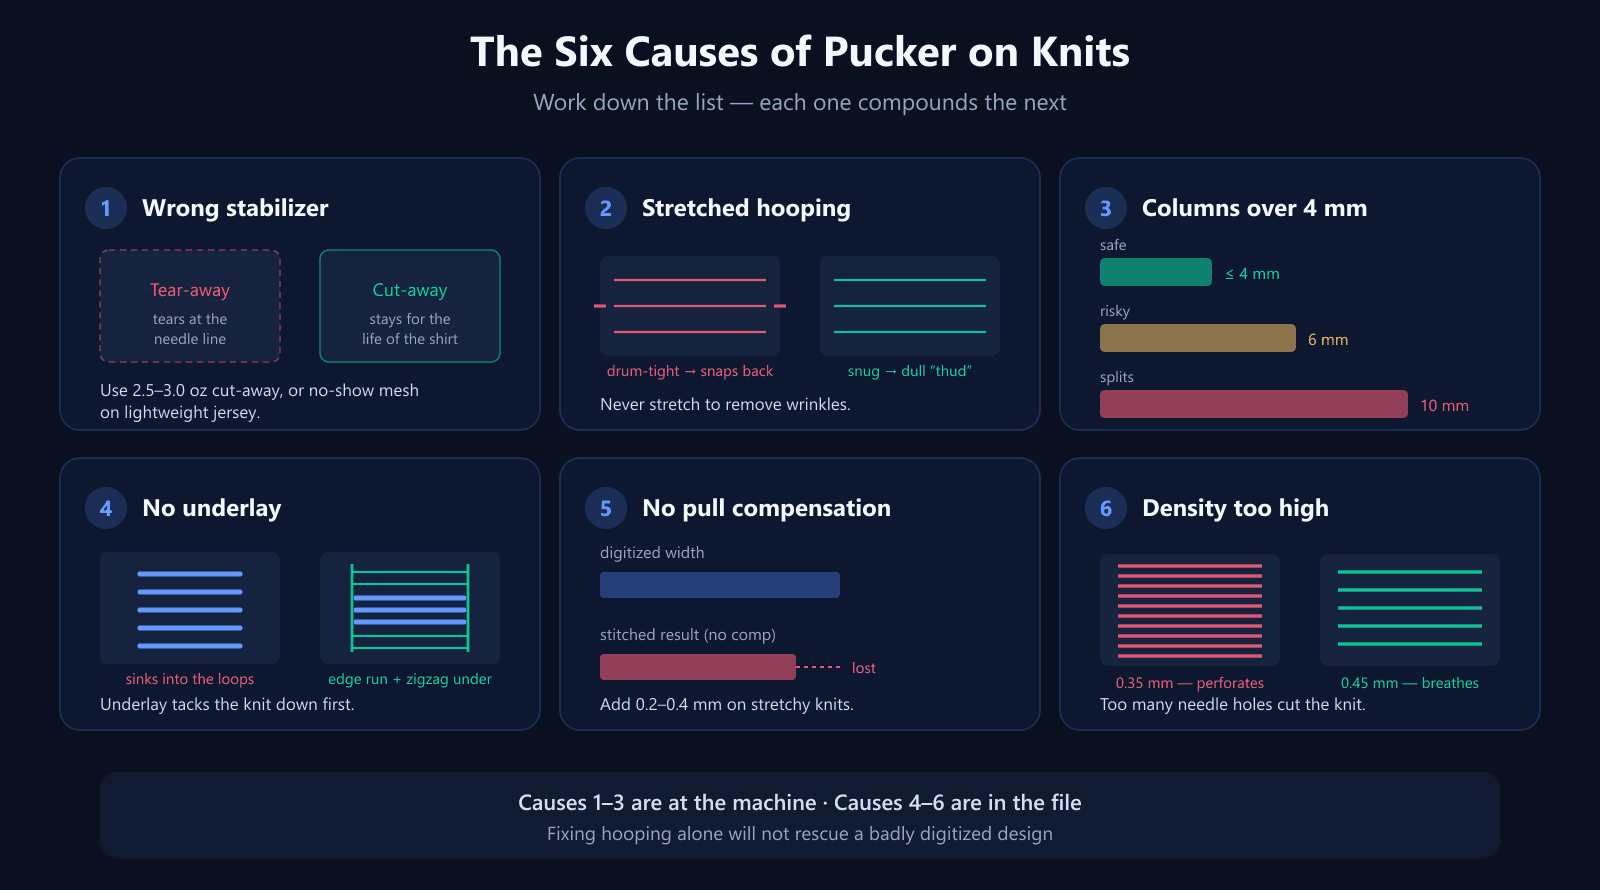
In practice, puckering almost always traces to one or more of six factors. The first three live at your machine and cost nothing to change. The last three live inside the design file and need a digitizing tool to fix.
1. The stabilizer is wrong
This is the single most common cause, and the easiest to correct. Tear-away stabilizer works by being weak enough to tear — which means the needle penetrations along your column effectively perforate it. On a knit, the support fails exactly where the pull is strongest, and whatever survives the stitch-out gets torn off afterward.
Knits need cut-away. A 2.5–3.0 oz cut-away stays bonded to the garment for its entire life, holding the loops in position through every wash. For lightweight or pale jersey where a heavy backing would show through or feel stiff, use a no-show mesh cut-away — same permanence, far softer drape.
Weight matters in both directions. Too light and the knit buckles anyway; too heavy and the backing stiffens the garment and can drag the fabric down around the design.
2. The fabric was hooped stretched
This one is counter-intuitive, so it catches almost everyone. It feels natural to pull a knit taut in the hoop to remove wrinkles and get a flat surface. Doing that guarantees puckering.
Here is why. If you stretch the knit before stitching, you embroider it in its elongated state. The stitches are placed to match that stretched geometry. When you unhoop, the knit contracts back to its relaxed size — but the thread cannot shrink with it. The fabric is now smaller than the embroidery sitting on it, and the excess buckles into ridges around every column.
Hoop knits snug, never stretched. A useful field test: tap the hooped fabric with a fingertip. A dull thud means it's seated correctly. A high-pitched drum sound means it's under tension — release it and re-hoop. If wrinkles remain, press them out before hooping rather than pulling them out in the hoop.
3. The satin columns are too wide
The inward pull of a satin stitch scales with its length. A narrow column barely moves the fabric; a wide one has real leverage.
- Up to about 4 mm — safe on most knits with proper backing.
- 4 to 6 mm — the pull becomes strong enough to distort the fabric noticeably; pull compensation is mandatory.
- Beyond 8 to 10 mm — the stitches are long enough to snag on anything, sink into the knit's loops, and pull hard enough that no stabilizer fully saves them.
When a shape genuinely needs to be that wide, don't stitch it as one column. Split it into narrower parallel columns, or convert it to a fill stitch, which distributes its tension across many short stitches in alternating directions instead of concentrating it along one axis.
4. There is no underlay
Underlay is a light layer of stitching laid down before the visible satin, and on knits it is doing two jobs at once. It tacks the fabric to the stabilizer so the loops cannot travel, and it builds a raised base so the satin sits on top of the knit's texture rather than sinking between its loops.
Two types matter most here:
- Edge run (contour) — a line of running stitches just inside each edge of the column, giving the satin a firm rail to anchor against and keeping its outline crisp.
- Zigzag — a wide, low-density zigzag beneath the column that adds loft and flattens the knit's surface before the satin covers it.
For satin work on knits, a combination of the two is the professional default: edge run for clean boundaries, zigzag for support underneath. A design digitized without any underlay will sink and pucker on knit no matter how good your stabilizer is.
5. Pull compensation is missing
Because thread pull narrows every satin column slightly, digitized width and stitched width are never the same number. Pull compensation is the correction: you deliberately draw the shape wider than you want it, so that after the fabric pulls it in, it finishes at the intended size.
Typical values scale with column width and fabric stretch:
- A 2 mm column — add roughly 0.15 to 0.2 mm.
- A 5–6 mm column — add roughly 0.25 to 0.30 mm.
- Very stretchy knits such as piqué — up to about 0.4 mm.
Without it, you get the classic symptom of gaps appearing between elements that touched perfectly on screen, and outlines that no longer line up with the fills they were meant to border.
6. The density is too high
Density is the spacing between adjacent stitches. It is tempting to treat tighter as better — denser stitching gives richer coverage — but on a knit each stitch is also a needle hole. Pack those holes close enough together and you are effectively perforating the fabric along a line, weakening the very material you need to hold your design.
A satin density around 0.35 mm that looks luxurious on a woven polo can chew through lightweight jersey. Opening it toward 0.45 mm lets the knit breathe, reduces total thread tension across the design, and typically costs less in visible coverage than you would expect. Fewer stitches also means a faster, cheaper run.
Need a design built with underlay, pull compensation and knit-friendly density already applied?
Try the AI digitizerFix It in This Order
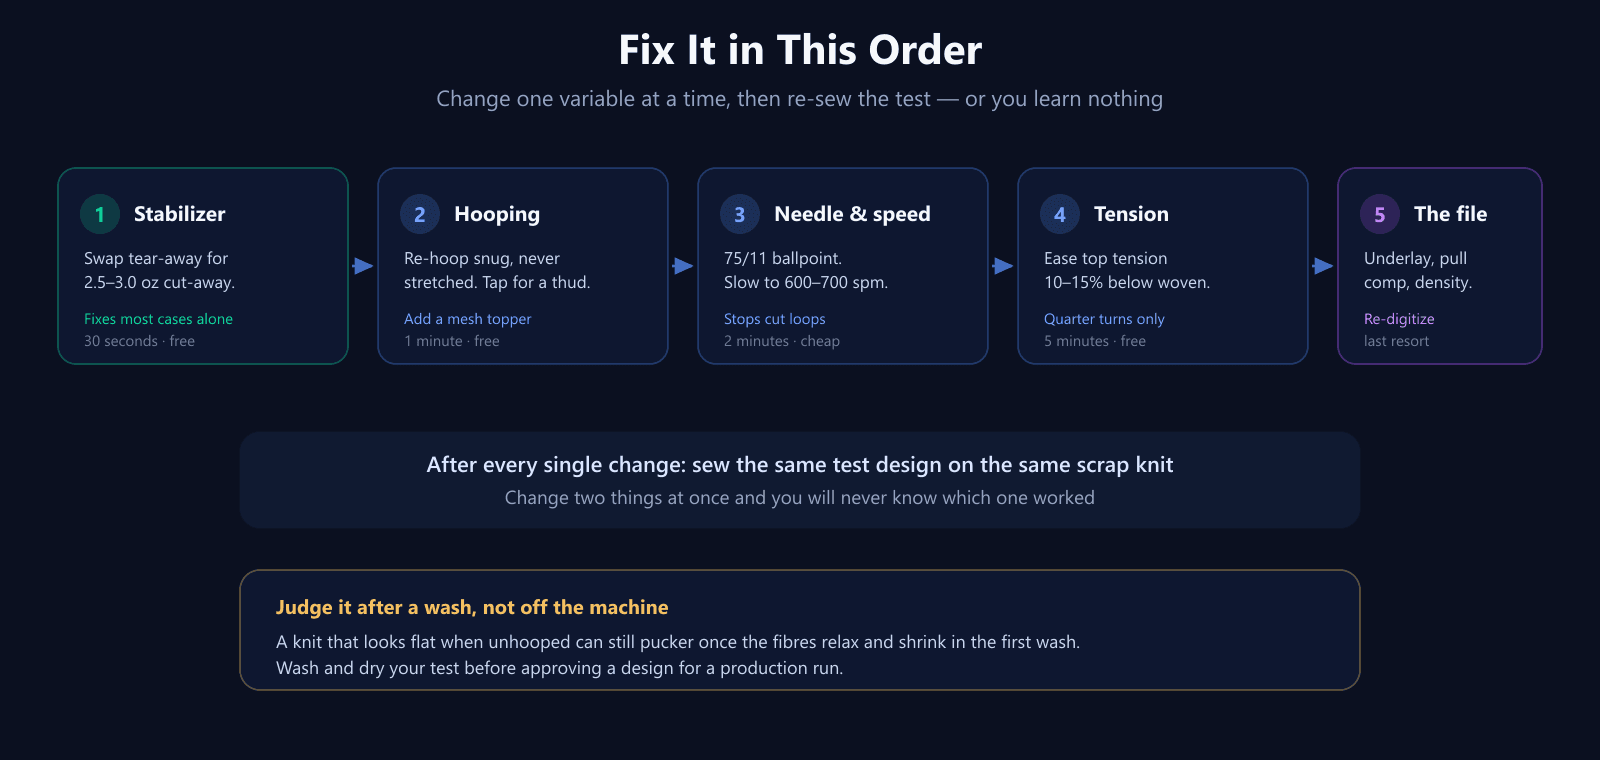
When a stitch-out puckers, the instinct is to change several things at once and re-sew. Resist it. If you adjust the stabilizer, the hooping and the tension together and the next sample comes out clean, you have learned nothing — and you will be back here on the next garment.
Work from cheapest and most likely to most involved, re-sewing the same test design on the same scrap knit after every single change.
A note on needles and speed
Two machine settings matter more on knits than on wovens. Use a 75/11 ballpointneedle: its rounded tip pushes between the knit's loops instead of piercing the yarn, which prevents the cut loops that turn into holes and runs. And slow the machine to around 600–700 spm. Lower speed means less vibration and less fabric shift under the needle, which on a mobile fabric like jersey is worth the extra minute per garment.
A water-soluble topping is also worth keeping on hand. Laid on top of the fabric before stitching, it stops satin stitches from sinking into the surface texture of piqué, waffle knits and fleece, then rinses away completely.
Easing tension for knits
Top tension tuned for woven fabric is usually a little tight for knits. Easing it roughly 10–15% below your woven baseline reduces the inward force at every stitch. Make the change in quarter turns and re-test — and if you want to confirm the balance is still correct afterward, our embroidery thread tension guide walks through reading the back of a column with the 1/3 rule.
Always Judge After a Wash
A knit that looks flat the moment you unhoop it can still pucker later. Knits relax and shrink slightly in their first wash and dry cycle, while the embroidery on top stays exactly the same dimensions. Any mismatch you built in — a slightly stretched hoop, a stabilizer that was a touch too light — shows up then.
Before you approve a design for a production run of shirts, wash and dry the test piece the way a customer would. It is the only honest test, and it is far cheaper to discover a problem on one sample than on fifty finished garments.
Check the File Before You Blame the Shop
If you have corrected the stabilizer, re-hooped without stretch, fitted a ballpoint needle and eased the tension, and the design still puckers, the problem is in the file. Wide columns, missing underlay, zero pull compensation and aggressive density are design decisions, not machine settings — and no amount of shop-floor technique will undo them.
You can inspect any design in your browser before you commit fabric to it. Our free DST viewer renders the actual stitch paths, and the DST analyzer reports stitch count and density so you can see whether a file is simply too heavy for the garment you are about to run it on.
Quick Anti-Pucker Checklist
- Use 2.5–3.0 oz cut-away, or no-show mesh on lightweight knits — never tear-away.
- Hoop snug and flat; tap for a dull thud, never a drum sound.
- Add a water-soluble topping on piqué, waffle and fleece.
- Fit a 75/11 ballpoint needle and slow to 600–700 spm.
- Ease top tension 10–15% below your woven baseline.
- Keep satin columns at or under 4 mm; split or fill anything wider.
- Require edge run plus zigzag underlay on every column.
- Add 0.2–0.4 mm pull compensation depending on stretch.
- Open density toward 0.45 mm rather than 0.35 mm.
- Change one thing at a time, and wash the test before approving.
Conclusion
Puckering on knits comes down to a single sentence: a satin stitch pulls inward, and a knit has nothing to push back with. Everything that works — cut-away backing, relaxed hooping, underlay, pull compensation, lighter density — is either giving the fabric resistance or asking less of it.
Start with the stabilizer, because it is free and it solves most cases outright. Work down the list one change at a time. And if the file itself was never built for stretch fabric, fix it at the source rather than fighting it on the machine — the EmbroidAI image-to-embroidery converter generates designs with underlay, pull compensation and sensible density already applied, so your knits start from a file that isn't working against them.
Frequently Asked Questions
Why does my embroidery pucker on t-shirts but not on canvas or denim?
Woven fabrics like canvas and denim have threads locked at right angles, so they barely move when a stitch pulls on them. A knit is built from interlocking loops that can slide and elongate, so the same inward pull from a satin column drags the loops toward the center of the design. The design isn't at fault — the fabric simply has no built-in resistance.
What stabilizer stops puckering on knit fabric?
A 2.5–3.0 oz cut-away is the reliable choice for jersey and interlock, because it stays with the garment permanently and keeps supporting the stitches through every wash. Tear-away fails on knits: it perforates along the needle line and its remaining support is torn away exactly where the fabric needed it. For lightweight or light-colored knits, a no-show mesh cut-away gives the same permanence with far less show-through.
How wide can a satin stitch be on knit fabric?
Keep satin columns at or below about 4 mm on knits. Between 4 and 6 mm the column starts pulling hard enough to distort the fabric, and beyond roughly 8–10 mm the stitches are long enough to snag and to sink into the loops. Wide shapes should be split into narrower columns or converted to a fill stitch.
How much pull compensation should I add for knits?
Roughly 0.15–0.2 mm for a narrow 2 mm column, 0.25–0.30 mm for columns in the 5–6 mm range, and up to about 0.4 mm on very stretchy fabrics like piqué. Pull compensation widens the digitized shape so that after the fabric draws the stitches inward, the finished column measures what you designed.
Does thread tension cause puckering on knits?
It contributes, but it is rarely the root cause. Over-tight top tension pulls the fabric inward at every stitch and makes puckering worse, so easing it about 10–15% below your woven baseline helps. If your stabilizer and hooping are wrong, though, no tension setting will save the stitch-out.
Should I hoop knit fabric tightly to keep it flat?
No — this is the most common mistake. Stretching a knit drum-tight in the hoop means it is embroidered in a stretched state; when you unhoop it, the fabric contracts back to its relaxed size and the stitches, which cannot shrink, buckle the fabric around them. Hoop it snug and flat so it makes a dull thud when tapped, not a high-pitched drum sound.
Why did my embroidery look fine until I washed it?
Knits relax and shrink slightly in their first wash, while the embroidery stays exactly the same size. If the design was stitched onto a stretched or under-stabilized knit, that difference shows up as puckering after washing. Always wash and dry a test piece before approving a design for a production run.
Can better digitizing fix puckering by itself?
It fixes the half of the problem that lives in the file — underlay, pull compensation, density, and column width. It cannot compensate for a tear-away stabilizer or a stretched hoop. Get the material and hooping right first, then make sure the file is built for knits.