Embroidery Basics
Why Does Embroidery Pucker? Causes and Solutions
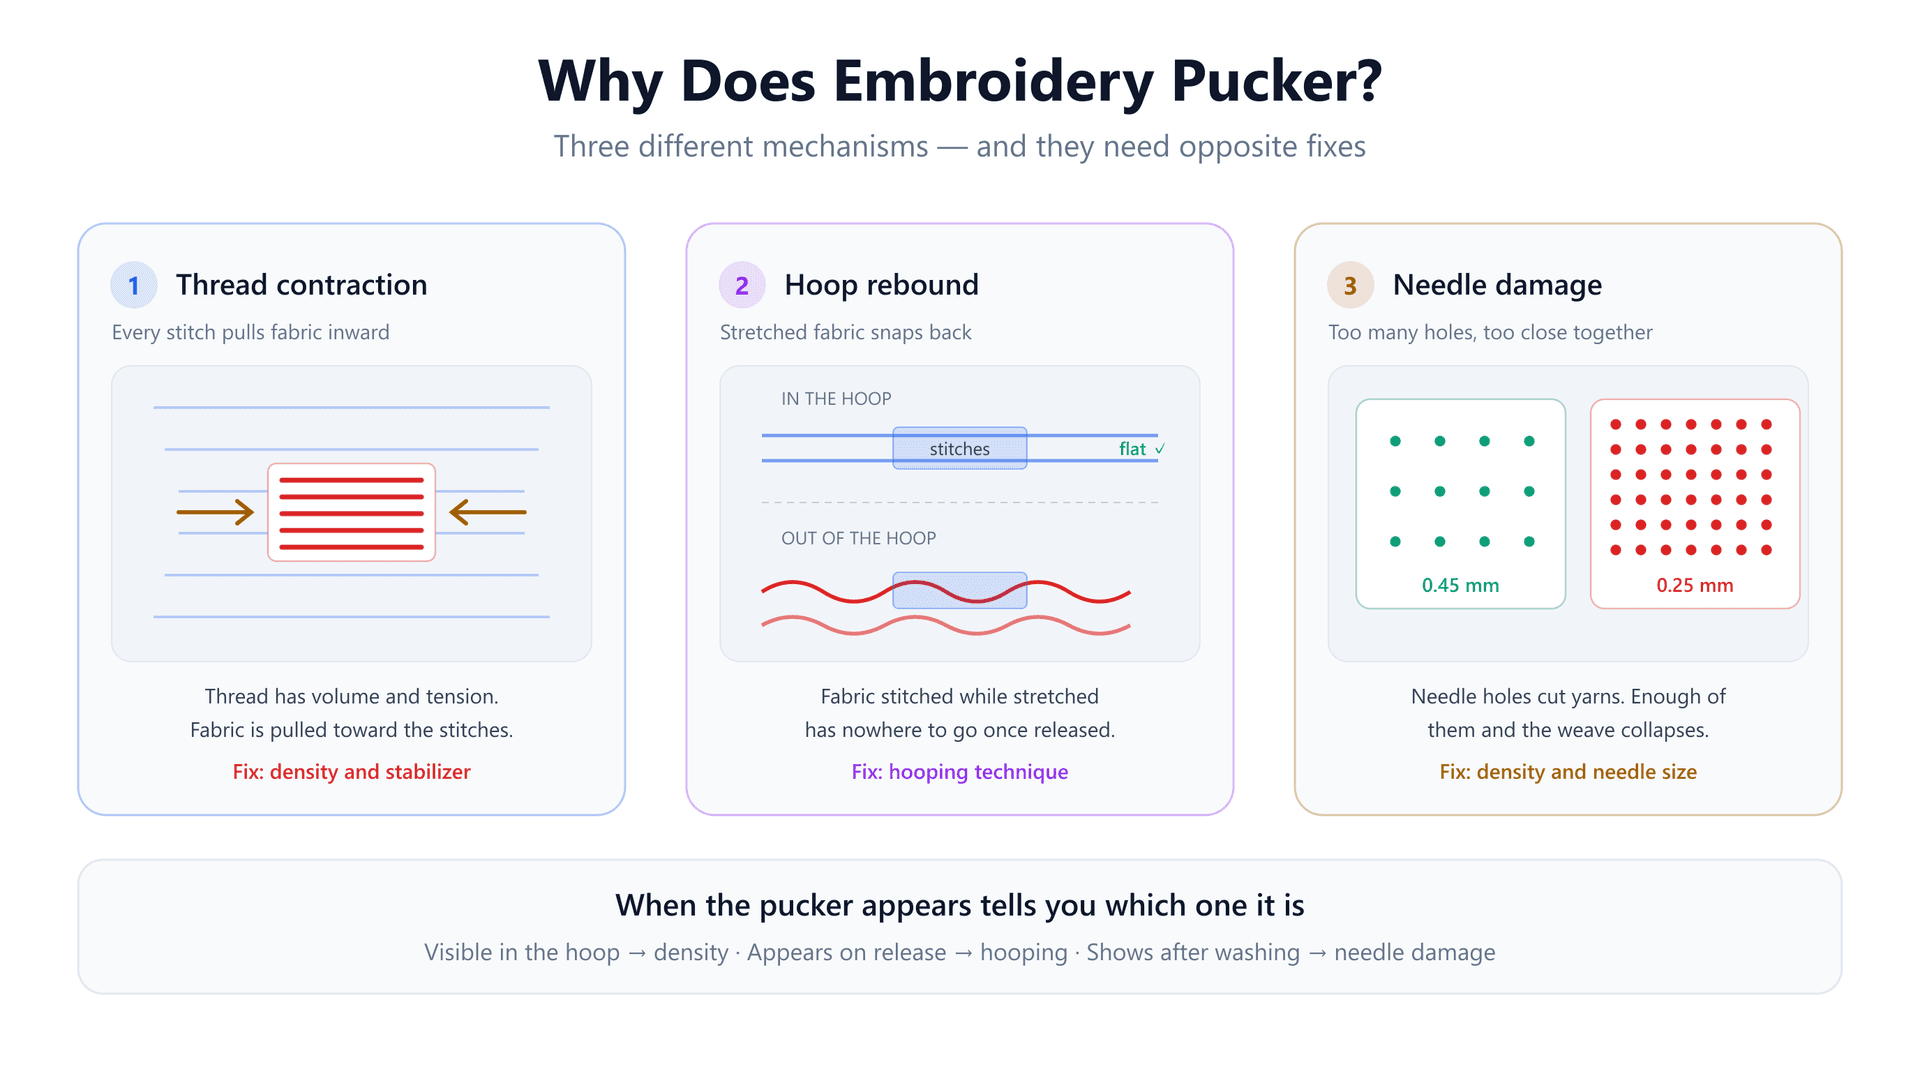
The design looked perfect on the machine. You unclip the hoop, lift the garment out, and the fabric around your logo has gone soft and wavy — small ridges radiating out from the stitching that were not there sixty seconds ago. Press it and they flatten. Let go and they come back.
Almost every guide answers this with the same list: your stabilizer is wrong, your hooping is loose, your tension is off, your design is too dense. All of those appear below. But the list on its own is close to useless, because it does not tell you which one is yours, and the fixes actively contradict each other. Tighten your hooping to solve one cause and you will create another.
There is a much better diagnostic than looking at the pucker, and it costs nothing: when did it appear? Fabric that buckles while still stretched in the hoop has a different cause than fabric that only ripples once released, which is different again from fabric that came off the machine flat and puckered in the wash. Each points at one mechanism and rules out the others.
What Puckering Physically Is
Strip away the embroidery for a moment. Puckering is a simple geometric mismatch: the fabric in an area is longer than the space available for it. Cloth cannot compress, so the excess has nowhere to go but up and out of plane, and it buckles into ridges. That is the whole phenomenon.
Everything that follows is a different route to the same mismatch. Either the available space shrank while the fabric stayed the same length, or the fabric grew longer while the space stayed fixed. Once you see it in those terms, the three causes stop being a list to memorize and become three answers to one question: what changed the length of the fabric relative to its stitching?
A fabric manufacturer weaves cloth expecting nothing to be added to it. Embroidery adds thousands of thread segments, each with real volume and real tension, into a plane that had no room set aside for them. The surprise is not that fabric puckers. It is that it usually does not.
Cause 1: The Thread Pulls the Fabric In
Every stitch is a loop of thread pulled snug against cloth. Snug means under tension, and that tension does not disappear when the needle moves on — it stays locked in the finished stitch, pulling the two penetration points very slightly toward each other. One stitch moves the fabric an amount too small to see.
A fill area contains thousands of them, all pulling in the same direction, and the effect adds up. This is why a design that stitches beautifully at 3 inches puckers when someone scales it to 5 inches without re-digitizing: scaling a stitch file usually stretches the geometry while keeping the stitch count, so the same pulling force gets applied over a larger, less supported area.
This is also where density enters. Density is the gap between adjacent rows of stitching, measured in millimetres, and it is the single most direct control over how much inward pull a design applies. For most woven fabric the working range is 0.40–0.45 mm between rows, with about 0.35 mm as the tight limit. Tighter than that packs more thread — and more pull — into the same area.
The instinct when embroidery looks thin or patchy is to increase density. On a fabric that is already struggling, that is precisely the wrong move. Our guide to stitch density covers the values by fabric type, but the rule for puckering is simple: when in doubt, open it up.
Where the stabilizer comes in
A stabilizer does not stop the thread from pulling. It gives the pull something else to act on — a material stiff enough to resist being drawn inward, bonded or held against the fabric so the fabric cannot move either. The stabilizer absorbs the force the cloth would otherwise absorb by buckling.
Which makes the tear-away versus cut-away decision much less arbitrary than it first appears. Tear-away is engineered to fail along a line of needle perforations — that is its entire purpose. A dense design is a machine for producing needle perforations. So a heavy design on tear-away begins destroying its own support partway through the stitch-out, and the last few thousand stitches land on fabric with substantially less backing than the first few thousand had.
Cut-away does not perforate; it stays under the design for the life of the garment. Use it for anything lightweight, anything stretchy, and anything densely stitched. Tear-away is genuinely fine — on stable, firm wovens carrying light designs, which is a narrower band of work than its popularity suggests.
Worth knowing: stabilizer alone will not rescue an over-dense design. Embroidery Library ran a 35,000-stitch design across fabric and backing combinations and found that quilter's cotton puckered even with cut-away backing, while the same design on medium denim with cut-away came out clean. Backing buys you a lot of margin. It does not buy unlimited margin, and no backing makes a lightweight fabric behave like denim.
Cause 2: The Hoop Rebound
This one produces the most maddening version of the problem: the embroidery looks flawless while hooped, and ruins itself the moment you release it.
The mechanism is worth stating precisely, because the popular phrasing — "hoop it tight" — causes the very failure it is meant to prevent. If you pull fabric taut while hooping, you are stitching into cloth that is held in a stretched state. The stitches anchor that stretched geometry permanently: thread does not have the give the fabric had.
Release the hoop and the surrounding fabric returns to its natural relaxed length. The stitched area cannot, because it is locked. Now the fabric around your design is longer than the design allows for, the excess has nowhere to go, and it buckles. The pucker was built into the garment during hooping, before a single stitch was sewn.
The correct target is taut but not stretched, and there is a reliable test: tap the hooped fabric with a finger. A dull thud is right. A drum note means you have stretched it. If there are wrinkles, do not pull them out — loosen the outer ring, re-seat the fabric, and re-tighten the screw. Hoop the backing and the fabric together as one sandwich so they cannot shift relative to each other, and never try to "hoop out" a crease.
Knits deserve their own warning here, since they stretch far more readily than wovens and are correspondingly easier to hoop wrong. If you work on t-shirts and polos, our guide to puckering on knit fabric goes deeper on the stretch-specific side of this.
Cause 3: Damage and Shrinkage
The third mechanism is the one that passes inspection at the machine and fails at the customer. Two different things hide here, and both surface later.
Needle perforation
A needle does not politely part the yarns of a fabric every time. Push enough holes close enough together and the needle starts cutting yarns rather than displacing them. Each cut yarn is one less structural member holding that area of cloth in shape, and past a threshold the weave loses integrity and collapses into soft, permanent waviness.
This is the failure mode that makes "just add more stitches" dangerous. It also explains why needle choice matters more on fine fabric than most people expect: Madeira recommends 60/8 or 65/9 needles for finer materials, alongside 60 or 75 weight thread (any thread under about 200 dtex). A smaller needle makes a smaller hole; lighter thread needs less tension to seat properly.
Differential shrinkage
Cotton and linen shrink in the wash. Polyester embroidery thread essentially does not. Embroider untreated cotton, wash it, and the fabric contracts around a patch of stitching that stays exactly the same size — so the cloth gathers around a rigid island. The design did nothing wrong; the substrate moved underneath it.
The fix is upstream and cheap: pre-wash and dry shrink-prone garments before embroidering, so the shrinkage happens while the fabric is still blank. This is standard practice on cotton towels, tea towels and unbranded cotton blanks, and skipping it is a common cause of "it was fine when I shipped it" complaints.
Diagnosing Which One You Have
Here is the shortcut that makes this practical. You do not need to evaluate all three causes — the timing of the pucker eliminates two of them for you.
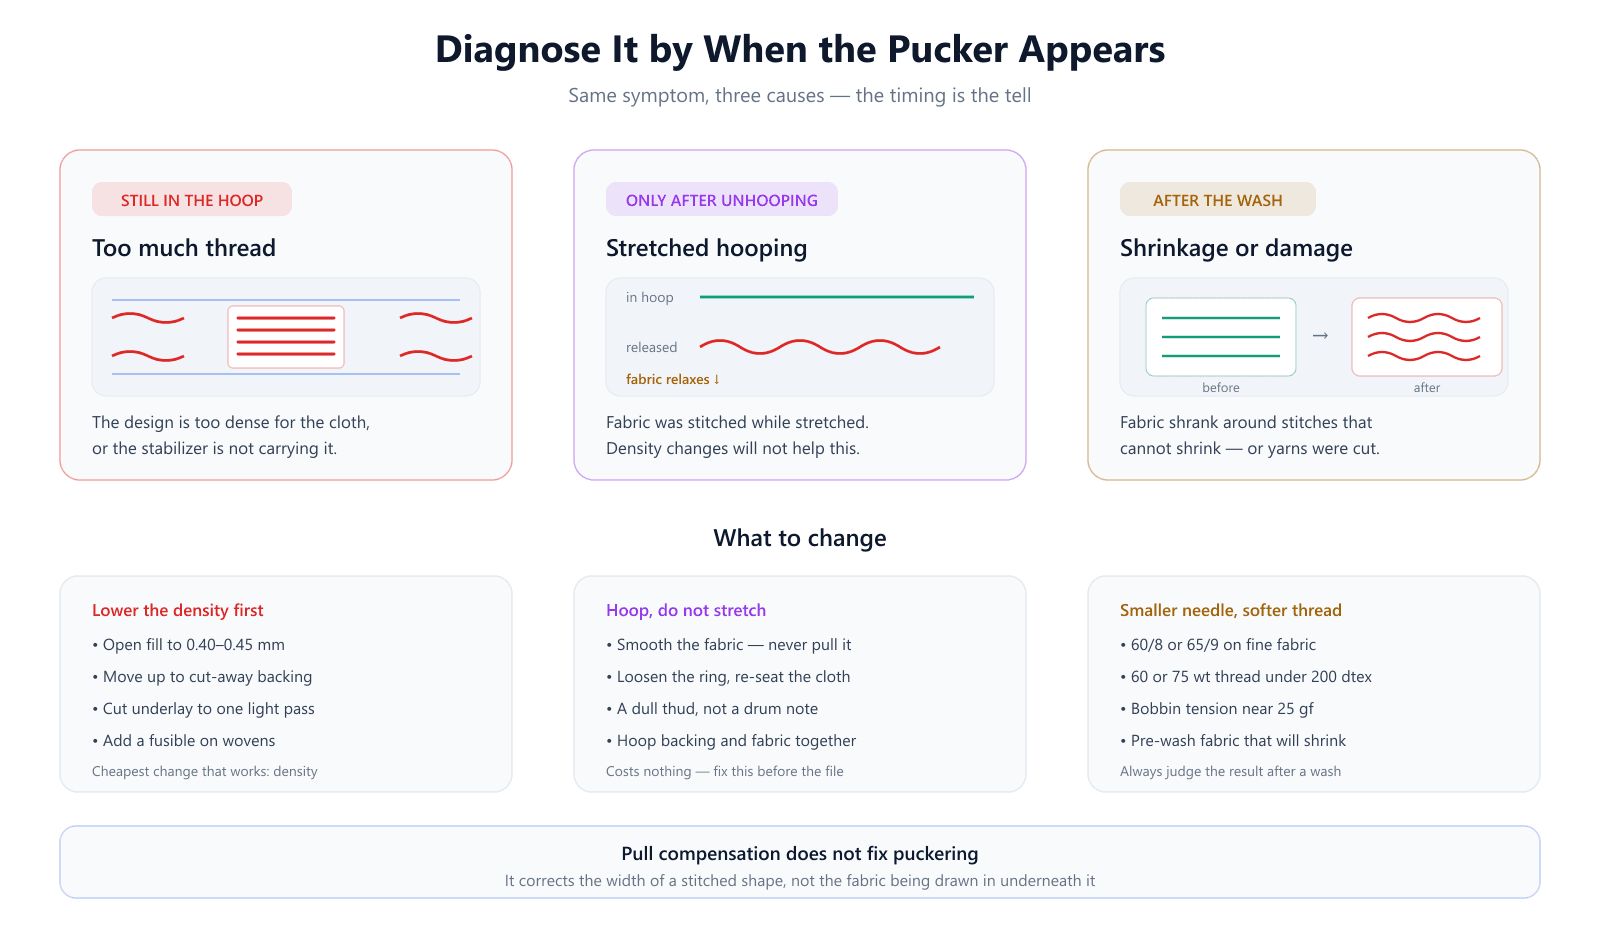
- Visible while still hooped — the fabric is buckling against restraint it cannot overcome, so this is thread pull. The design is too dense for this material, or the stabilizer is not carrying the load. Hooping is not your problem; the fabric is held flat and it is puckering anyway.
- Flat in the hoop, ripples on release — this is hoop rebound, and it is a hooping fault almost every time. The fabric was stretched during hooping and has just returned to its natural length. Density changes will not touch this.
- Came off the machine clean, puckered after washing — shrinkage or delayed perforation damage. Ask whether the fabric was pre-washed and whether the design was dense enough to have cut yarns.
A useful confirmation for the middle case: hoop a scrap of the same fabric with no design at all, leave it for an hour, then release it. If the fabric shows ring marks or does not return to flat on its own, your hooping tension is too high — before embroidery is even involved.
Why Pull Compensation Does Not Fix This
This deserves its own section because it is the most common wrong turn in digitizing, and it wastes a lot of time.
Pull compensation widens shapes in the file to account for thread pulling them narrower as they stitch. Digitize a 4 mm satin column with no compensation and it may sew out at 3.6 mm, so you draw it slightly wider and the stitched result lands at the width you wanted. It is a real and necessary technique.
But look at what it corrects: the dimensions of the stitched shape, not the behavior of the fabric underneath it. The inward force is identical before and after compensation — you have adjusted where the thread lands, not how hard it pulls. A design with textbook pull compensation can pucker just as badly as one with none.
If a shape is coming out narrower than intended, use pull compensation. If the fabric around it is rippling, you need less thread, better support, or better hooping. They are different problems that happen to share a cause.
Fix It in This Order
Work cheapest-first. Each step is reversible and costs less than the one after it, and there is no sense re-digitizing a file to solve a hooping habit.
- 1. Re-hoop. Free, instant, and the single most common cause. Smooth the fabric in, never pull it. Hoop backing and fabric together. Aim for a dull thud, not a drum note.
- 2. Change the stabilizer. Move to cut-away on anything light, stretchy, or densely stitched. Add a fusible backing on troublesome wovens so the fabric is bonded rather than merely held.
- 3. Check tension. Madeira's reference point is bobbin tension near 25 gf, with top tension set from there — the classic target is about one-third bobbin thread showing on the reverse. Over-tight bobbin tension pulls fabric down and puckers it directly.
- 4. Match the needle and thread to the fabric. 60/8 or 65/9 with 60–75 wt thread on fine materials. A blunt or oversized needle punches larger holes than the fabric can absorb.
- 5. Open the density. Move fill spacing toward 0.40–0.45 mm and trim underlay to what the shape actually needs. This is the first change that requires touching the file.
- 6. Re-digitize or re-scale. If the design was scaled without recalculating stitches, or was built dense for a stable fabric and is now going on jersey, regenerate it rather than patching settings.
Test after each step on the same fabric you will actually use — not a stable scrap that will pass regardless — and judge the result after a wash. Puckering from shrinkage and from marginal perforation both hide until the first laundering, and a sew-out that looks perfect on the machine can still fail a week later.
Checking the File Before You Stitch
Some of this is visible before you waste a garment. A design's stitch count relative to its physical size is a decent proxy for how hard it will pull: a small logo carrying a very high stitch count is packing a lot of thread into an area that has to absorb all of it.
You can open a design in our free DST viewer to see the actual stitch layout and spot solid fills packed into small areas, and the DST analyzer reports stitch count and dimensions so you can compare two versions of a design with numbers rather than impressions. A file that looks visually identical to another but carries 40% more stitches will behave very differently on lightweight cloth.
This matters most when the design did not originate with you. Density is invisible in a preview image and shows up on the garment, which is why it is a common corner to cut. If you are generating designs from artwork, our image-to-embroidery converter lets you set the output size before stitches are generated, so the density is calculated for the size you are actually stitching rather than inherited from a design built for different dimensions.
Anti-Pucker Checklist
- Note when the pucker appeared — in the hoop, on release, or after washing. That answers which cause you have.
- Smooth fabric into the hoop; never stretch it. Dull thud, not a drum note.
- Hoop the stabilizer and the fabric together as one sandwich.
- Cut-away for lightweight, stretchy or dense work. Tear-away only on firm wovens with light designs.
- Fill density at 0.40–0.45 mm on most wovens; treat 0.35 mm as the tight limit.
- Underlay does its job in one light pass — extra underlay is extra pull.
- 60/8 or 65/9 needle with 60–75 wt thread on fine fabrics.
- Bobbin tension around 25 gf; roughly one-third bobbin thread visible on the reverse.
- Pre-wash and dry cotton or linen blanks before embroidering them.
- Do not reach for pull compensation — it corrects shape width, not fabric distortion.
- Test on the real fabric, and judge it after a wash rather than off the machine.
Conclusion
Puckering is one symptom with three unrelated causes, and the reason it is so persistent is that people fix the wrong one. Fabric buckles because it has become longer than the space it occupies — whether the thread pulled that space closed, the fabric rebounded after being stitched under stretch, or the cloth shrank around stitching that could not shrink with it.
Let the timing tell you which. Puckering in the hoop is a density and support problem. Puckering on release is a hooping problem. Puckering after the wash is a shrinkage or damage problem. Then fix in cost order — hooping, stabilizer, tension, needle, density, file — and confirm it survived a wash before running the batch.
If you suspect the file rather than your setup, load it into the DST analyzer and look at the stitch count against the design's size. On a design that keeps puckering no matter how carefully you hoop, that number is usually where the answer has been all along.
Frequently Asked Questions
Why does my embroidery pucker?
Puckering means the fabric around your stitches is longer than the space it has to sit in, so it buckles. Three separate things cause that: the thread physically drawing the fabric inward as it stitches, fabric that was stretched in the hoop springing back once released, and fabric shrinking or losing structure after washing. They look identical in the finished garment but need completely different fixes, which is why the timing of when the pucker appeared matters more than what it looks like.
How do I stop embroidery from puckering?
Work in cost order. First check hooping, because it is free: the fabric should be smoothed into the hoop and never pulled tight, and the backing should be hooped together with it. Then match the stabilizer to the fabric — cut-away for anything lightweight or stretchy, since tear-away disintegrates at the needle line and stops supporting the design. Only then open up the design's density toward 0.40–0.45 mm. Changing the file is the most expensive fix, so verify the first two before you touch it.
Does pull compensation fix puckering?
No, and this is the most common misunderstanding in digitizing. Pull compensation widens a shape in the file so that after the thread draws it in, the stitched result matches the intended width. It is a correction to the geometry of the shape, not to the fabric underneath it. A design with perfect pull compensation can still pucker badly, because the fabric is still being pulled inward by exactly the same amount. If you are puckering, the design is likely too dense for that material.
Should embroidery fabric be tight in the hoop?
Taut, but never stretched. The test is acoustic: tap the hooped fabric and you want a dull thud, not a drum note. If it sounds like a drum you have stretched it, and any fabric not locked under stitches will relax when the hoop comes off, pushing the excess into ripples around the design. Smooth the fabric into place instead of pulling it, and if there are wrinkles, loosen the ring and re-seat the cloth rather than tugging them out.
What stitch density stops puckering?
For most woven fabric, 0.40–0.45 mm between fill rows is the working range, and 0.35 mm is about as tight as you should go. Lighter and softer materials want the looser end. Tightening density is almost never the fix for a quality problem — going below roughly 0.35 mm on a lightweight fabric puts so many needle holes in a small area that the yarns start being cut rather than pushed aside, which weakens the cloth and causes puckering rather than curing it.
Why does my embroidery pucker only after washing?
Two things surface in the wash. Untreated natural fibers like cotton and linen shrink, and the embroidered patch cannot shrink with them because polyester thread is dimensionally stable — so the fabric draws up around a rigid island of stitching. The second is delayed damage: if the design perforated the fabric, agitation finishes what the needle started. Pre-wash and dry garments made from shrink-prone fabric before embroidering, and always judge a test sew-out after a wash, not straight off the machine.
Is tear-away or cut-away stabilizer better for puckering?
Cut-away, for anything lightweight, stretchy, or densely stitched. Tear-away is designed to break along the needle perforations, which is exactly what happens during a dense design — it begins disintegrating while stitching is still in progress and leaves nothing supporting the fabric for the rest of the run. Cut-away stays intact for the life of the garment. Tear-away is fine on stable, firm wovens with light designs, which is a narrower case than most people assume.
Can you fix embroidery that has already puckered?
Mild puckering from hooping or light shrinkage often relaxes with steam: hold an iron just above the back of the piece without touching it, let the fibers relax, and let it dry flat. That works because you are letting stretched fibers return to their natural length. What steam cannot fix is a design too dense for the fabric or one that cut the yarns — the fabric is physically shorter or damaged, and no amount of pressing adds material back. At that point the file has to change before the next run.