Tutorials
How to Convert SVG to DST: A Complete Walkthrough
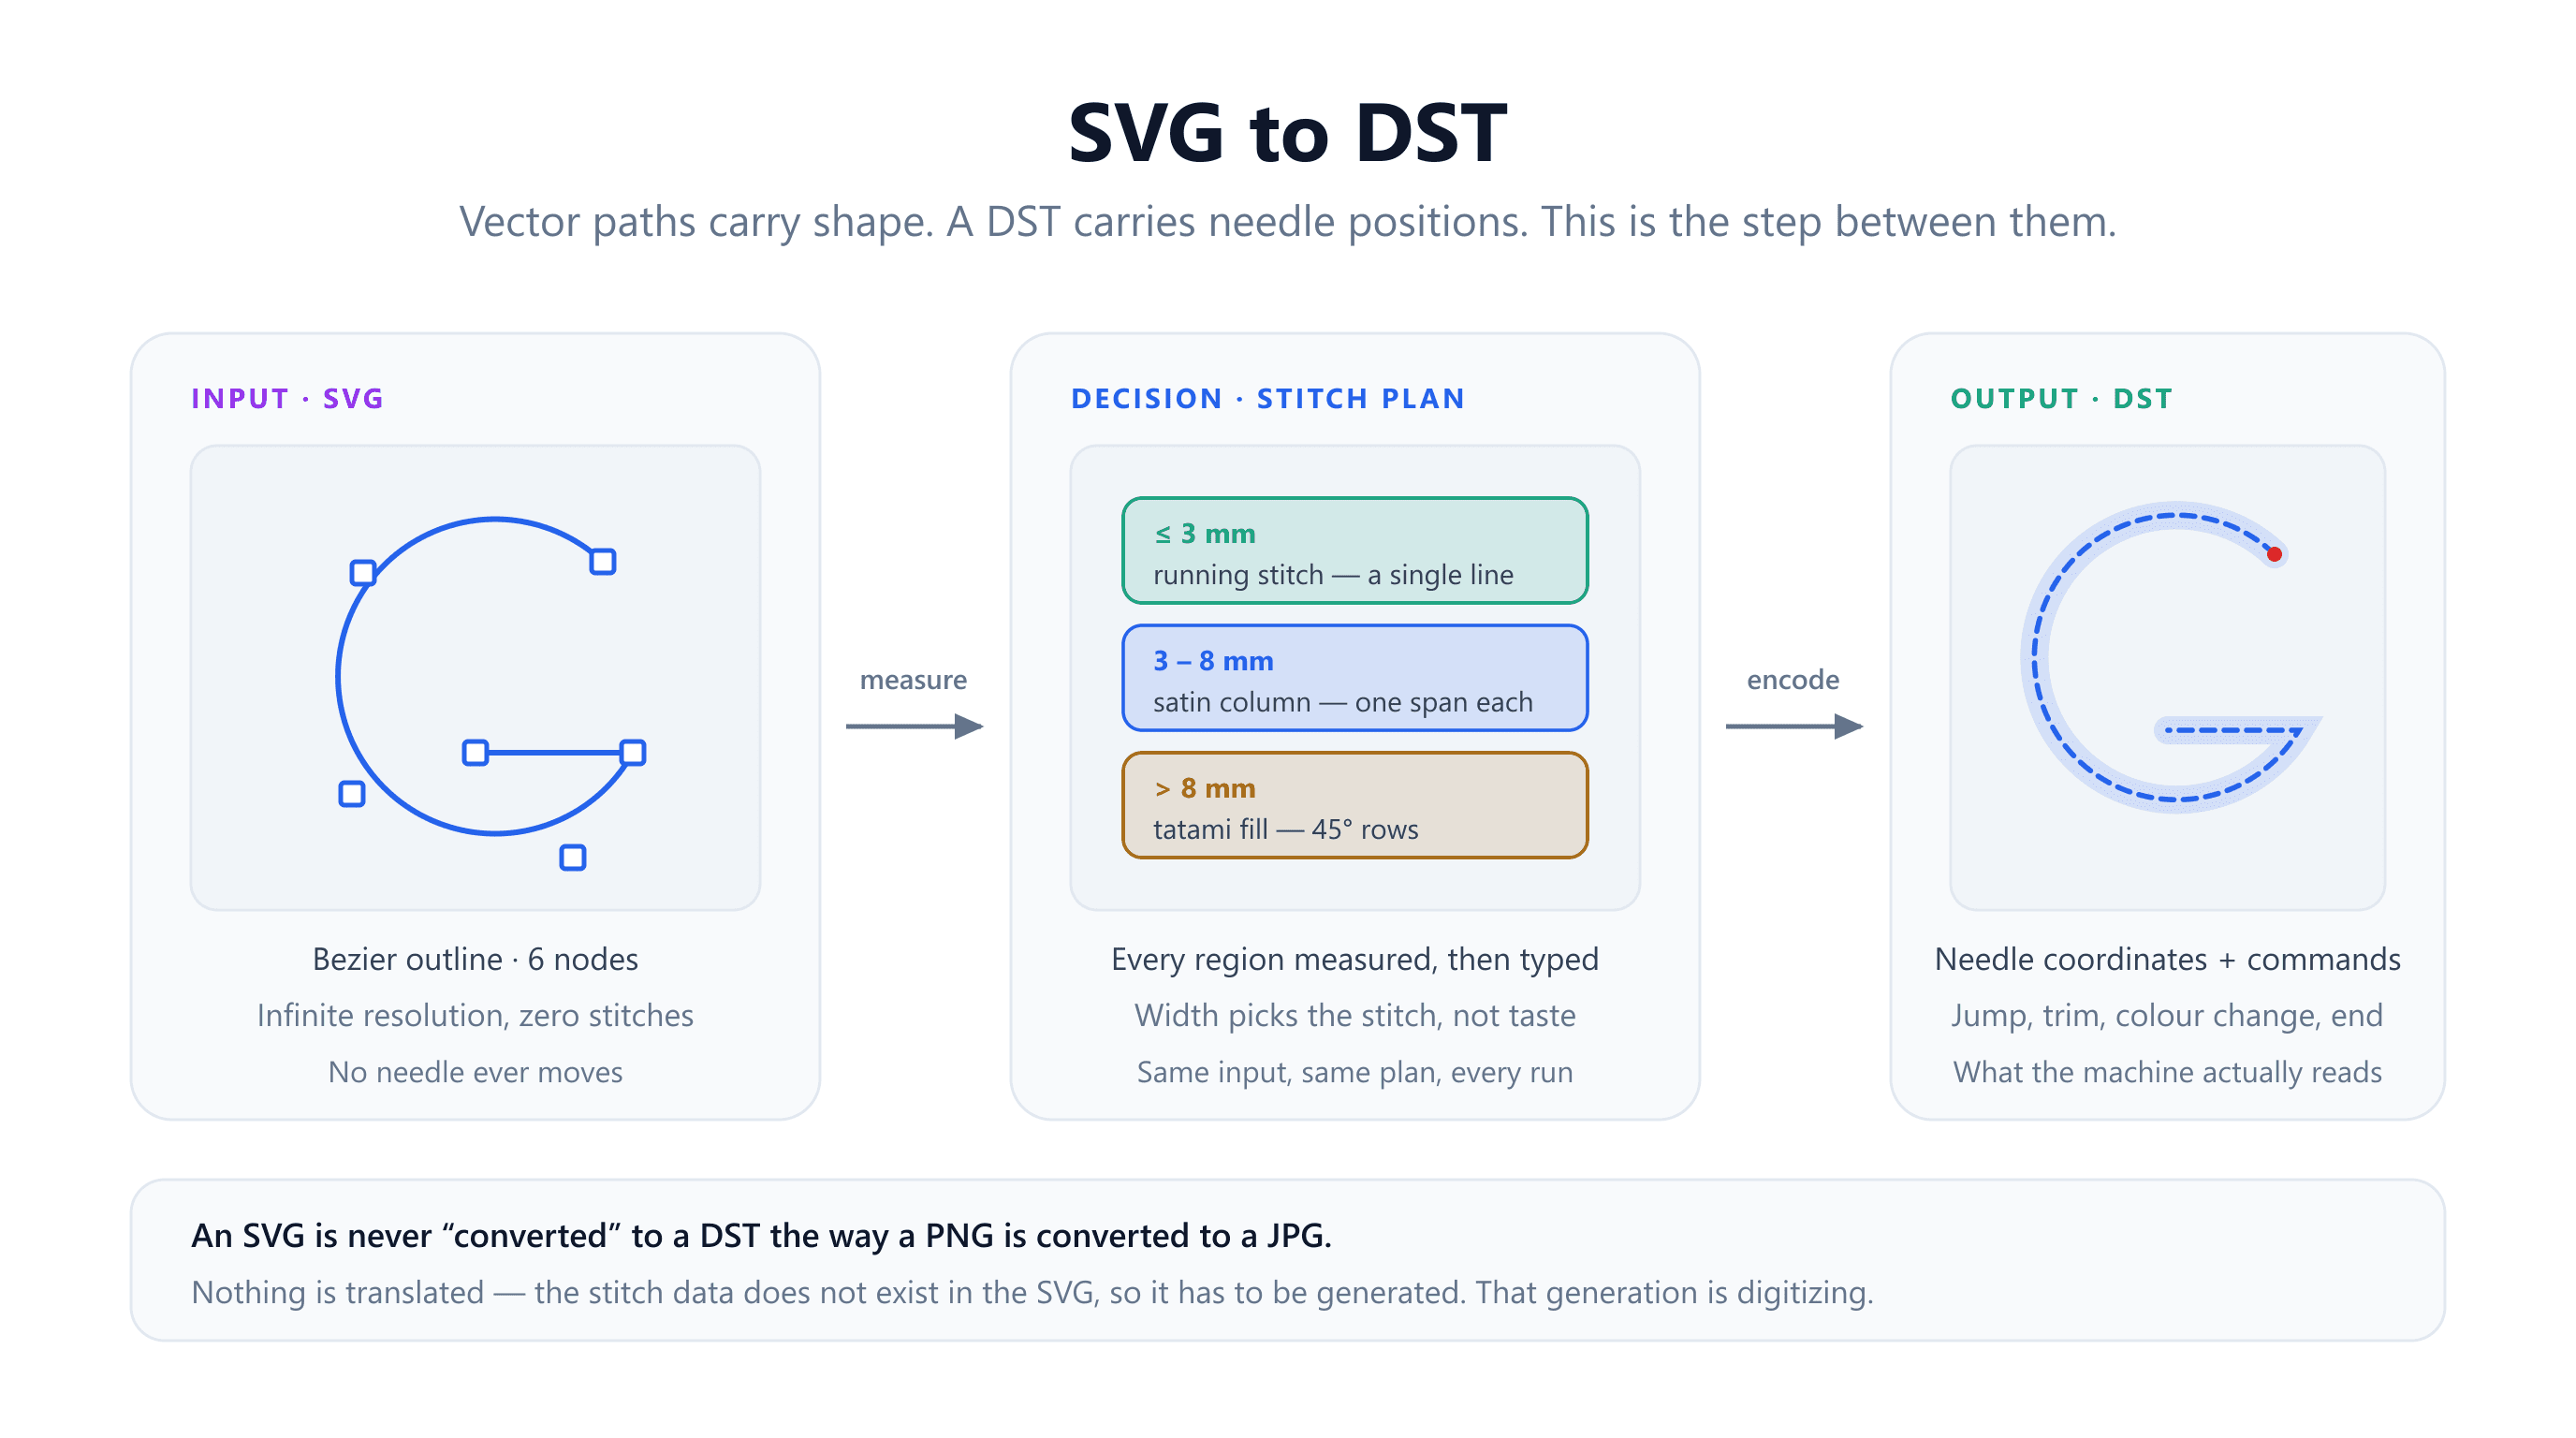
You have a logo as an SVG. It is already vector, already clean, already infinitely scalable — so handing it to an embroidery machine should be the easy part. Then you discover the machine will not open it, and every tool that promises to convert SVG to DST is quietly doing something far more involved than a file conversion.
The reason is simple once you see it. An SVG describes where the edges of a shape are. A DST describes where the needle goes, in order. Those are not two encodings of the same information — the second one does not exist anywhere in the first. It has to be invented.
This guide covers what that invention actually involves, the four steps to do it, the specific things in an SVG that get thrown away without warning, and how to read the resulting stitch plan so you catch problems on screen instead of on a ruined shirt.
Why This Is Not Really a File Conversion
Converting a PNG to a JPG is a translation. The same pixels come out the other side, encoded differently. Nothing is created and nothing is decided.
Going from SVG to DST is not like that. Consider a single circle in your artwork. The SVG says: a closed curve, centred here, this radius, filled with this colour. That is the complete description. Now consider what the machine needs to know before it can sew that circle:
- Should the outline be sewn as a line, or should the interior be covered with thread?
- If covered, in which direction do the rows run, and how far apart?
- Where does the needle enter first, and where does it finish?
- How does it get there from the end of the previous shape — and is that trip long enough to need a trim?
- Which of these shapes share a thread, so they can all be sewn before the operator changes colour?
None of those answers are in the SVG. Every one of them is a decision, and the collection of those decisions is what the industry calls digitizing. When a tool converts your SVG to DST, it is making all of them on your behalf. The difference between a good result and a bad one is almost never the file format — it is whether those decisions were reasonable for your artwork.
This is also why the honest answer to “can I just rename it?” is no. There is nothing to rename. You can read more about the target format in our guide to what a DST file is.
The One Real Advantage of Starting in SVG
Here is the good news, and it is worth more than it first appears. When you upload a PNG or a photo, the very first thing that happens is vectorizing: the image is traced to find shape boundaries. That stage is lossy in a way that is hard to undo. Anti-aliased edges become slightly wobbly paths. JPEG compression artifacts become false detail. A thin line can break into fragments. Two colours that looked distinct on screen merge into one blob.
An SVG already contains the outlines, drawn deliberately by whoever made the file. So vectorizing is skipped entirely — the paths go straight into the stitch planner exactly as they were drawn. You begin the hard part with correct geometry instead of a guess at it.
If you are weighing which source file to start from, this is the whole argument for hunting down the vector original rather than working from a screenshot. Our companion guide on converting PNG to DST covers the raster path in detail, including how to get the most out of a trace when a vector simply is not available.
Converting an SVG to DST in Four Steps
The workflow below uses the EmbroidAI upload workspace, but the stages map onto any digitizing tool — the names of the settings change, the decisions do not.
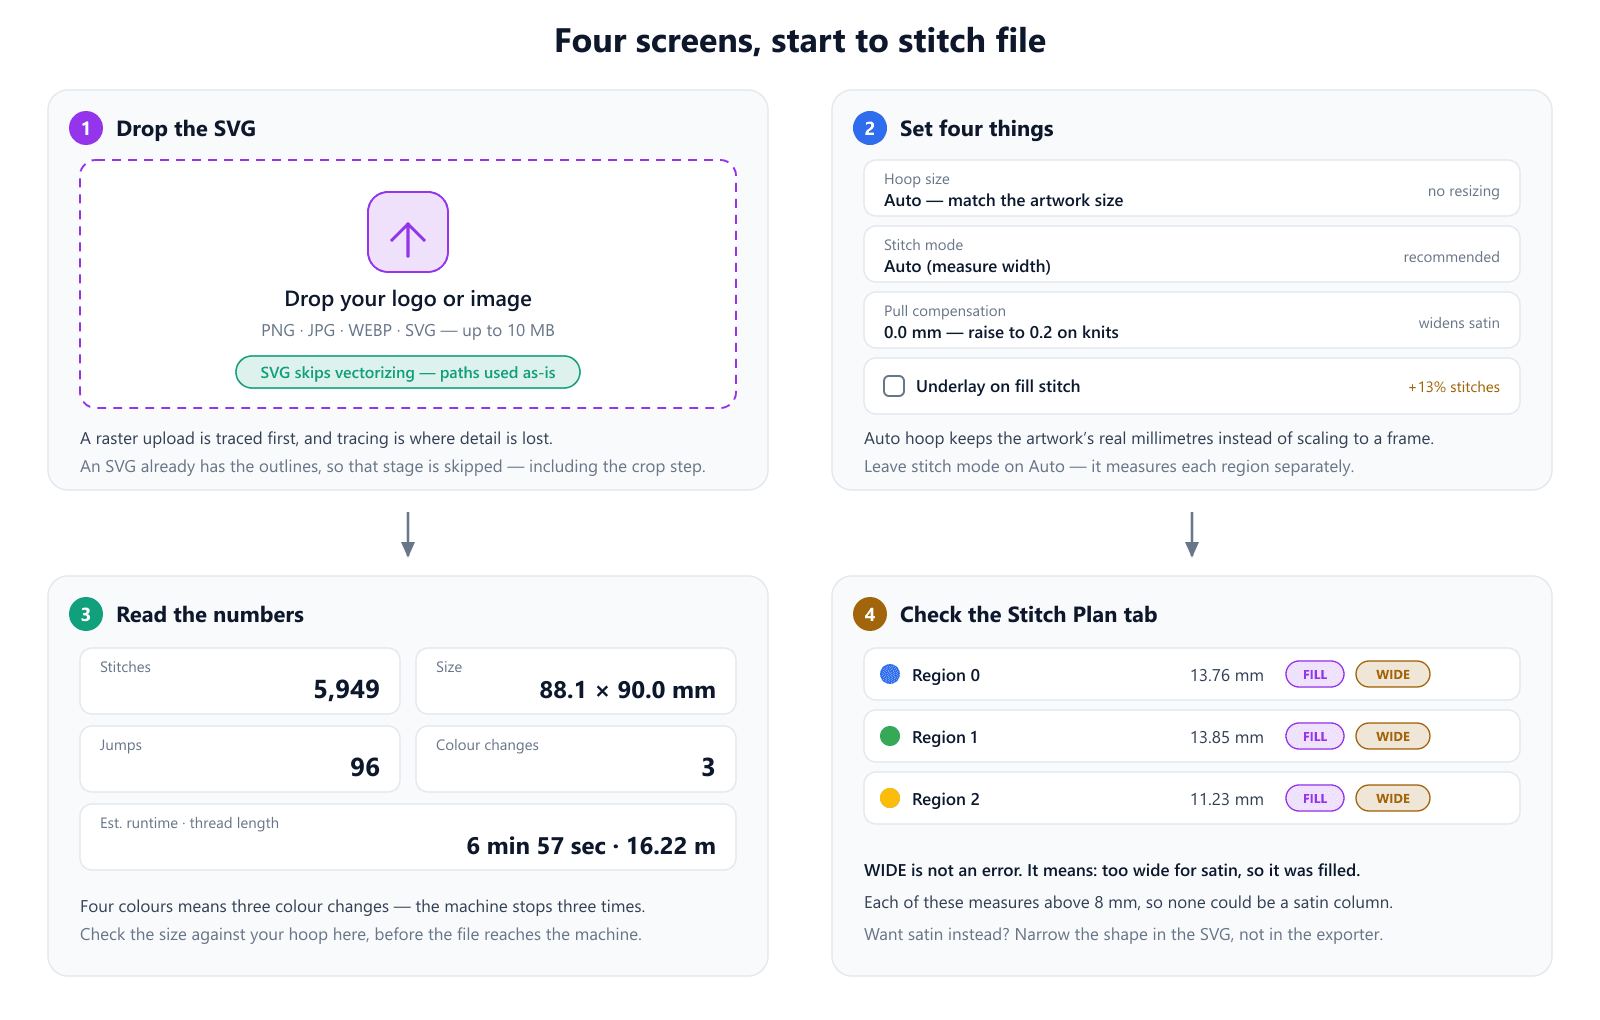
1. Upload the SVG
Drop the file into the workspace. An SVG bypasses both the vectorizing stage and the crop dialog that raster uploads go through, because cropping is a pixel operation and running a vector through it would rasterize the very data you are trying to preserve.
You should immediately see a path count in the preview header — something like 800×800 · 4 paths. Check that number against what you expect. If a four-colour logo reports one path, your shapes are grouped or clipped in a way that will collapse them; if it reports two hundred, your file has stray nodes or a traced background that will produce a mess of tiny regions.
2. Set hoop, stitch mode and compensation
Four settings matter, and the defaults are right for most first attempts.
Hoop sizedefaults to Auto, which keeps the artwork's own dimensions and does not resize anything. That is usually what you want when the SVG was drawn at its finished size. Choose a specific hoop instead — 100×100, 130×180 and so on — and the design is scaled to fit inside a 5 mm safety margin on each side, so a 100×100 mm hoop takes a 90×90 mm design. The fabric nearest the ring is under the most tension and is unreliable to sew, which is what the margin is protecting you from.
Stitch mode should stay on Auto (measure width). The alternatives force every region to fill, satin or outline regardless of size, which is occasionally useful and usually a mistake — forcing satin on a 14 mm shape produces stitches long enough to snag on everything.
Pull compensation starts at 0 mm. Thread under tension pulls a satin column narrower than you drew it, and this setting widens the shape to cancel that out. Leave it at zero for stable wovens; raise it to roughly 0.2 mm for jersey and other knits, and toward 0.3–0.4 mm on very stretchy fabric like piqué.
Underlay on fill stitch is off by default because it adds roughly 13% more stitches. Turn it on for knits, fleece and towelling, where it tacks the fabric down and stops the visible stitches sinking into the pile. On a stable woven it is largely wasted thread and runtime.
3. Read the numbers before you download
Once the design is generated you get a stitch simulation and a stats panel. This panel is the cheapest quality check in the whole process, and it takes about fifteen seconds to read.
- Size — compare it against your hoop's usable area, not its nominal size. A 88.1 × 90.0 mm design will not fit a 100 × 100 mm hoop's 90 × 90 mm working area with any margin to spare.
- Stitches — a rough sanity check on density. Roughly 6,000 stitches for a 88 × 90 mm four-colour mark is reasonable; ten times that for the same area means something is being sewn far too densely.
- Colour changes — always one fewer than your colour count. Four threads means three stops, each one an operator intervention on a single-needle machine.
- Jumps — needle travel between areas. A high count on scattered small shapes means frequent trims and a slower run.
- Estimated runtime — the number to quote when someone asks how long a batch takes. Multiply by your garment count before promising a deadline.
Have an SVG ready? Upload it and see the stitch plan before you commit thread to it.
Convert an SVG4. Read the stitch plan
The Stitch Plan tab is where the digitizing decisions become visible, and it is the part almost everyone ignores. It lists every region with its measured width, the stitch type it was assigned, and any flags.
This is where you find out that your four beautifully drawn coloured segments all measured between 11 and 14 mm and were therefore filled rather than satined — before you discover it on fabric. Which brings us to the rule that governs nearly everything here.
Width Decides the Stitch, Not Preference
Most confusion about SVG-to-DST conversion disappears once you internalize this: the stitch type is chosen by measuring the shape, and the measurement is not negotiable from the settings panel.
A satin stitch is a single span of thread crossing a shape from one edge to the other. That definition contains its own limit. If the shape is wider than a stitch can usefully span, satin is physically the wrong answer — the thread would be long, loose, and ready to catch on the first thing it touches. So there are three bands:
- At or below 3 mm — a running stitch. The shape is too narrow for a column to mean anything, so it becomes a single line of stitches along its centre.
- Between 3 mm and 8 mm — a satin column. Each stitch crosses the full width, giving the glossy raised look satin is prized for.
- Above 8 mm — a tatami fill. Rows of running stitch laid at 45 degrees to the design, spaced so each row overlaps its neighbour and no fabric shows through.
The 45-degree angle is deliberate rather than decorative: rows running parallel to the fabric's weave sink into it and read as visible stripes, so fills are laid on the bias. And the two bands meet exactly at 8 mm with no gap and no overlap — at or below it, satin; above it, fill. There is no ambiguous middle zone.
When a region is flagged WIDE in the plan, that is the system telling you it measured past the satin ceiling and fell into the fill band. It is a report, not a warning. The Google-style mark in the screenshots above has four regions measuring 11.23, 13.76, 13.85 and 13.92 mm — every one of them is well past 8 mm, so all four are fills, and no export setting will change that. If you want satin, the shape itself has to get narrower in your vector editor.
Prepare the SVG Before You Upload
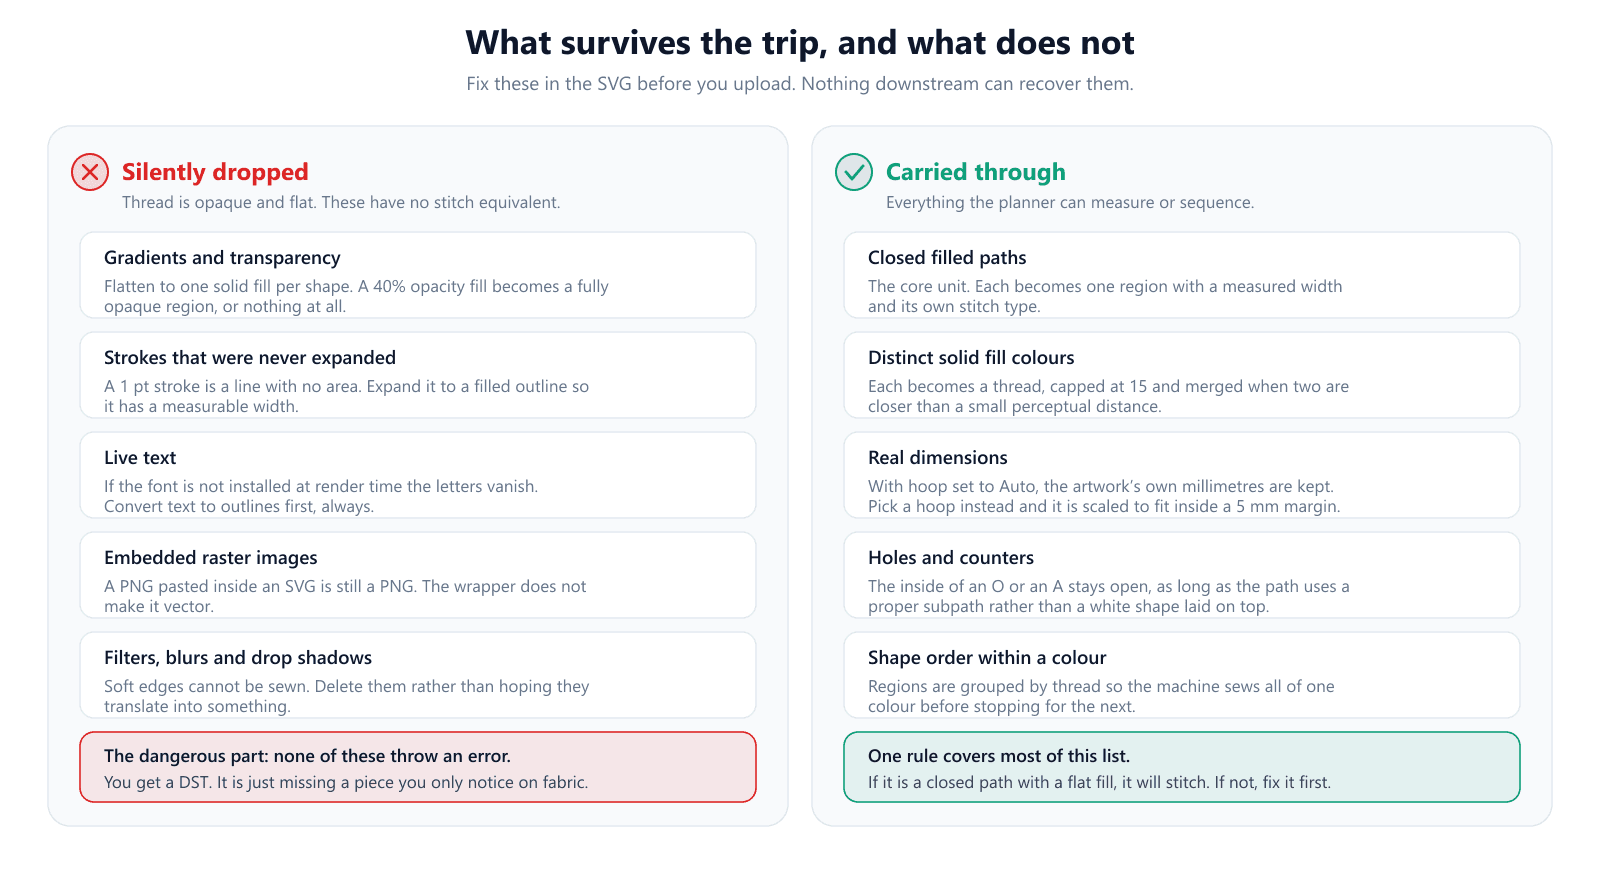
Because the paths are used as-drawn, the quality of your SVG sets a ceiling on the result. Most bad conversions trace back to something in the source file that thread cannot express — and the dangerous part is that these failures are silent. You still get a DST. It is just missing something.
Flatten every gradient and transparency
Thread is opaque and one colour along its length. There is no stitch that is 40% visible, and no way to fade from red to orange within a single region. A gradient either collapses to a single flat colour or disappears. Decide which solid colour you want and set it yourself, rather than letting the tool guess.
The same applies to overlapping semi-transparent shapes, where the blended colour you see on screen exists nowhere in the file. What gets read is the underlying fill, which is often not the colour you designed around.
Expand your strokes
This one catches people constantly. A stroke in SVG is a line style applied to a path, not a shape — it has no area to measure. A 1 pt outline around a letter looks like a solid border on screen but presents no width to a system that decides stitch type by width.
Expand strokes into filled shapes before uploading: Path → Stroke to Path in Inkscape, Object → Expand in Illustrator. Now the outline is a closed region with real dimensions, and it will be measured and assigned a stitch type like everything else. Aim for at least 1 mm of finished width on anything you want visible — below that, the machine cannot reliably place a column at all.
Convert text to outlines
Live text in an SVG is a reference to a font. If that font is not available wherever the file is processed, the letters render as something else or vanish. Convert every text element to paths before you export. This is standard practice for print artwork too — embroidery just punishes the omission more visibly.
While you are there, check your smallest lettering. Text under about 5 mm cap height is at the edge of what a machine can form cleanly, because the satin columns making up the letter strokes approach the 1 mm minimum where stitches stop landing reliably.
Check for embedded raster images
An SVG can contain an embedded PNG or JPEG. The wrapper is vector; the contents are not. If your “vector” logo was produced by pasting a bitmap into a new SVG document, you have a raster file with a misleading extension, and it will not skip the vectorizing stage in any meaningful sense. Open the file in a text editor and search for <image or data:image — if either appears, that part of your artwork is pixels.
Set the artboard to the finished size
Because stitch type is decided in millimetres, the size you draw at is not cosmetic — it changes the output. A shape that is 6 mm wide becomes a satin column; the same shape scaled to half size measures 3 mm and becomes a running stitch. Set your artboard to the real embroidered dimensions before exporting, so what you see measured in the plan is what you intended.
Common finished sizes worth designing to:
- Left chest logo — 70 to 90 mm wide.
- Cap front — about 50 mm tall, and keep clear of the seam.
- Full back — up to roughly 280 mm wide, hoop permitting.
- Sleeve or cuff — 40 to 60 mm, where fine detail rarely survives.
What Happens to Your Colours
Each distinct solid fill in the SVG becomes its own thread, and the design is sewn colour by colour with a colour change between groups. Two details are worth knowing.
First, near-identical colours are merged. Two fills that differ by a perceptually tiny amount — the kind of difference that comes from anti-aliasing or a careless copy-paste rather than a design decision — are treated as one thread. This stops a logo that looks like four colours from being planned as eleven. There is also a ceiling of 15 threads, matching the needle count of a common commercial head, with the least-used colours folded into their nearest neighbour beyond that.
Second, and more surprising: the DST file itself does not store colours at all. The format records colour-change stops and nothing else — no palette, no thread brand, no RGB. It was designed for machines whose control units had no screen, and that austerity is precisely why DST runs on virtually every commercial machine ever built.
The practical consequence is that your colour information has to travel next to the file, not inside it. The thread order shown in the stitch plan is that list — the sequence an operator follows when loading the machine. Save it or print it alongside the DST. If you want colours embedded in the file itself, you need a format like PES; the trade-offs are covered in our DST vs PES comparison.
Verify Before You Commit Fabric
A DST that downloads successfully is not the same as a DST that sews well. Three checks catch nearly everything, and all of them happen on screen.
Watch the simulation. Play the stitch-out and watch the order. You are looking for the needle travelling back and forth across the design repeatedly instead of finishing one area before moving on — that pattern means excess jumps, more trims and a longer run.
Check the size against the usable hoop area.Not the hoop's nominal size. A 100 × 100 mm hoop has about 90 × 90 mm of reliable sewing area once the tensioned edge is excluded.
Open the finished file fresh. Re-open the downloaded DST in a DST viewer and confirm it contains what you expect. This catches a truncated download or a wrong file far more reliably than trusting the preview you were already looking at. For a density and stitch count breakdown, the DST analyzer reports whether a design is simply too heavy for the garment you are about to run it on.
Then sew one test piece on the same fabric as the real job, and judge it after a wash rather than straight off the machine.
Pre-Upload Checklist
- Artboard set to the real finished size in millimetres.
- All gradients and transparency flattened to solid fills.
- Strokes expanded into closed filled shapes.
- Text converted to outlines.
- No embedded raster images — check for <image in the source.
- Filters, blurs and drop shadows deleted.
- Colour count reduced to the threads you will actually load.
- Shapes you want as satin narrowed to 8 mm or less.
- Nothing you need to keep thinner than about 1 mm.
- Path count in the preview matches what you expect.
Conclusion
Converting an SVG to DST comes down to one sentence: the SVG says where the edges are, and everything else — stitch type, direction, order, travel — has to be generated. Starting from vector saves you the lossy tracing step, but it does not save you from the digitizing decisions, because those decisions were never in any source file to begin with.
Clean the SVG first, because the paths are used exactly as drawn. Then read the stitch plan rather than skipping to the download — the region widths tell you what the machine is actually going to do, and a WIDE flag is information you want on screen rather than on a garment. When you are ready, the EmbroidAI converter takes the SVG straight through to a downloadable DST with the full plan visible before you commit, and the same output is deterministic — the same file with the same settings gives you the same stitches every time.
Frequently Asked Questions
Can I just rename an SVG file to .dst?
No. The two files do not contain the same kind of information, so there is nothing to rename. An SVG stores shape outlines as mathematical curves; a DST stores a sequence of needle coordinates and machine commands. Renaming produces a file your machine will reject or read as garbage, because the stitch data was never in the SVG to begin with. It has to be generated, and that generation is called digitizing.
Is converting an SVG to DST easier than converting a PNG?
Yes, and meaningfully so. A raster file has to be traced into outlines first, and tracing is lossy — anti-aliased edges become wobbly paths, JPEG noise becomes false detail, and a thin line can break apart. An SVG already contains the outlines, so that entire stage is skipped and the paths are used as they were drawn. You start the digitizing step with clean geometry rather than an approximation of it.
Why did my SVG shapes come out as fill instead of satin?
Because of their width. A satin stitch is a single thread span from one edge of a shape to the other, so it only works while the shape is narrow enough for one stitch to cross it — up to about 8 mm. Anything wider gets a tatami fill of parallel rows instead. If a region shows a WIDE flag, it measured above that ceiling. That is a decision, not an error, and the fix is to narrow the shape in your vector editor rather than to change an export setting.
What size should my SVG be for embroidery?
Set the artboard to the real finished size in millimetres. A left-chest logo is typically 70–90 mm wide, a cap front around 50 mm tall, and a full back up to roughly 280 mm. Getting this right in the SVG matters because every stitch decision downstream is made from measured millimetres — the same artwork at half the size may fall below the satin threshold and change stitch type entirely.
Do DST files store my thread colors?
No. The Tajima DST format records only colour-change stops, never a palette — it dates from machines whose control heads had no screen. That is why a DST often opens looking like one flat colour in other software. Your colour sequence has to travel alongside the file as a thread list, which is what the stitch plan's thread order gives you.
Why does my design have so many jumps?
A jump is the needle travelling between two areas without sewing. Multi-colour artwork with many separate shapes naturally produces them — a four-colour logo with scattered regions can easily hit 90 or more. They are only a problem when they are long: any jump over about 5 mm gets a trim command before it, so a high jump count on a design with distant small parts means more thread trims and more time. Merging small isolated shapes of the same colour is the usual fix.
Does converting an SVG to DST lose quality?
It loses things thread cannot reproduce, which is a different problem from resolution. Gradients, transparency, blurs and drop shadows have no stitch equivalent and are dropped. The geometry itself is not degraded — curves are sampled finely enough that the stitched edge follows the original path. The quality you should worry about is whether the design was built for thread at all, not whether the file survived conversion.
Should I expand strokes before converting an SVG?
Yes, on anything you want stitched as a solid shape. A stroke is a line with no area, so it cannot be measured for width and may be ignored or reduced to a single running stitch. Expanding it (Path → Stroke to Path in Inkscape, Object → Expand in Illustrator) converts it into a closed filled outline with real dimensions the planner can measure and assign a stitch type to.