Embroidery Basics
The 6 Types of Underlay in Embroidery — and How to Pick the Right One
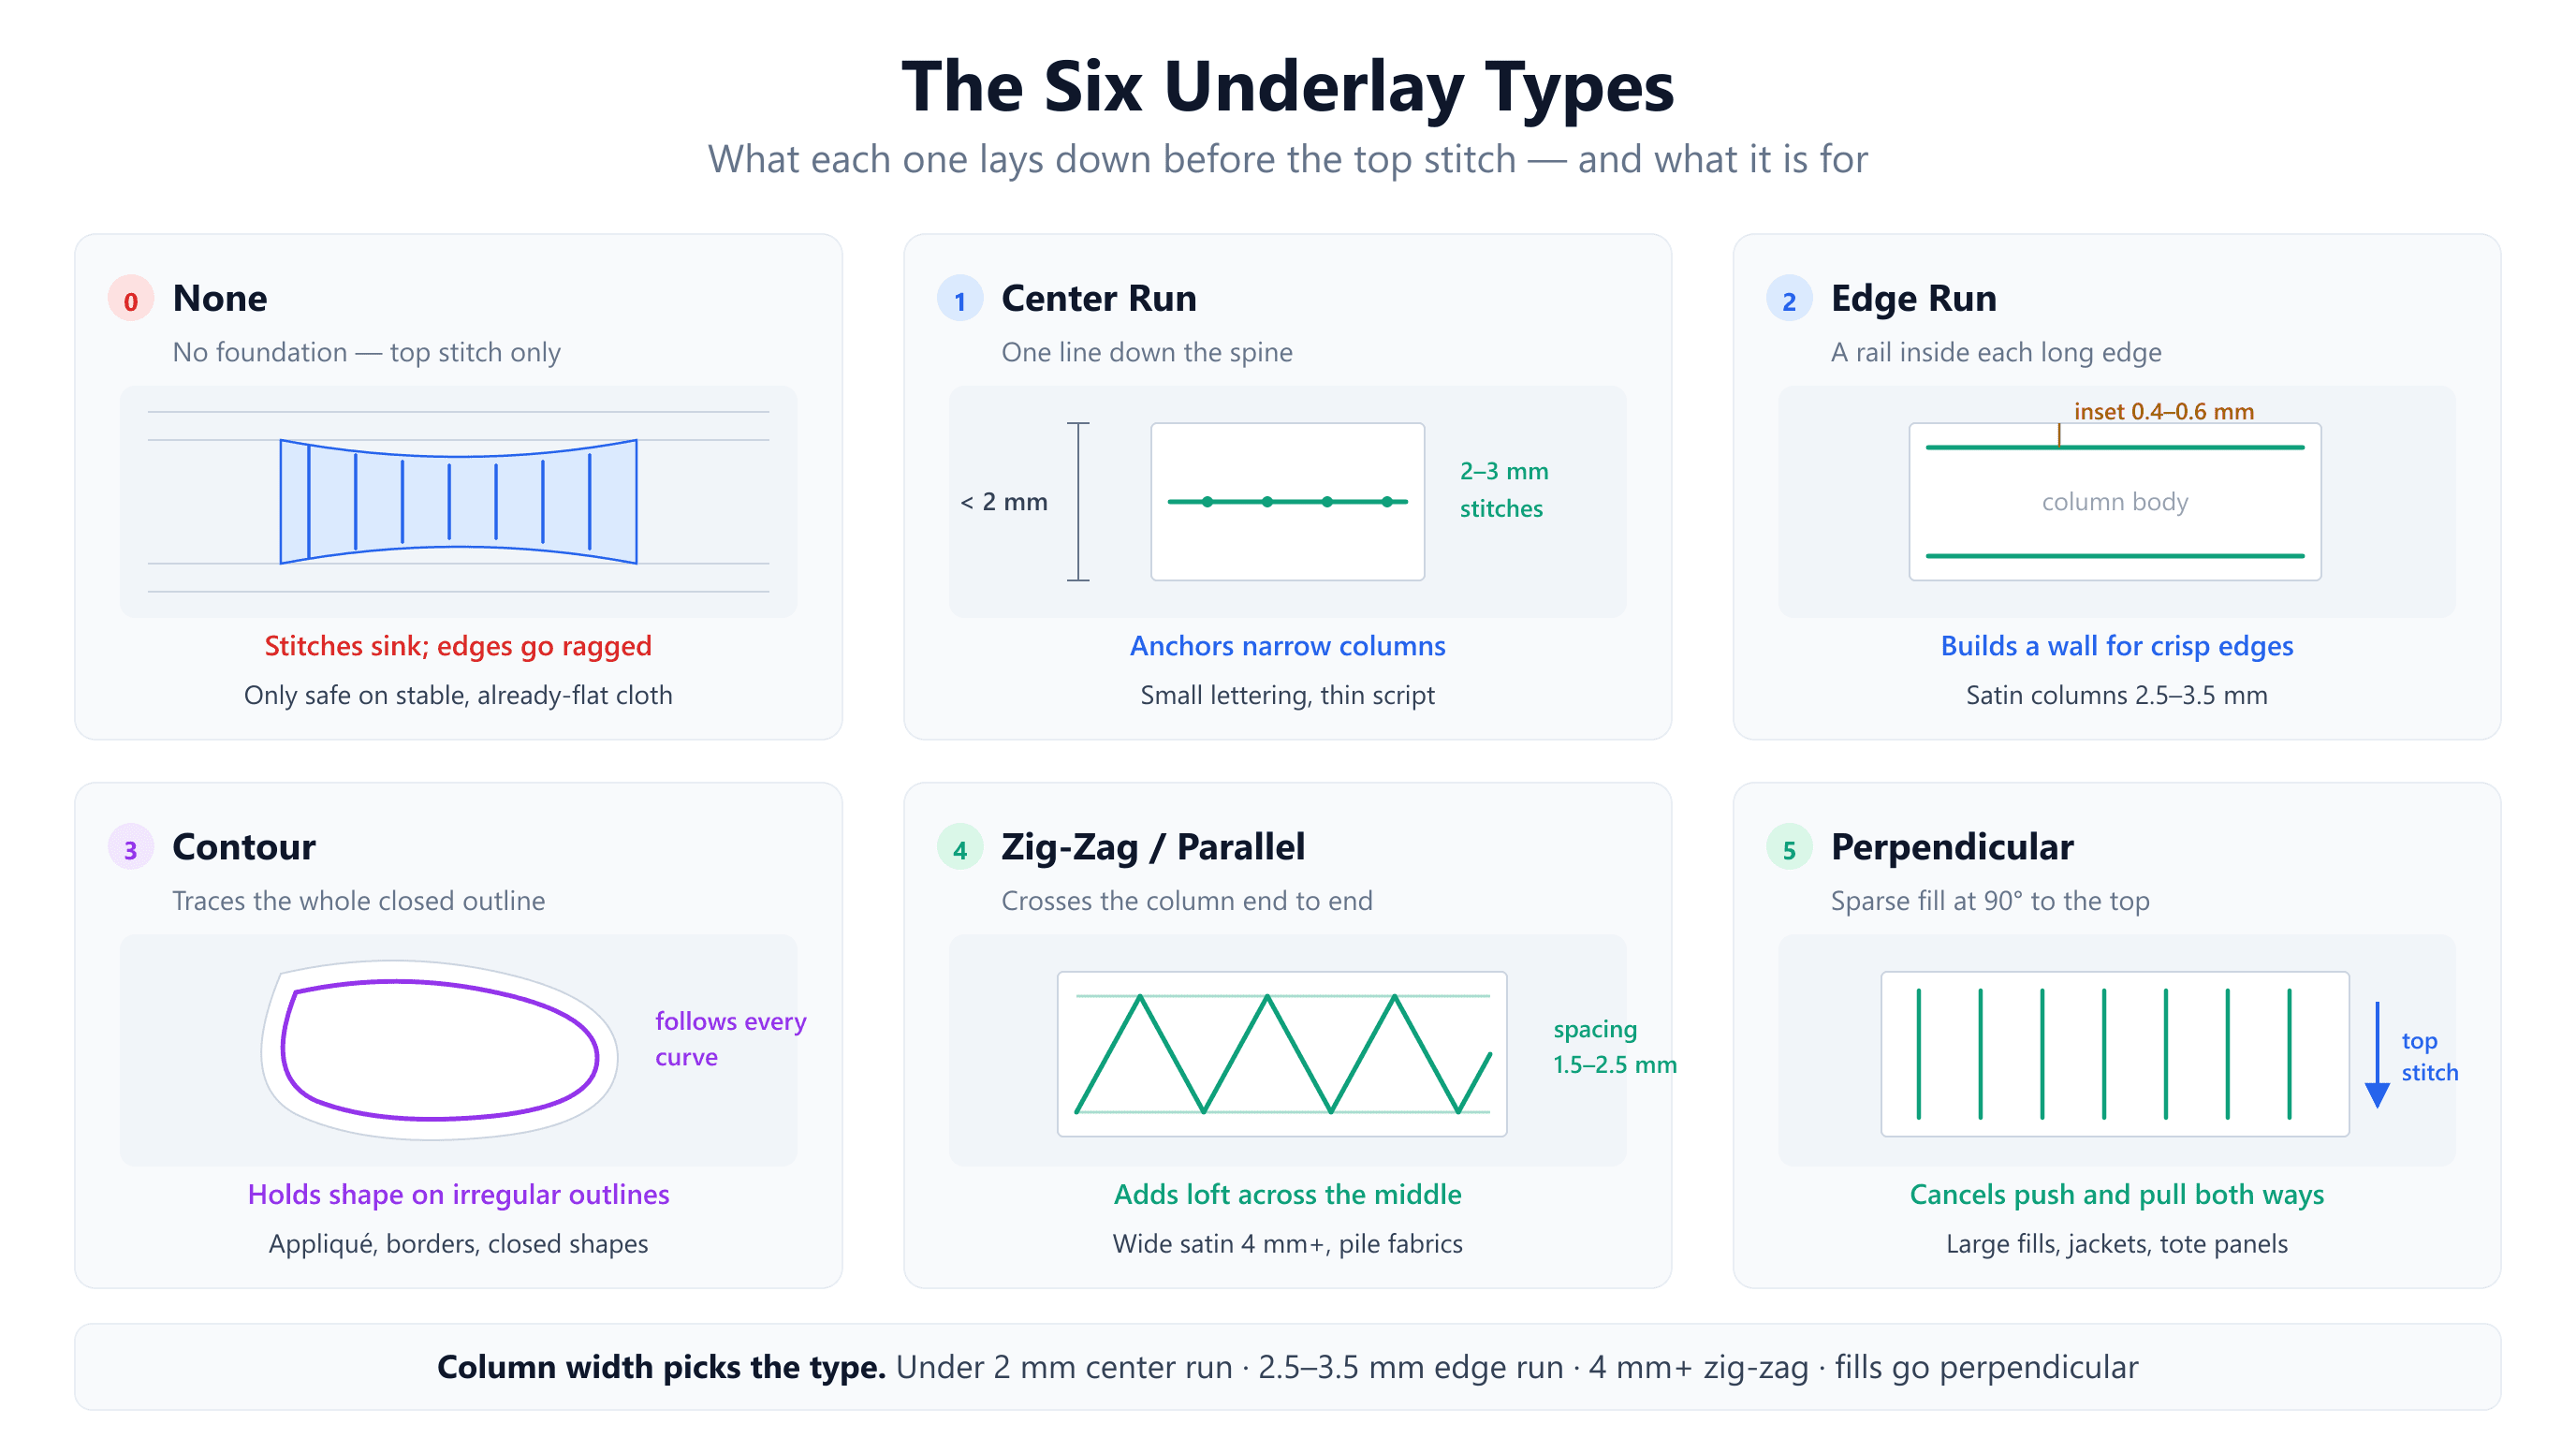
Your digitizing software offers an underlay dropdown with six entries, a checkbox next to each, and no indication of which one this particular shape wants. Most guides answer by listing what each type looks like. That tells you what they are — it still doesn't tell you which to click.
There is an actual rule, and it is narrower than it looks. Two measurements decide almost every underlay choice you will ever make: how wide the shape is, and which direction the top stitching runs. Everything else — fabric, garment, thread weight — adjusts the settings within that choice rather than changing it.
This guide covers all six options, including the two that get muddled together in most write-ups and the one that is genuinely correct sometimes. If you want the background on what underlay does at all, start with what underlay is and why it matters. This article picks up where that one leaves off.
The Mechanism: Stitches Distort Fabric Two Ways at Once
Every underlay decision follows from one piece of physics, so it is worth thirty seconds before the list.
A line of stitching does two things to the cloth underneath it. The thread is under tension and tension wants to shorten, so the line pulls the fabric inward along its own length. At the same time, the thread occupies physical volume where it sits, so it pushes the fabric outward at right angles to that line. Pull along the axis, push across it.
This is why a stitched shape never comes out the size you drew it. It gets shorter in the direction the stitches run and wider across them — the distortion digitizers call push and pull, and the reason density settings and pull compensation exist.
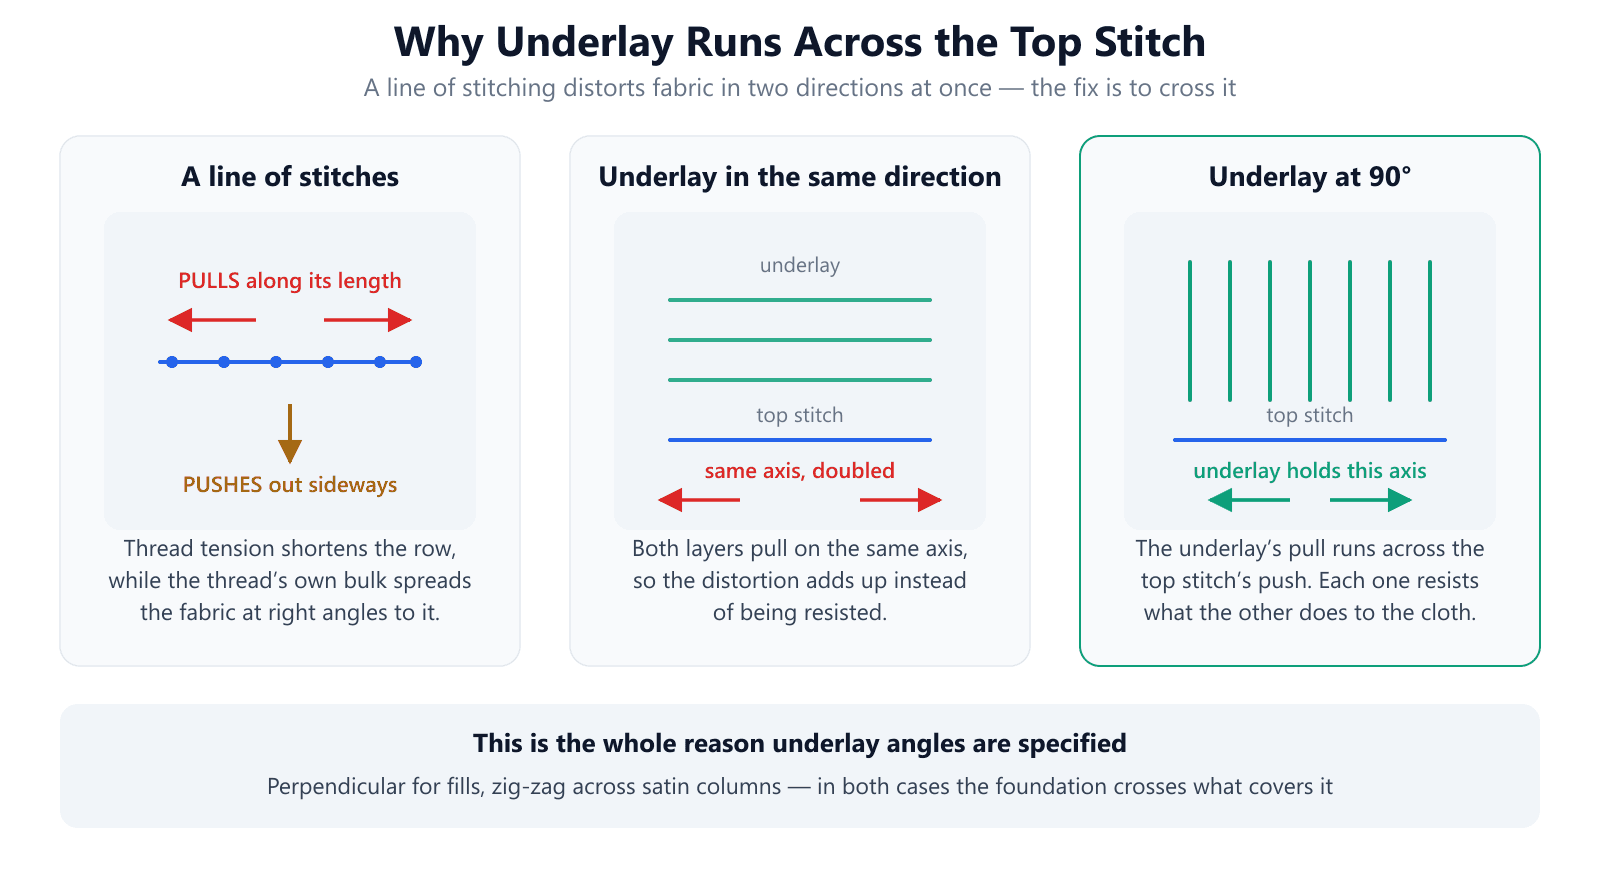
Now put a second layer of stitching underneath. If it runs the same direction as the top layer, both pull on the same axis and the distortion compounds — you have made the problem worse while spending stitches. If it runs across the top layer, the underlay's pull works against the top stitch's push, and the two largely cancel.
That single fact explains why perpendicular underlay is specified at 90 degrees, why zig-zag crosses a satin column instead of running along it, and why tatami underlay under a fill is usually set 45 degrees off the top angle. The foundation crosses what covers it. Hold onto that and the six types stop being a list to memorize.
The Six Types
Software vendors name these slightly differently — what Hatch calls edge walk, Wilcom calls edge run, and some packages fold contour into the same setting. The underlying stitch patterns are the same six.
1. None
No foundation at all. The top stitching goes straight onto the fabric.
This is a real option, not just the absence of a choice, and it is the right one more often than beginners expect. Use it for very small lettering — under roughly 4 mm tall, where underlay stitches would crowd into the same needle holes as the satin and build a hard lump. Use it for fine detail placed on top of an existing filled area, where the fill beneath is already serving as the foundation. And use it on small, dense elements on firm woven fabric that was never going to move anyway.
The failure mode is specific: without underlay on anything larger or on any unstable fabric, the stitches sink into the material, edges go ragged, and the design looks flat and thin because nothing lifted it off the surface. If your design is sinking into a piqué polo, missing underlay is the first thing to check.
2. Center Run
A single line of running stitches straight down the spine of the shape. The lightest foundation available.
Center run is what you use when there is no room for anything else. On a satin column under about 2 mm wide — thin script, small serif text, the fine strokes of a monogram — an edge run would place its two rails almost on top of each other, and a zig-zag would be nearly as wide as the column it is supposed to support. A single centered line is all the geometry allows.
Typical stitch length is 2 to 3 mm. On soft or unstable fabric, running the center line twice is a common trick: it doubles the anchoring without adding width. Some software calls this center-walk or centerline underlay; it is the same stitch.
3. Edge Run
A line of running stitches just inside each long edge of a column, leaving the middle empty.
This is the workhorse for satin, and the mechanism is worth stating plainly. The two rails create what digitizers call a break wall — a firm ridge at each side that the satin stitch catches and holds to. Without it the satin's end points land on bare fabric and wander, which is what produces that slightly furry, undefined edge on otherwise clean lettering.
The inset is the setting that matters. Place the rails 0.4 mm to 0.6 mm inside the finished edge as a starting point — roughly half a needle width. Different packages allow anywhere from 0.1 mm to 1.2 mm, and looser fabrics want the larger end. Tune it by looking at the stitch-out: underlay visible past the satin means the inset is too small, while a wavy unsupported satin edge means it is too large. Edge run suits columns from about 2.5 mm to 3.5 mm on its own.
4. Contour
A running stitch that follows the entire outline of a shape, around every curve and corner, as a closed path.
Here is the distinction most articles skip: contour and edge run get used as synonyms, and in a lot of software they genuinely are the same setting. But they answer different questions. An edge run thinks in terms of two sides of a column — it suits lettering and borders, shapes with a clear length and width. Contour thinks in terms of one closed boundary, which is what an irregular blob, an appliqué placement line, or a shape with concave curves actually has.
Reach for contour when the outline itself is the point: appliqué placement and tack-down passes, decorative borders, and any shape whose edge has to land exactly where you drew it. If your software exposes only one of the two names, it is almost certainly doing the contour behaviour and applying it sensibly to columns as well.
5. Zig-Zag / Parallel
A wide, low-density zigzag travelling the length of the shape, crossing from edge to edge as it goes. Run it out and back and it becomes a double zigzag.
Zig-zag is the loft builder. Once a satin column passes roughly 4 mm, two edge rails are no longer enough — they support the sides and leave the entire middle of the column sitting unsupported on bare fabric, which is where wide satin starts to look sunken and uneven. The zigzag lays thread across that gap.
Spacing usually sits around 1.5 mm to 2.5 mm, deliberately far looser than the satin above it. Because the legs travel diagonally they are longer than the cover stitches, so cap the maximum stitch length if your software allows — overlong underlay legs on soft fabric snag and defeat the purpose. Double zigzag is for the hard cases: towelling, fleece, velour, heavy pile and loosely woven material where a single pass still lets the top stitching sink.
6. Perpendicular
A sparse fill covering the whole shape, running at 90 degrees to the direction of the top stitching.
This is the option for large filled areas, where the covered ground is far too wide for edge rails to stabilize anything. Set it perpendicular to the top fill and it does exactly what the mechanism section described: its pull runs across the top layer's push, so the two fight each other to a draw instead of adding up. It is the most effective single thing you can do about push and pull in a big fill.
Typical settings are a light-density fill at 3.0 mm to 4.0 mm spacing with a stitch length around 3.0 mm to 4.0 mm, inset at least 0.4 mm inside the edge. Some packages call the 90-degree version perpendicular and a same-direction version parallel; a few offer lattice or full lattice, which are crosshatched variants that pull in two directions at once for very unstable fabric.
Choosing: Width Decides, Fabric Adjusts
With the six types understood, the selection rule is short enough to memorize.
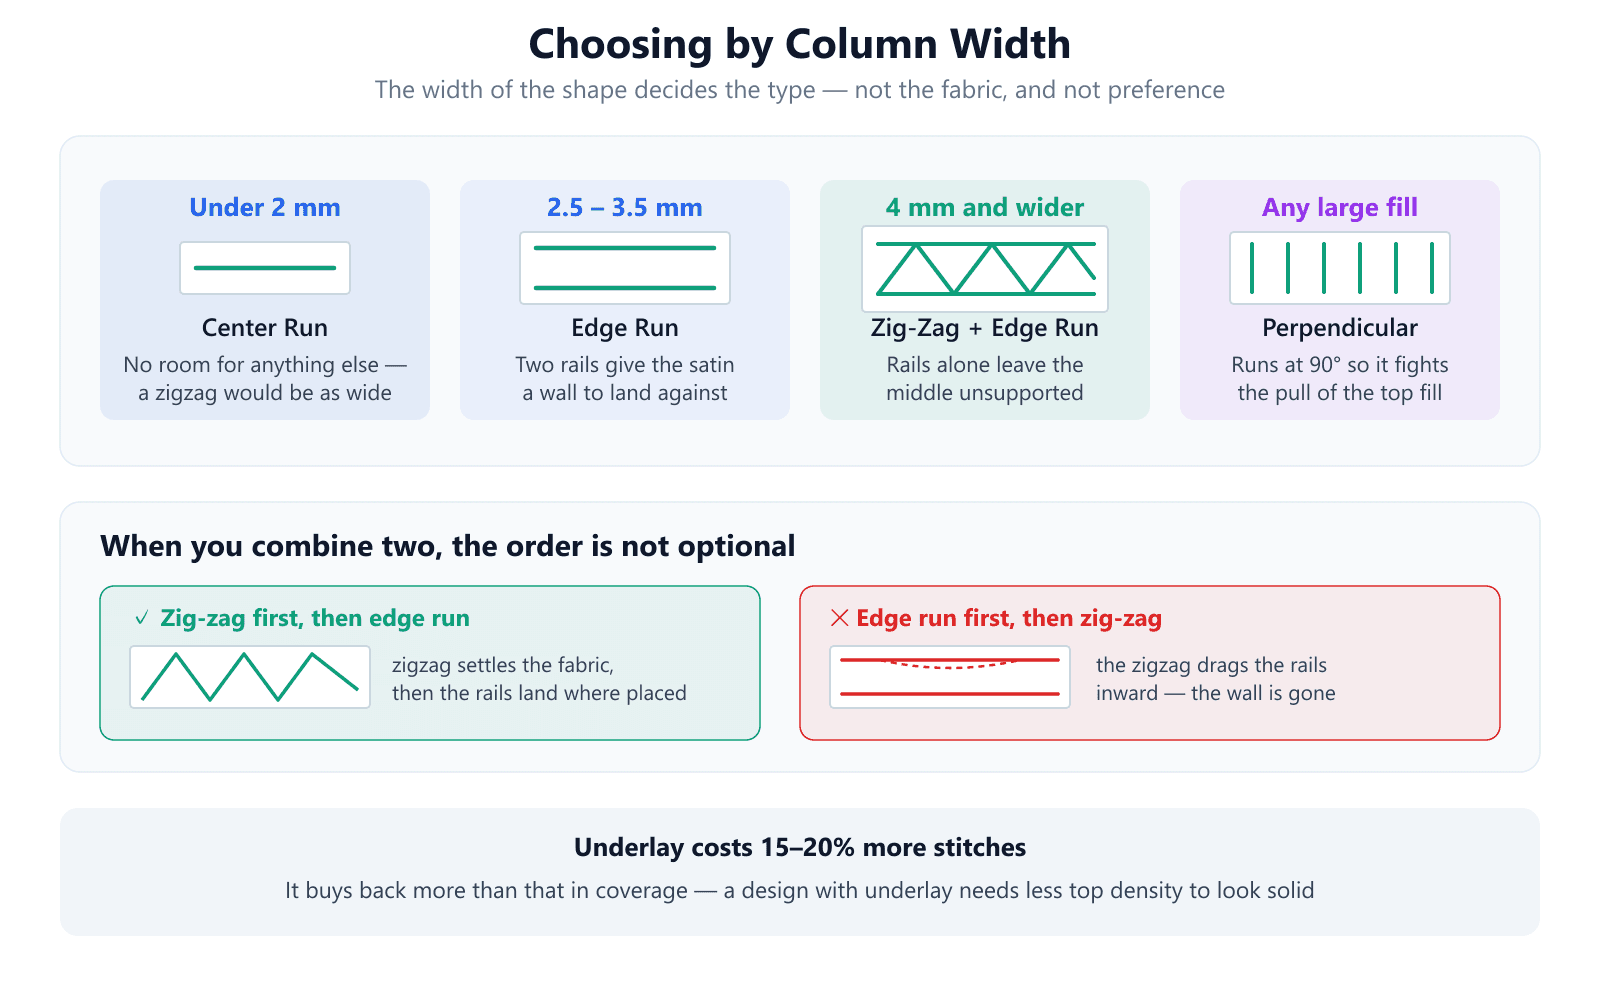
- Satin under 2 mm — center run. Nothing else fits.
- Satin 2.5–3.5 mm — edge run, inset 0.4–0.6 mm.
- Satin 4 mm and wider — zig-zag plus edge run, in that order.
- Any large fill — perpendicular, at 90° to the top stitch angle.
- Irregular closed shapes and appliqué — contour.
- Tiny lettering, or detail over an existing fill — none.
Fabric does not change which row you land on; it changes the numbers inside it. On knits and anything stretchy, add a pass rather than a type — double the center run, or move from edge run alone to edge run plus a light zigzag. On pile and terry, lengthen the underlay stitches so they do not disappear into the loops, and go to double zigzag. On leather, vinyl and coated fabric, lengthen stitches for the opposite reason: short stitches perforate the material along a line and it tears.
The Order You Stitch Them In
When you combine two underlay types — which you will, any time a column is over 4 mm — the sequence is not a preference. It has a correct answer and a wrong one.
Zig-zag goes down first, then the edge run.The zigzag's job is to settle and compress the fabric across the whole column. Once that has happened, the edge run is placed onto already-stabilized cloth, and its rails end up exactly where you intended the satin edge to fall.
Do it the other way and you get a quiet failure. The edge run lands first, then the zigzag stitches over it and drags the fabric — along with those carefully placed rails — inward. The break wall is no longer where you put it, so the satin edge has nothing accurate to register against. The design still stitches out, it just looks slightly soft at every edge and there is no obvious cause when you go looking.
What Underlay Costs
Underlay adds roughly 15 to 20 percent to the total stitch count. On a 10,000-stitch left-chest logo that is 1,500 to 2,000 extra stitches, which is real machine time and real money if you price per thousand.
It normally pays for itself. A design sitting on proper underlay does not need as much top-stitch density to read as solid, because the foundation is already holding the cover stitches up off the fabric. Cutting underlay to save stitches usually means raising density to compensate, which costs more stitches than you saved and puckers the fabric on the way.
You can see the trade directly. Open a design in the DST analyzer and compare its stitch count against its physical size, or step through the stitch order in the DST viewer — underlay shows up as sparse passes laid down before each dense section, in the same thread colour.
Four Ways Underlay Goes Wrong
Underlay set too dense
Underlay that approaches the density of the top stitching stops being a foundation and becomes a second cover layer. The area goes stiff, builds height, and puckers. Underlay should always look sparse next to what covers it — that contrast is the entire point.
Inset left at zero
With no inset, the edge run sits directly on the finished outline and the satin cannot fully cover it. You get a faint fringe of underlay colour showing past the edge, which looks like a registration fault and gets blamed on the machine.
Underlay parallel to the top stitch
The mistake the mechanism section exists to prevent. A fill underlay running the same direction as the top fill doubles the pull instead of opposing it. If a large filled area is distorting along one axis, check the two angles before touching anything else.
Applying it to everything
Turning underlay on globally puts it under 3 mm lettering and under detail stitched on top of existing fills, where it adds bulk, height and stitch count for no benefit. "None" is on the list for a reason.
Quick Checklist
- Measure the column width first — it picks the type.
- Under 2 mm center run · 2.5–3.5 mm edge run · 4 mm+ zig-zag with edge run.
- Large fills get perpendicular underlay at 90° to the top angle.
- Inset edge runs 0.4–0.6 mm and check for fringe in the stitch-out.
- Zig-zag before edge run, never the reverse.
- Lengthen underlay stitches on pile, leather and vinyl.
- Expect 15–20% more stitches, and drop top density to match.
- Leave it off tiny lettering and detail over existing fills.
Conclusion
Underlay selection looks like a menu of six equivalent options and is really two questions. How wide is the shape — that picks between center run, edge run and zig-zag. Which way does the top stitching run — that sets the angle for a fill. Contour handles closed irregular outlines, and none is correct when the shape is too small or already sitting on a foundation.
The thread running through all of it is that the foundation crosses what covers it. Underlay in the same direction as the top stitch spends stitches to make the distortion worse; underlay across it spends the same stitches to cancel the distortion out.
If you would rather not set six parameters per shape by hand, the EmbroidAI image-to-embroidery converter applies underlay automatically — choosing the type from each region's width and setting the angle against the top stitch direction, using the same rules above. You can inspect exactly what it generated in the stitch viewer before you commit a garment to it.
Frequently Asked Questions
What are the different types of underlay in embroidery?
Six options cover essentially all work: none, center run, edge run, contour, zig-zag (also called parallel), and perpendicular. Center run is a single line down the spine of a shape. Edge run places a straight rail just inside each long edge. Contour traces a closed outline all the way around. Zig-zag crosses back and forth along the column. Perpendicular is a sparse fill running at 90 degrees to the top stitching. None means no foundation at all, which is occasionally the right call on small, stable work.
Which underlay should I use for a satin column?
Let the width decide. Below about 2 mm there is only room for a center run. Between roughly 2.5 mm and 3.5 mm an edge run is the standard choice. At 4 mm and wider, use a zig-zag with an edge run so the middle of the column is supported as well as the edges. These thresholds come from geometry, not preference — a zig-zag inside a 2 mm column would be almost as wide as the column itself.
What is the difference between edge run and contour underlay?
Most software treats them as the same thing, and many guides use the words interchangeably. The useful distinction is what they follow. An edge run puts a straight rail inside each long side of a column, so it suits lettering and satin borders. A contour follows an entire closed outline including the curves and corners, which is what an irregular shape or an appliqué placement line needs. If your software only offers one, it is almost certainly doing the contour behaviour.
Why does perpendicular underlay run at 90 degrees to the top stitch?
Because a line of stitching distorts fabric in two directions at once. Thread tension pulls the fabric inward along the length of the stitch line, while the bulk of the thread pushes the fabric outward at right angles to it. Running the underlay across the top stitch means the underlay's pull opposes the top layer's push, so the two cancel instead of compounding. That is also why zig-zag underlay crosses a satin column rather than running along it.
How much inset should edge run underlay have?
Between 0.4 mm and 0.6 mm inside the finished edge is the usual range, with 0.1 mm to 1.2 mm covering the extremes across different software and fabrics. The inset exists so the top stitching hides the underlay. If you can see a fringe of underlay poking out past the satin, increase it; if the satin edge looks unsupported and wavy, decrease it.
Does underlay slow down my embroidery or add cost?
It adds roughly 15 to 20 percent to the stitch count, which is real machine time and matters when you price per thousand stitches. It usually pays for itself, though: a design with proper underlay needs less top-stitch density to look solid, so part of that 15 to 20 percent comes back as a lower top density. Skipping underlay to save stitches often means adding density to compensate, which costs more and puckers the fabric.
Does the order of underlay stitches matter?
Yes, and it is easy to get backwards. When you combine a zig-zag with an edge run, the zig-zag has to go down first. The zig-zag settles and compresses the fabric, and the edge run is then placed precisely where you want the satin edge to land. Reverse them and the zig-zag drags the already-placed edge run inward, which destroys the wall the edge run existed to build.
When should I use no underlay at all?
On small, stable work where the foundation would do more harm than good. Very small lettering under about 4 mm tall, fine detail inside an already-stitched area, and dense work on firm woven fabric can all be fine without it. The other case is a shape sitting on top of an existing fill — the fill underneath is already acting as the foundation, so adding more just stiffens the area and builds unwanted height.